
CON-345 · Lesson 8 of 12 · 23 min
Envelope, air barrier and water testing
The building envelope, the walls, windows, doors and roof that separate the inside from the outside, causes more callbacks and claims than almost any other part of a building. Leaks damage finishes and structure, air leakage wastes energy and causes condensation, and failures often appear years after the contractor has left. Envelope defects are also hard to see: the critical layers, the water-resistive barrier, the air barrier and the flashings, are hidden under cladding within days of installation. This lesson covers how the Larkspur Commons team inspects and tests the envelope, building on the mock-up in lesson 4.
British Columbia has a particular reason to take envelope quality seriously. In the 1990s and early 2000s, thousands of wood-frame condominium buildings in the Lower Mainland and on Vancouver Island suffered water penetration and rot, a crisis widely known as the leaky condo crisis. A provincial commission led by Dave Barrett reported in 1998, and the province responded with the Homeowner Protection Act, mandatory home warranty insurance for new residential construction and requirements for building envelope professionals on many projects. Rainscreen walls with a drained and vented cavity behind the cladding became the normal design for wood-frame buildings in coastal areas, and envelope consultants' field reviews became routine. Larkspur Commons is a rental building in the drier Okanagan, but its owner adopted the same rainscreen approach and envelope consultant reviews.
What the envelope must control
An envelope controls four flows: liquid water from rain and snow, air, water vapour and heat. Each has a control layer, and each control layer must be continuous across the whole envelope, including at the joints between materials and between trades. Most envelope failures are failures of continuity at joints: the window-to-wall interface, the wall-to-roof transition, balcony door thresholds, penetrations for vents and pipes, and the junctions where one trade's work meets another's.
| Control layer | What it does | At Larkspur Commons |
|---|---|---|
| Water control | Sheds and drains water; the cladding is the first line and the water-resistive barrier behind the cavity the second | Fibre cement and metal panel cladding on a drained cavity, over a sheet water-resistive barrier |
| Air control | Stops air flowing through the envelope; must resist wind and stack pressures | The same sheet membrane, taped and sealed, acts as the air barrier, connected to windows and roof |
| Vapour control | Limits diffusion of water vapour into the assembly | Interior vapour retarder appropriate to the climate |
| Thermal control | Limits heat flow | Insulation in the stud cavity and continuous exterior insulation |
On this project the sheet membrane on the sheathing does two jobs: it is both the water-resistive barrier and the air barrier. That makes its continuity doubly important. A gap at a window corner lets water into the wall and lets air carry moisture into the assembly in winter.
Inspecting the barriers before cover
The envelope ITP has inspections at each layer, with hold points before each layer is covered. The membrane is inspected after installation and before cladding girts and insulation go on; windows are inspected after installation and before the membrane strips that tie them in; the ties are inspected before cladding. The envelope consultant reviews a sample of each layer and has a hold point at the first work in each zone, as lesson 4 described.
| Inspection point | What to check |
|---|---|
| Sheathing | Fastened, dry, no damage; gaps at joints as specified |
| Membrane field | Laps shingled so water runs over, not into, each lap; lap widths; fasteners sealed where required; tears repaired |
| Rough openings | Sill pan or sloped sill membrane, turned up at jambs and back dam; corners sealed per the approved sequence |
| Windows | Shimmed, anchored and set to the approved shop drawings; perimeter sealant joint dimensions and backer; drainage paths clear |
| Window tie-in | Jamb and head membrane strips lapped correctly over the window flange and under the field membrane above |
| Penetrations | Vent hoods, pipes and brackets sealed with the approved collars or membranes |
| Transitions | Membrane continuous at the roof, the podium and balconies; compatible materials where different membranes meet |
| Cavity | Clear of debris and mortar; drainage at the base; insect screens; vents at top and bottom |
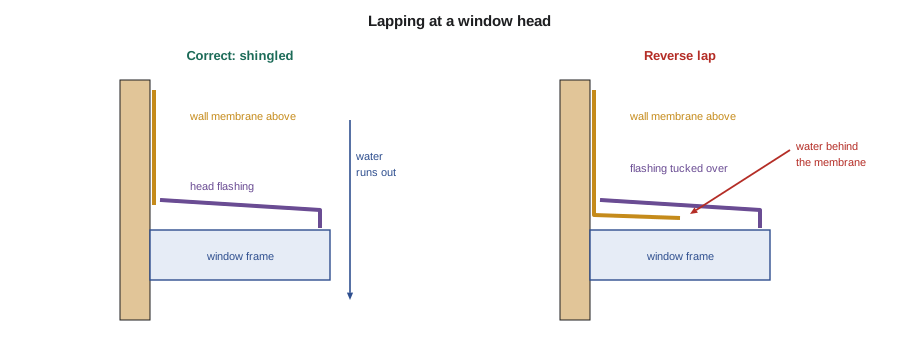
Lapping direction is the classic error. Water runs downhill, so every lap must put the upper sheet over the lower one. At the head of a window, the head flashing goes over the window flange and under the membrane above. A strip installed in the wrong order looks neat and sealed, but it creates a reverse lap that funnels water behind the membrane. The envelope consultant's first two reviews on the wood frame found exactly this error at window heads, which is why lesson 2 described a witness point being added for the first window in each zone.
Adhesion and membrane checks
Self-adhered membranes depend on adhesion to the sheathing and to each other. Adhesion suffers if the surface is wet, dusty or too cold, or if the primer is wrong or skipped. Field checks include rolling all laps with a hand roller, probing lap edges with a blunt tool to find loose edges, and simple adhesion pull tests on sample areas, in which a strip is cut and pulled and the force or the failure mode is recorded. A membrane that peels cleanly off the substrate has not bonded; one that tears or leaves adhesive on the substrate has.
Temperature limits matter in a Kelowna winter. The membrane manufacturer's instructions set minimum surface and air temperatures, and the specification requires that they be followed. When temperatures fell in November, the air barrier crew switched to the low-temperature primer approved in lesson 5, and Mei added a daily check of the surface temperature with an infrared thermometer to the follow-up inspections.
Window water testing in place
The specification for Larkspur Commons requires field water testing of installed windows in addition to the mock-up test: a set of windows on each floor, chosen by the envelope consultant, is tested to ASTM E1105 at the specified pressure before interior finishes are installed. If a window fails, the cause is investigated and corrected, the window retested, and further windows of the same type tested. This sampling approach is common because testing every window is slow and expensive, while testing none leaves the owner relying on visual inspection of hidden work.
# Field window water testing by floor (illustrative)
# Specification: test 3 windows per floor; on any failure, test 3 more of that type on that floor
results = {
    "L3": [("W-A", "pass"), ("W-B", "pass"), ("D-1", "pass")],
    "L4": [("W-A", "pass"), ("W-A", "fail"), ("W-B", "pass"),
           ("W-A", "pass"), ("W-A", "pass"), ("W-A", "pass")],
    "L5": [("W-A", "pass"), ("W-B", "pass"), ("D-1", "fail"),
           ("D-1", "fail"), ("D-1", "pass"), ("D-1", "pass")],
}
total = sum(len(v) for v in results.values())
fails = sum(1 for v in results.values() for _, r in v if r == "fail")
for floor, tests in results.items():
    f = [t for t, r in tests if r == "fail"]
    print(f"{floor}: {len(tests)} tests, {len(f)} fail{'s' if len(f) != 1 else ''} {('(' + ', '.join(f) + ')') if f else ''}".rstrip())
print(f"overall: {total} tests, {fails} failures ({fails / total:.0%})")L3: 3 tests, 0 fails L4: 6 tests, 1 fail (W-A) L5: 6 tests, 2 fails (D-1, D-1) overall: 15 tests, 3 failures (20%)
Level 5's balcony door type D-1 failed twice, which was a pattern, not a one-off. The investigation found that the threshold sill pans on level 5 had been installed by a different crew, which had not attended the preinstallation meeting, and had omitted the end dams at the threshold ends. Every D-1 door on level 5 was opened up and corrected, and the crew went through a preparatory and initial phase as lesson 5 describes. The single failure on level 4 was a missing sealant plug at a frame joint, an isolated workmanship error.
Roofing inspection and testing
Larkspur Commons has a low-slope roof with a two-ply modified bitumen membrane over tapered insulation on the wood-frame roof deck, and a protected membrane on the podium deck over the parking garage, where the waterproofing sits under insulation, drainage board and pavers. Roof inspection during installation checks the substrate, the insulation fastening or adhesion, the membrane laps and seams, flashings at curbs, parapets and drains, and the details at penetrations. Seams are probed for voids and the manufacturer's representative usually inspects the roof for the warranty.
| Test | How it works | Notes |
|---|---|---|
| Flood test | Drains are plugged and the area flooded with water to a set depth, often for 24 to 72 hours, while the underside is watched | Suits small, level areas such as podium decks and planters; heavy, and not suited to sloped or lightweight roofs |
| Electronic leak detection | An electrical potential is applied across the membrane; breaches are found by locating where current flows through it | Fast over large areas; requires a conductive layer below the membrane in some methods; standards such as ASTM D7877 describe practice |
| Infrared survey | Thermal camera finds wet insulation under the membrane by its different temperature | Used for existing roofs and diagnosis; weather-dependent |
| Seam probing and adhesion tests | Probing seams for voids; peel tests on sample seams | Routine quality control during installation |
The podium deck was flood tested in sections before the drainage board and pavers went on, because a leak found after the pavers are placed means removing them, and a leak over the parking garage drips onto cars. The roof over the residential floors was tested by electronic leak detection, which found two small breaches: a puncture from a dropped tool near a mechanical curb and an unsealed seam end at a drain. Both were repaired the same day. Lesson 1 mentioned a podium waterproofing leak that occurred during the first heavy rain; it was at a wall-to-deck transition that had not been included in the flood test area, and the ITP was changed so that every flood test area includes its perimeter transitions.
Air leakage testing
Air tightness can be measured. A whole-building or whole-zone air leakage test uses large fans to pressurize or depressurize the building and measures the air flow needed to hold a set pressure difference across the envelope. The result is normalized by the area of the envelope and reported, for example, as the air flow per square metre of envelope at 75 Pa. Test standards such as ASTM E779 and ASTM E3158, which addresses large and multizone buildings, describe the procedures, and Canadian practice also uses the CGSB 149 series of standards.
Airtightness testing is increasingly required in British Columbia under energy step codes and by owners and funders of rental housing. For Larkspur Commons, the owner's specification requires a whole-building test with a target of 1.5 L/s·m² of envelope at 75 Pa, along with compartmentalization tests on a sample of suites to limit air, odour and smoke transfer between homes. The target is a project requirement chosen by the owner, not a code minimum.
A good test is done at several pressures, not just one. The relationship between flow and pressure through the many small cracks in an envelope follows a power law, so the testing agency measures flow at a series of pressures, fits the curve and reports the flow at the reference pressure. The script below shows the calculation for a preliminary test of level 3 west, done before drywall so that leaks could still be found and sealed.
# Multipoint air leakage test, level 3 west zone before drywall (illustrative)
import math
area = 1180.0   # m2 of exterior envelope enclosing the zone, plus the boundary to adjacent zones
data = [(25, 980), (35, 1230), (45, 1450), (55, 1660), (65, 1850)]   # (pressure Pa, flow L/s)
xs = [math.log(p) for p, _ in data]; ys = [math.log(q) for _, q in data]
n = len(data); mx = sum(xs) / n; my = sum(ys) / n
slope = sum((x - mx) * (y - my) for x, y in zip(xs, ys)) / sum((x - mx) ** 2 for x in xs)
C = math.exp(my - slope * mx)
q75 = C * 75 ** slope
print(f"flow exponent n = {slope:.2f}, coefficient C = {C:.1f}")
print(f"flow at 75 Pa = {q75:.0f} L/s, normalized = {q75 / area:.2f} L/s per m2 (target 1.50)")flow exponent n = 0.67, coefficient C = 115.4 flow at 75 Pa = 2038 L/s, normalized = 1.73 L/s per m2 (target 1.50)
The zone came in above the target. That was not surprising at a preliminary stage, and it was the reason for testing early. While the fans held the zone under pressure, the testing agency and Mei walked the zone with a smoke pencil and an infrared camera, which showed cold air streaming in at three kinds of location: the joints between the floor framing and the wall membrane at the rim, a set of unsealed electrical boxes in exterior walls, and the gaps around exhaust duct penetrations. All three were sealed and the zone was retested at 1.4 L/s·m², below the target. The lessons were built into the ITP for the remaining zones, and the final whole-building test passed with margin.
The flow exponent says something too. Values near 0.5 suggest a few large openings, where air behaves like flow through an orifice; values near 1 suggest many tiny cracks. A typical building envelope falls between about 0.6 and 0.7. A result well outside that range is a reason to check the test setup.
Finding leaks: diagnostic tools
When a test fails, the problem is finding where. The common tools are simple and effective in experienced hands.
- Smoke pencils or theatrical smoke show air movement at a crack while the building is pressurized.
- Infrared thermography shows temperature differences caused by air leakage or wet materials, best when there is a large indoor-outdoor temperature difference.
- Calibrated spray racks and hoses find water leaks by testing small areas in sequence, starting low and working up, so a leak is not masked by water from above.
- Moisture meters measure the moisture content of wood framing and sheathing, used before closing walls and in investigating leaks.
On wood-frame buildings, moisture content of the framing before close-in is itself a quality check. Wet framing closed into walls can shrink, cause cracks and nail pops, and grow mould. The Larkspur Commons specification sets a maximum moisture content for framing before insulation and drywall, and Omar's moisture readings are a review point in the insulation ITP (CON-335 lesson 3).
Coordination between trades
Envelope work involves more trades than almost any other part of the building: framers, membrane installers, window installers, cladding installers, roofers, sheet metal workers, electricians and plumbers for penetrations, and the mechanical trade for vents. Each can damage another's work. Cladding installers puncture the membrane with fasteners in the wrong places; electricians cut holes for exterior lights and do not seal them; roofers and sheet metal workers argue about who flashes the parapet. The preinstallation meeting in lesson 4 settled the main interfaces, but day-to-day protection needs a clear rule. On Larkspur Commons, any trade that penetrates the membrane after it has been inspected must use an approved seal and record the penetration on the zone's envelope log, and the log is checked before cladding.
Common mistakes
MistakeAssuming a neat, sealed membrane is correct.
InsteadCheck lapping direction at every joint; a neat reverse lap funnels water behind the membrane.
MistakeTesting only a few windows and moving on when one fails.
InsteadInvestigate every failure, correct the cause and test more of that type; two failures of one type indicate a pattern.
MistakeFlood testing the field of a deck but not its transitions.
InsteadInclude perimeter transitions and penetrations in every flood test area.
MistakeTesting air tightness only at the end of the project.
InsteadTest a zone before drywall so leaks can still be found and sealed, then apply the lessons to the other zones.
MistakeLetting trades penetrate an inspected membrane without control.
InsteadRequire approved seals and an envelope penetration log checked before cladding.
Summary and key terms
- Envelope failures are costly and often hidden; most are failures of continuity at joints and transitions.
- BC's leaky condo crisis led to the Homeowner Protection Act, home warranty insurance and widespread use of rainscreen walls and envelope consultants.
- The envelope controls water, air, vapour and heat; at Larkspur Commons one membrane is both water-resistive barrier and air barrier.
- Inspections before cover check lapping direction, rough openings, window tie-ins, penetrations, transitions and the drainage cavity.
- Field window testing to ASTM E1105 samples installed windows; repeated failures of one type point to a process problem.
- Roofs and decks are checked with seam probing, flood tests and electronic leak detection; tests must include transitions.
- Air leakage tests at several pressures give a normalized leakage rate; testing before drywall allows leaks to be found and sealed.
- Smoke, infrared thermography, calibrated sprays and moisture meters locate leaks; penetrations by later trades must be controlled.
- Building envelope
- The walls, windows, doors and roof separating the inside of a building from the outside.
- Rainscreen wall
- A wall with a drained and vented cavity behind the cladding.
- Water-resistive barrier
- The layer behind the cladding that sheds water that gets past it.
- Air barrier
- The continuous layer that stops air flowing through the envelope.
- Reverse lap
- A lap in which the lower sheet covers the upper one, directing water behind the barrier.
- Flood test
- A test in which a roof or deck area is flooded to check for leaks.
- Electronic leak detection
- A method of locating breaches in a membrane by measuring electrical current through them.
- Air leakage test
- A test using fans to measure air flow through the envelope at set pressure differences.
Practice problems
Work each problem on paper first, then reveal the answer to check.
Why does a gap in the membrane at Larkspur Commons matter twice?
Show answer
The membrane is both the water-resistive barrier and the air barrier, so a gap lets in both water and air.
What is a reverse lap and where was it found on this project?
Show answer
A lap where the lower sheet covers the upper one; at window heads in the first envelope reviews.
What pattern did the window water tests on level 5 show, and what caused it?
Show answer
Two failures of door type D-1; a crew that missed the preinstallation meeting omitted the end dams at threshold sill pans.
Why was the podium deck flood tested before pavers were placed?
Show answer
A leak found afterwards means removing pavers and would drip onto cars in the garage.
In the air leakage test, what was the normalized result before sealing, and what was found?
Show answer
About 1.73 L/s per m2 at 75 Pa against a 1.5 target; leaks at rim joints, exterior electrical boxes and exhaust penetrations.
What does a flow exponent near 0.5 suggest?
Show answer
A few large openings rather than many small cracks.
Lesson quiz · 5 questions
Score 60% or more to complete this lesson.
Create a free account to save your progress, take quizzes and earn a certificate.