
CINE-302 · Lesson 5 of 12 · 25 min
Green and blue screen technique
Chroma key photography lets filmmakers place actors in environments that could not be filmed: other planets, historical cities, dangerous locations, or simply a view outside a window that changes in every take. The principle is simple: photograph the subject against a uniform, saturated colour that does not appear in the subject, and use software to make that colour transparent. In practice, getting a clean key with natural edges, correct light and no spill requires careful choices about screen colour, materials, lighting levels, distances, wardrobe, camera settings and data. This lesson covers how keying works, choosing green or blue, screen materials, lighting the screen and the subject, levels and evenness, spill and distance, motion blur and depth of field, wardrobe and hair, tracking and lighting for the final environment.
How keying works
A keyer analyses each pixel and estimates how much of it belongs to the screen colour, producing a matte: white where the subject is opaque, black where the screen is, and shades of grey for semi-transparent areas such as hair, motion blur, smoke and glass. Modern keyers work on the colour difference between the screen channel and the other channels; for green screen, the matte is based roughly on how much the green channel exceeds red and blue. The keyer also suppresses spill, removing the screen colour that has reflected onto the subject. Keying works best when the screen is saturated, evenly lit, and well separated in colour and brightness from the subject, and when the camera records enough colour information, ideally raw or 4:4:4 log at high bit depth, to separate fine edges. Noise, compression, chroma subsampling, motion blur and soft focus all make keying harder.
Green or blue
Both colours work; the choice depends on the scene. Green has advantages: digital sensors have more green photosites in the Bayer pattern and green is less noisy, so green screens generally key with cleaner detail; green needs less light to reach a given level; and it is rarely the colour of skin or common costumes. Blue has advantages: it is less likely to appear in hair and skin, it spills less noticeably onto subjects because the spill reads as cool ambient light rather than a sickly green, it suits night scenes and scenes with green foliage, costume or props, and its lower luminance makes it easier to light at the low levels needed for dark scenes. Other colours, such as red for miniatures or grey and black for some modern machine-learning workflows, are occasionally used.
| Factor | Green screen | Blue screen |
|---|---|---|
| Sensor noise and detail | Cleaner (more green photosites) | Noisier channel |
| Light needed | Less | More |
| Spill appearance | Green cast, more noticeable | Cool cast, often more natural |
| Conflicts | Green costumes, foliage, some eyes | Blue jeans, blue eyes, sky blue props |
| Typical uses | Day exteriors, bright scenes, general work | Night scenes, blond hair, green props |
Screen materials
Screens are made from dyed fabrics, painted surfaces or illuminated panels. Fabric screens, often muslin, spandex or specialized chroma fabrics, are portable and can be stretched on frames or hung from trusses, but must be taut and free of wrinkles, which create uneven shading. Painted cycloramas and walls, using specialist chroma key paints, give smooth, even surfaces for permanent stages and floors. Floors are painted or covered with chroma vinyl, which can be cleaned and replaced as it wears under foot traffic. Backlit translucent screens and LED panels set to chroma colours provide extremely even illumination and less spill, and LED volumes can display a green area behind the actors only within the camera frustum while showing the environment elsewhere for reflections and light (Lesson 10). Retroreflective screens lit by ring lights around the lens are another option for small setups.
Lighting the screen
The goal is a screen that is uniform in brightness and colour, at a level that gives a strong colour difference without clipping or excessive noise. Common practices include:
- Light the screen separately from the subject, using soft, wide sources such as space lights, Kino-type tubes, LED panels or cyc lights, positioned to avoid hot spots.
- Aim for evenness within about one-third of a stop across the visible area, checked with a spot meter, false colour or a waveform.
- Set the screen level relative to the subject's key: many supervisors aim for the screen around middle grey to one stop under the key light on the face, but the right level depends on the camera, the keyer and the scene; agree it with the VFX supervisor.
- Avoid clipping the screen channel and avoid underexposing to the point of noise.
- Use colour-pure light: daylight-balanced or tuned LED sources, and in some cases sources tuned to the screen colour, increase saturation.
Because sensors and keyers differ, a camera test of the screen, subject and lighting before the shoot is the most reliable way to set levels.
Worked problem
Checking screen evenness
A spot meter reads a green screen at T4 in the centre, T2.8 + 2/3 at the top left corner and T4 + 1/3 at the bottom right. Is the screen even enough, and what should be adjusted?
Show solution
- Convert to stops relative to the centre: top left is 1/3 stop darker (T2.8 + 2/3 is one-third below T4); bottom right is 1/3 stop brighter.
- The total spread is 2/3 stop, more than the one-third stop target.
- Add light or move a unit to brighten the top left slightly, and flag or dim the source hitting the bottom right.
- Re-meter, or check with false colour, until the spread is within about one-third of a stop.
Answer: A two-thirds stop spread is too uneven; brighten the top left and reduce the bottom right until the screen is within about one-third of a stop.
Lighting the subject
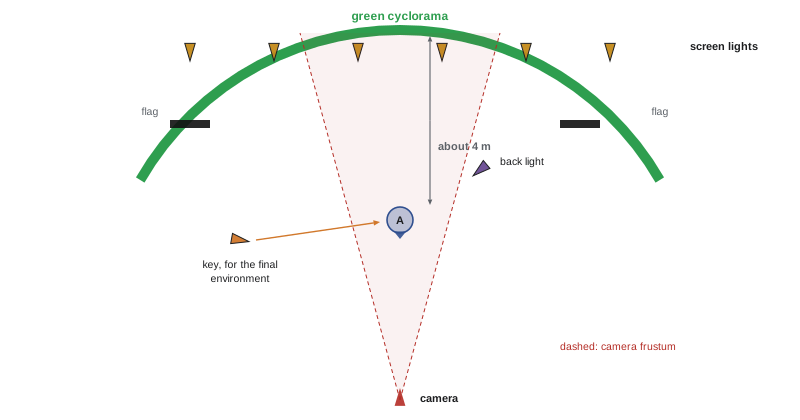
The subject should be lit for the final environment, not for the screen. If the composite will place an actor in a desert at noon, the actor needs hard, high sunlight and warm bounce from the ground; if it will be a neon-lit street at night, the actor needs coloured, moving practical light. Previs, concept art and HDRIs of the intended environment (Lesson 7) guide this lighting. A back light or rim helps separate hair and edges from the screen and can counteract spill on the back of the head and shoulders. Interactive light, such as passing car headlights, explosions or flickering fire, sells integration and should be planned with the VFX supervisor so that it matches CG events.
Spill and distance
Spill is screen-coloured light that bounces from the screen onto the subject, tinting skin, hair, costumes and props and contaminating edges. It increases with screen size, brightness and proximity. Strategies to reduce spill include:
- Placing the subject as far from the screen as the stage allows, often 3 to 5 m or more, since the illuminance from the screen falls with distance.
- Using only as much screen as the frame needs, flagging or covering unused areas, or using smaller screens behind the subject.
- Lighting the subject brightly enough relative to the screen.
- Using back light and negative fill to counteract spill.
- Choosing blue for subjects where green spill would be most visible.
Floors are a particular challenge: a green floor under the actor reflects strongly onto legs and costumes. Some productions use grey or real floors and extend them digitally, or replace only the walls with screen.
For a small source this inverse-square relation describes how screen spill falls as the subject moves from \(d_1\) to \(d_2\); for large screens the falloff is gentler, which is why distance helps but does not solve everything.
Motion blur, focus and edges
Fine detail at the edge of the subject, such as hair, fur, smoke and motion blur, contains a mixture of subject and screen colour. Keyers can preserve this detail if it is recorded cleanly, but it is still the hardest part of any key. Shutter angle should match the intended look of the composite; reducing motion blur by shooting at a faster shutter can make keys easier but produces staccato motion that may not suit the film, so the choice should be agreed. Shallow depth of field softens edges, which looks natural if the background will also be soft, but makes the edge contain more screen colour; documenting focus distance and aperture lets compositors match background defocus. A screen that is slightly out of focus is acceptable and can hide fabric texture and seams, provided tracking markers remain usable (Lesson 6).
Wardrobe, hair, props and glass
Costumes, props and makeup must avoid the screen colour and colours close to it, including subtle tones: a teal shirt may key partly on green screen; denim may key on blue. Reflective surfaces, such as glasses, metal props, visors, jewellery and vehicles, reflect the screen and need anti-reflective treatment, angling, or plans for digital replacement of reflections. Transparent objects, such as drinking glasses, bottles and windows, show the screen through them; artists can rebuild them, but they add cost. Fine flyaway hair is easiest on a screen that contrasts with its colour: blond hair often keys better on blue. Communicating with costume, hair, makeup and props departments before the shoot prevents surprises.
Exposure and recording
Expose the subject correctly for the scene; expose the screen at its agreed level; avoid clipping and crushing. Record in the highest-quality format available, ideally raw or 4:4:4 log at 12 bits or more, avoiding heavy compression and 4:2:0 subsampling, which reduce colour resolution and produce blocky edges. Turn off in-camera sharpening and noise reduction on cameras that apply them. Use monitoring LUTs that make it easy to judge screen evenness, and false colour to check levels. Many productions use a live keyer on set, or simulcam, to give the director and cinematographer a rough composite of the background for framing and performance.
Checking the key on set
Many productions run a live key on set, a quick composite of the camera feed over a temp background using a hardware keyer or software on a laptop. This shows the director a rough version of the final shot and reveals problems with the screen immediately: uneven lighting shows as noise or holes in the matte, spill shows as fringes, and costume problems show as transparent areas. A live key is a monitoring tool, not a quality judgement, because the final key will be pulled with far more care in post; but if the live key struggles badly, the final key will be expensive. Checking a frame with a waveform set to show the screen's green channel is a fast, objective way to confirm evenness.
Tracking markers on screens
Screens usually carry small tracking markers so that camera motion can be solved later (Lesson 6). Markers on green screens are often made of tape in a slightly different shade of green, or in contrasting colours where they will be keyed out anyway. They should be small enough to remove easily but large enough to resolve in the plate, and placed so that some are visible in every frame of a moving shot without sitting behind actors' hair or edges where they would complicate the key.
Finally, protect the screen itself. Footprints, dust and wrinkles on a painted floor or fabric screen show up as uneven tones in the key, so crews cover the floor between takes, keep shoes clean, and steam or stretch fabric before shooting.
Common mistakes
MistakeLighting the subject and screen with the same sources.
InsteadLight them separately for control.
MistakePlacing actors close to large bright screens.
InsteadIncrease distance, flag unused screen and add back light.
MistakeUneven screens with hot spots and wrinkles.
InsteadAim for one-third-stop evenness on taut screens.
MistakeLighting actors for the stage, not the final environment.
InsteadLight for the composite using concept art and HDRIs.
MistakeRecording keys in heavily compressed 4:2:0.
InsteadUse raw or 4:4:4 log at high bit depth.
Summary and key terms
- Keyers turn screen colour into a matte and suppress spill.
- Green keys cleaner with less light; blue suits night, foliage and blond hair.
- Screens must be taut, uniform and well chosen for the stage.
- Light the screen evenly and separately, at a level agreed with VFX.
- Light the subject for the final environment, with rims and interactive light.
- Distance, flags and back light reduce spill.
- Plan wardrobe, reflections and transparency, and record high-quality images.
- Chroma key
- Making a specific colour transparent to create a matte.
- Keyer
- Software that generates mattes from screen colour.
- Spill
- Screen-coloured light contaminating the subject.
- Spill suppression
- Removing screen colour from the subject.
- Cyclorama
- Curved wall and floor with no visible corner.
- Evenness
- Uniformity of screen brightness.
- Interactive light
- Light on set that matches events in the composite.
- Live keyer
- Real-time key for on-set preview.
- Colour difference
- Separation between screen and other channels.
- Negative fill
- Black material that absorbs light and reduces spill.
Practice problems
Work each problem on paper first, then reveal the answer to check.
Why does green usually key cleaner?
Show answer
More green photosites and less noise.
When is blue a better choice?
Show answer
Night scenes, foliage, green props, blond hair.
Target screen evenness?
Show answer
Within about one-third of a stop.
A screen reads T4 in the middle and T2.8 at an edge; how uneven?
Show answer
One stop.
What should the subject be lit for?
Show answer
The final environment.
Name three ways to reduce spill.
Show answer
Distance, flags, back light, negative fill, smaller screen.
Spill change when moving from 2 m to 4 m from a small source?
Show answer
About 2 stops less.
Why document focus and aperture?
Show answer
To match background defocus.
Name two wardrobe risks.
Show answer
Screen-coloured clothing, reflective props, transparent objects.
Best recording format for keys?
Show answer
Raw or 4:4:4 log at high bit depth.
Lesson quiz · 5 questions
Score 60% or more to complete this lesson.
Create a free account to save your progress, take quizzes and earn a certificate.