
SMW-310 · Lesson 7 of 12 · 19 min
Installing rectangular and round duct runs
Hanging the first section of a main is easy. Making the tenth section meet the ninth, square, level, tight and sealed, with the branch takeoffs pointing at the right diffusers, is the skill. This lesson covers how a crew joins rectangular and round duct in the field, keeps runs aligned, cuts in branches, deals with walls, floors and roofs, and leaves the duct ready for sealing inspection, testing and insulation. SMW-130 covered how the seams and joints are made and SMW-220 how the duct is fabricated; this lesson is about putting the pieces together in place.
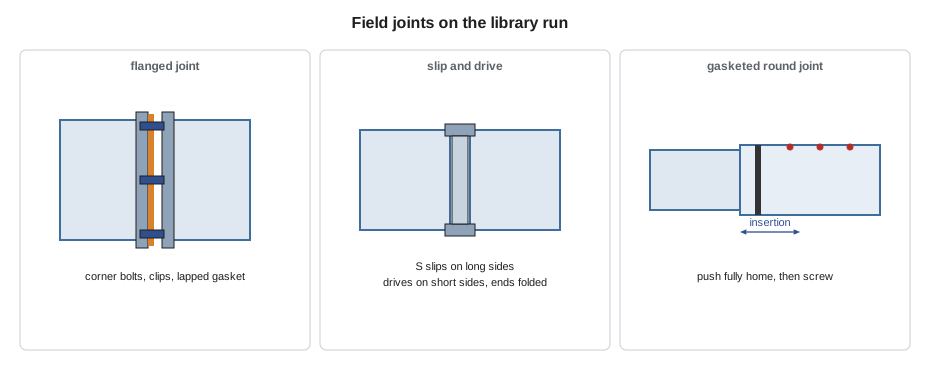
At Ashgrove, the library supply run had all three kinds of field joint Keelson uses: TDC flanged joints on trunks T1 to T3, slip-and-drive joints on the small rectangular branch to the librarian's office, and gasketed spiral fittings and couplings on the round branches.
Flanged joints in the field
Most medium and large rectangular duct now arrives with roll-formed flanges on each end, the kind often called TDC or TDF after the machines that make them. In the field the crew sets corner pieces into the flange ends if the shop has not already, applies gasket tape or a bead of sealant to one flange, brings the next section up so the corners line up, bolts the four corners together and then closes the flanges along their length with spring clips or cleats. The corner bolts pull the joint together; the clips and cleats hold the flanges closed between them.
Clip spacing and gasket type come from the duct construction standard and the specification. Clips placed too far apart let the flanges gap in the middle of a long side, which leaks and rattles. Keelson's field rule is clips within about 6 in of each corner and no more than about 12 in apart between them for the pressure classes on the Ashgrove job, with a cleat on long sides where the standard calls for one. The gasket must be continuous around the corners, with its ends overlapped, not butted.
# Clips and gasket for flanged joints on a run (illustrative Keelson field rules)
import math
sizes = [('T1 36x18', 36, 18, 5), ('T2 24x18', 24, 18, 4), ('T3 18x12', 18, 12, 3)]             # (trunk, width, depth, number of joints), in
corner_gap = 6           # first clip from each corner, in
max_pitch = 12            # maximum clip spacing, in
lap = 2                 # gasket overlap at the start and end, in
total_clips = 0; total_gasket = 0.0
for name, w, h, n in sizes:
    clips = 0
    for side in (w, w, h, h):
        span = side - 2 * corner_gap
        clips += max(1, math.ceil(span / max_pitch) + 1)
    gasket = (2 * (w + h) + lap) / 12
    total_clips += clips * n; total_gasket += gasket * n
    print(f"{name}: {clips} clips and {gasket:.2f} ft of gasket per joint, {n} joints")
print(f"run total: {total_clips} clips, {total_gasket:.1f} ft of gasket")T1 36x18: 10 clips and 9.17 ft of gasket per joint, 5 joints T2 24x18: 8 clips and 7.17 ft of gasket per joint, 4 joints T3 18x12: 6 clips and 5.17 ft of gasket per joint, 3 joints run total: 100 clips, 90.0 ft of gasket
The numbers gave Sean a material list for the run: clips and gasket tape by the box, not by guess, and a check that the shop had sent enough corner pieces.
Slip and drive joints
Smaller rectangular duct is often joined with S slips on two sides and drive cleats on the other two. The sections are pushed together into the slips, the drives are slid on, and their ends are folded over the duct to lock them. In the field, the order matters: the slips go on the long sides, the drives on the short sides, and the drive ends must be bent over cleanly or the joint can pull apart. Slip and drive joints are not as tight as flanged joints and need sealant on the joint to meet seal class A.
Round and spiral duct
Round duct is joined by slipping the male end of one piece into the female end of the next, or into a coupling, to the full insertion depth, and fastening it with sheet metal screws or rivets spaced around the joint. Keelson uses at least three screws on small round joints and more on larger sizes, at the spacing in the specification. Screws go in after the joint is fully home and aligned, never to pull it together.
Many spiral duct systems use fittings and couplings with factory-installed rubber gaskets that seal when the joint is pushed home, which saves the time of field sealing and passes a leakage test more easily. Gasketed joints still get screws, but the screws must not cut the gasket. Ungasketed round joints are sealed with mastic applied to the male end before assembly, or with mastic and tape outside, as the specification requires. Long spiral runs expand and contract with temperature; very long runs, outdoor runs and hot exhaust need provision for movement, which the engineer shows.
Keeping the run aligned
A duct run is only straight if each section is set straight. Aggie's method was to hang the first section of each main exactly to the layout marks and the laser, check it in both directions, then hang each following section to the previous one and check every third section against the laser again. Trapezes are left slightly low at first and raised to final height once the joint is made, so the joint goes together without the crew lifting one section against the other.
When joints do not meet, the cause is usually a layout error, a section made to the wrong length, or a fitting turned a few degrees. Forcing the joint with a come-along strains the joint and the hangers and often leaks. The crew finds the cause first. A section a few millimeters or an eighth of an inch long can sometimes be taken up at a slip joint; anything more goes back to Lin and the shop.
Branches and takeoffs
Branch takeoffs are often installed in the field, so the branch can line up with the diffuser it serves. The crew marks the branch centerline from the reflected ceiling plan, cuts the opening in the trunk with snips or a nibbler, inserts the spin-in, conical or bellmouth fitting, fastens it and seals it. Volume dampers belong close to the takeoff where the balancer can reach the quadrant, as SMW-220 showed. Field-cut openings must be clean and the right size: an oversized hole leaks and an undersized one strangles the branch.
Rectangular branches use shop-made fittings such as 45-degree entry taps or shoe taps, set into a field-cut opening and fastened with flanges or tabs. Taps go on the side of the trunk unless the drawing shows otherwise; a tap on the bottom of a trunk collects dust and debris.
Walls, floors and roofs
Where duct passes through a wall or floor that is not fire-rated, the opening is sized to leave a small gap all round, and the gap is sealed with a non-hardening sealant or packed with mineral wool and sealed, so sound and air do not pass around the duct. The duct must not carry the wall: it hangs from its own supports on each side.
Fire-rated walls and floors are different. The duct passes through a listed fire damper or the penetration is firestopped with a tested and listed firestop system, and the details are strict. Lesson 8 covers dampers. Roof penetrations go through curbs installed by the roofer or with the roofer's details, with the duct flashed and counterflashed so water sheds outward. At Ashgrove, the new rooftop unit's supply and return dropped through its own curb, so the roofer needed only to flash the curb to the membrane.
Insulation and condensation
Duct that carries cold air through a warmer space, such as supply duct in cooling mode or outside air duct in winter, needs insulation with a continuous vapor retarder on the outside to keep moisture from condensing on the metal. Duct carrying warm, moist air through a cold space, such as exhaust from a shower area through an unheated attic, needs the same. The insulator installs the wrap, but the duct crew decides where hangers go, so the crew uses trapezes under insulated duct or leaves room for the insulation to pass the hanger, and anything that pierces the vapor retarder is sealed. Wet insulation and dripping duct at Ashgrove's old system were one reason the board replaced it.
Lined duct, which has its insulation inside, is installed the same way as bare duct, but the crew protects the liner ends from damage and moisture and checks that no liner has come loose at joints, because loose liner can block a branch or erode into the airstream.
Protecting the installed work
Installed duct is capped at its open ends at the end of each shift and kept clean. Branch ends wait for their diffusers with caps or plastic. Other trades are not allowed to hang anything from the duct or use it as a shelf or a step. Before the sealing inspection, the crew walks the run with a flashlight, checking every joint, screw, clip and fitting.
Worked problem
A round joint that will not go home
A 10 in spiral branch will not slide fully into its gasketed coupling: it stops 5/8 in short of the 2 in insertion mark. What should Kai check?
Show solution
- Check that the cut end is round and square, with no burr or flattened edge catching the gasket.
- Check that the coupling is the right size for the duct, not a fitting from the next size.
- Lubricate the gasket if the manufacturer allows it, align the pieces, and push straight, without twisting.
Answer: Never screw a joint that is not fully home: it will leak and may pull apart. Fix the end or the part, then fasten.
Access doors, test holes and other field additions
Some openings in the duct are made in the field because their exact positions depend on what is around them. Access doors go where they can be reached from the ceiling access points, at fire dampers, smoke dampers, coils, duct-mounted sensors and anywhere the specification calls for cleaning access. The door frame is screwed or riveted into a clean cut opening, gasketed, and sealed to the duct, and the door must open fully without hitting a pipe or a beam. Test holes for the balancer's pitot traverses are drilled where the balancing contractor marks them, in straight sections, and closed with plugs or caps that seal. Duct-mounted smoke detector housings and sensor wells are installed where the fire alarm and controls contractors need them, sealed in the same way. Every one of these is a potential leak, so the crew seals it as it is installed rather than leaving it for the sealing pass.
Field changes should be small. When a section has to be shortened, a transition added or a takeoff moved by more than a little, the change goes back to the detailer and the shop, because a field-made fitting is harder to seal, harder to inspect and missing from the shop drawings that the record drawings are built from. At Ashgrove, the crew cut only one field fitting in the library, a short filler piece at the T2 offset, and Kai added it to the redline drawing the same day.
Finished runs are also labeled. Many specifications require duct to be marked with its service and direction of flow at intervals and at access points, so maintenance staff can tell supply from return in a crowded ceiling. Keelson's crews applied stencilled labels after the leakage test and before the insulators wrapped the duct, then repeated the labels on the insulation jacket.
Common mistakes
MistakeButting gasket ends at a corner.
InsteadOverlap the gasket ends so the corner seals.
MistakeSpacing clips too widely on long sides.
InsteadFollow the clip spacing in the standard and specification.
MistakeUsing screws to pull a round joint together.
InsteadPush the joint fully home first, then fasten.
MistakeForcing misaligned joints with a come-along.
InsteadFind and fix the cause of the misalignment.
MistakeCutting an oversized branch opening.
InsteadCut to the fitting's size and seal the joint.
Summary and key terms
- Flanged joints are bolted at the corners and clipped along the sides over a continuous gasket.
- Slip and drive joints use slips on the long sides and drives on the short sides, sealed for tightness.
- Round joints go fully home before screws or rivets go in; gasketed fittings save field sealing.
- Hang the first section to layout and check against the laser every few sections.
- Field takeoffs are cut to size, sealed and lined up with the reflected ceiling plan.
- Penetrations, insulation and protection of the installed work all need planning with other trades.
- Corner piece
- A bent steel corner inserted into roll-formed flanges and bolted to the next section.
- Spring clip
- A clip that holds two duct flanges together between the corners.
- Insertion depth
- How far a round male end must go into its fitting or coupling.
- Spin-in
- A round takeoff fitting that screws into a hole cut in a trunk.
- Vapor retarder
- A layer on the outside of insulation that keeps moisture from reaching cold duct.
- Firestop system
- A tested and listed set of materials that seals a penetration in a fire-rated assembly.
Practice problems
Work each problem on paper first, then reveal the answer to check.
A 36 × 18 in flanged joint has clips 6 in from each corner and at no more than 12 in. How many clips on one 36 in side?
Show answer
Span 24 in; 24 ÷ 12 = 2 spaces, so 3 clips.
Where do the drive cleats go on a slip and drive joint?
Show answer
On the short sides; the S slips go on the long sides.
Why should the gasket ends overlap?
Show answer
So the joint seals at the start and end of the gasket, usually at a corner.
Why should a takeoff go on the side of a trunk rather than the bottom?
Show answer
A bottom takeoff collects dust and debris.
Lesson quiz · 5 questions
Score 60% or more to complete this lesson.
Create a free account to save your progress, take quizzes and earn a certificate.