
SMW-210 · Lesson 9 of 12 · 17 min
Eccentric round-to-round transitions
A concentric reducer keeps the duct's center line straight, so its top drops and its bottom rises as it changes size. That is often exactly what is not wanted. A duct running tight under a roof deck needs its top to stay level as it shrinks, so a concentric reducer would leave a gap and waste headroom. A duct sitting on a support needs its bottom to stay level. The fitting for both jobs is the eccentric reducer, a round-to-round transition with one side straight, flat on top or flat on the bottom. More generally, any round-to-round whose two ends are not on the same center line is an eccentric or offset transition. This lesson shows what kind of shape such a fitting is, develops it by triangulation, and explains when the faster radial line method can be used instead.
The Ashgrove gym main
The 24 in round supply main in the Ashgrove gym ran just under the roof deck, where Kai had hung it in SMW-120. At the far end of the gym the main dropped to 16 in, and at the last two diffusers to 12 in. Lin's drawing called for eccentric reducers, flat on top, so that the top of the duct stayed tight under the deck and the bottom stepped up. The 16 to 12 reducer was 14 in long, in 24-gauge galvanized steel, specified to its outside diameters.
What shape an eccentric reducer is
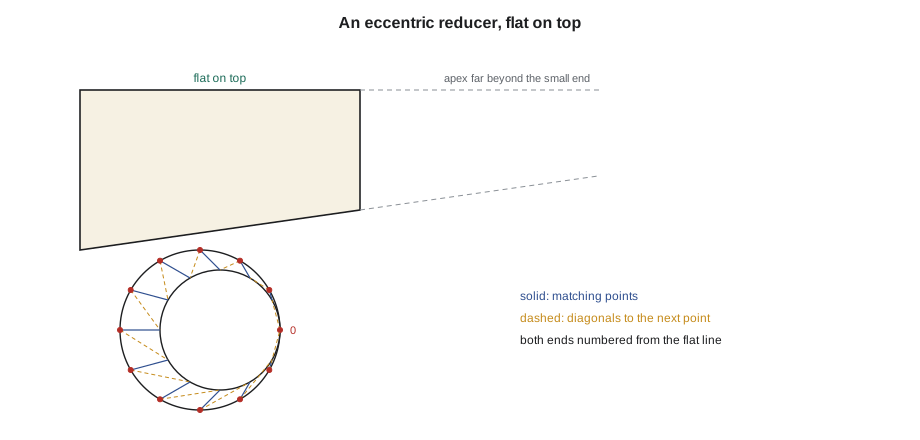
Look at an eccentric reducer flat on top from the side. Its top is a straight horizontal line. Its bottom slopes up from the large end to the small end. In the plan, its two round ends are circles of different sizes, touching at the top line. It is not part of a right cone, because its two ends are not on the same axis. It is, however, part of an oblique cone. If straight lines are drawn from each point on the large circle to the matching point on the small circle, the point at the same angle around each, those lines all meet at one point beyond the small end, the apex of an oblique cone. That is a general fact about two parallel circles: the lines joining matching points always meet at a single point, unless the circles are the same size.
That gives two ways to develop an eccentric reducer. If the apex can be reached on the bench, it can be developed as an oblique cone by radial lines, as in Lesson 4: find each element's true length from the apex, and lay out the pattern by triangles around the apex. If the apex is too far away, which it usually is for a gentle reducer, the fitting is developed by triangulation directly between the two circles, with no apex at all. The second method always works, and it is what most layout people use for eccentric reducers.
Triangulating between two circles
To triangulate an eccentric reducer, both ends are divided into the same number of equal spaces, 12 for this size, numbered from the flat line so that point 0 is the top on both circles. Each large-end point is joined to the small-end point with the same number by a solid line, and each large-end point is joined to the next small-end point by a dashed diagonal. The surface between each pair of solid lines is now two narrow triangles, split by a dashed diagonal.
Every solid and dashed line runs from one end to the other, so each has a rise equal to the reducer's length and needs a true length. The chords between neighboring points on each end, the step-offs, are true in the plan: one step-off for the large end and one for the small. Because the reducer is symmetrical about the vertical plane through its flat line, only half the lines need finding; the other half mirror them.
The script below calculates the solid and dashed lines for the 400 to 300 reducer, using mean diameters, and the two step-offs. The flat line, number 0, is exactly the reducer's length, as it should be: it is horizontal in the elevation and runs straight along the top.
# Eccentric reducer flat on one side, developed by triangulation
import math
D1, D2, L = 15.97, 11.97, 14    # in        # mean diameters of the large and small ends, and the length
r1, r2 = D1 / 2, D2 / 2
dx = r1 - r2           # small end moved so the bottoms line up (flat on the bottom)
n = 12
lo = [(r1*math.cos(2*math.pi*k/n), r1*math.sin(2*math.pi*k/n), 0) for k in range(n + 1)]
hi = [(dx + r2*math.cos(2*math.pi*k/n), r2*math.sin(2*math.pi*k/n), L) for k in range(n + 1)]
print(f"{'k':>2}{'solid':>10}{'dashed':>10}")
for k in range(n // 2 + 1):
    solid = math.dist(lo[k], hi[k])
    if k < n // 2:
        print(f"{k:>2}{solid:>10.2f}{math.dist(lo[k], hi[k + 1]):>10.2f}")
    else:
        print(f"{k:>2}{solid:>10.2f}")
print(f"step-offs: large end {math.dist(lo[0], lo[1]):.2f} in, small end {math.dist(hi[0], hi[1]):.2f} in")k solid dashed 0 14.00 14.34 1 14.04 14.18 2 14.14 14.17 3 14.28 14.31 4 14.42 14.56 5 14.52 14.85 6 14.56 step-offs: large end 4.13 in, small end 3.10 in
The solid lines grow from 14 in on the flat line to about 14 9/16 in at the bottom, number 6, where the slope is steepest. The dashed lines are a little longer than the solid lines on either side of them, as diagonals should be. The large step-off is about 4 1/8 in and the small about 3 3/32 in.
Drawing the pattern
Aggie had Kai put the seam along the flat line, which is the shortest element and also the one hidden against the roof deck. With the seam there, the pattern is symmetrical about the bottom line, number 6, and only half needs to be drawn and then mirrored. The steps follow the triangulation rule from Lesson 5.
- Draw the flat line 0-0 at its true length, the reducer's length, as a straight line on the sheet.
- From the large-end point 0, swing the large step-off; from the small-end point 0, swing the dashed line 0 to 1. Where they cross is large-end point 1.
- From the small-end point 0, swing the small step-off; from the new large-end point 1, swing the solid line 1. Where they cross is small-end point 1.
- Repeat, alternating dashed and solid lines, around to point 6 at the bottom.
- Mirror the half pattern about line 6 to get the other half, which ends at the seam on the far side.
- Draw smooth curves through the large-end points and through the small-end points with a batten.
The pattern comes out as a curved band, wider at the bottom line than at the flat line, with both edges curving more than a concentric reducer's would. It is not a band between two concentric arcs, because the elements are of different lengths; neither edge is an arc of a circle, which is why both are drawn through points rather than swung.
Checks
The checks are those of Lesson 5, adapted to round ends. The curve through the large-end points must equal the large mean circumference, and the curve through the small-end points the small mean circumference. On the half pattern, the chords between points run about 1 percent short of each half circumference, as on a square-to-round. The flat line must be exactly the reducer's length, and the bottom line must be the true slant length of the bottom of the reducer, the square root of the length squared plus the difference in diameter squared. For the gym reducer, the bottom line from the script, about 364 mm, matches that check.
Kai's trial reducer in scrap fit the main and the 12 in branch well, but its top was not quite straight: it bowed down about 3/32 in in the middle. Aggie traced it to the batten, which Kai had let flatten between the large-end points near the flat line. The curve should have kept rising smoothly to the seam. Redrawn with the batten held at every point, the second trial was straight.
When to use the apex
For a steep eccentric reducer, one with a large change in diameter over a short length, the apex of its oblique cone is close and the radial line method is quicker. The apex lies on the flat line extended beyond the small end, at a distance from the large end equal to the length times the large diameter over the difference in diameters. For the gym reducer, that is 350 times 399.3 over 100, almost 1.4 m, too far for comfortable bench work, which is why Kai triangulated. For a 400 to 200 reducer only 200 long, the apex would be 400 from the large end, and the oblique cone method would be faster. Lin's shop drawing notes said which method to use for each eccentric fitting, based on that test.
Offset round-to-round
An eccentric reducer is one case of a broader family: round-to-round transitions whose ends are offset by any amount, not just enough to line up one side. A round duct that must step sideways and shrink at the same time, or an offset with no change in size at all, can be developed the same way by triangulating between the two circles. If the offset is large, the fitting may be better made as two elbows and a reducer, which SMW-120's methods handle; a single offset round-to-round with a large offset makes a long, twisted pattern that is hard to form.
If the two round ends are not parallel, the fitting is an oblique round-to-round, and each line has its own rise, as in Lesson 7. Such fittings are common at fan inlets and equipment connections where a round duct meets a tilted collar, and they are a good candidate for pattern software.
Forming eccentric reducers
Eccentric reducers are harder to roll than concentric ones, because the curvature changes around the fitting: the flat line has none in the length direction and the bottom has the most. Shops roll them on the slip roll a little at a time, feeding the sheet at an angle and adjusting as they go, or form them by hand over a stake after bumping lightly along the element lines. The flat line is often left straight on purpose and the curvature worked into the rest. Many shops buy standard eccentric reducers, but odd sizes and lengths, like the Ashgrove gym's, are made in-house.
Eccentric reducers on the bottom
An eccentric reducer flat on the bottom is the same fitting turned over, and its pattern is identical; only the seam position and the numbering change. Flat-on-bottom reducers are common where a duct sits on a support or a trapeze hanger that must not be shimmed, and in duct that carries anything that might settle or drain, such as condensate from a coil or grease in a kitchen exhaust, where a level bottom keeps liquid from pooling in the fitting. Lin's drawings showed each eccentric reducer with a small note, FOT for flat on top or FOB for flat on bottom, and the fitting was labeled the same way in the shop so that the installer could not set it upside down. A flat-on-top reducer installed flat on bottom still fits the duct, which is exactly why the label matters: the mistake is easy to make and only shows up when someone measures the clearance to the deck.
Common mistakes
MistakeUsing a concentric reducer under a roof deck where headroom matters.
InsteadUse an eccentric reducer flat on top, so the top stays tight under the deck.
MistakeNumbering the two ends from different starting points.
InsteadNumber both ends from the flat line, so matching points carry the same number.
MistakeSwinging the reducer's edges as arcs.
InsteadAn eccentric reducer's edges are not arcs; draw both through the triangulated points with a batten.
MistakeLetting the batten flatten between points near the flat line.
InsteadHold the batten at every point so the curve stays fair to the seam.
MistakeChoosing triangulation or the apex method by habit.
InsteadFind the apex distance; if it is close, use radial lines, and if not, triangulate.
Summary and key terms
- An eccentric reducer keeps one side straight while the duct changes size, flat on top or flat on the bottom.
- It is part of an oblique cone: lines joining matching points on its two ends meet at one apex.
- When the apex is far away, triangulate between the two circles with solid elements and dashed diagonals.
- Number both ends from the flat line; the flat line equals the reducer's length and is the usual seam.
- The pattern's edges are not arcs; draw them through the points and check their lengths against the mean circumferences.
- The apex lies L times D1 over D1 minus D2 from the large end; when it is close, radial lines are quicker.
- Eccentric reducer
- A round reducer with one side straight, so the two ends are not on the same center line.
- Flat on top
- Arranged so that the top of the duct stays level through a fitting.
- Solid line
- In triangulation, an element joining matching points on two ends.
- Dashed line
- In triangulation, a diagonal joining a point on one end to the next point on the other.
- Oblique round-to-round
- A round-to-round transition whose two ends are not parallel.
Practice problems
Work each problem on paper first, then reveal the answer to check.
Why is an eccentric reducer flat on top used under a roof deck?
Show answer
It keeps the top of the duct tight under the deck, saving headroom.
An eccentric reducer is 20 to 12 in and 16 in long. How far is its apex from the large end?
Show answer
16 times 20 over 8, 40 in.
What is the true length of the flat line on an eccentric reducer flat on top?
Show answer
Exactly the reducer's length.
Why are the dashed lines slightly longer than the solid lines beside them?
Show answer
They are diagonals across each narrow four-sided strip.
Lesson quiz · 5 questions
Score 60% or more to complete this lesson.
Create a free account to save your progress, take quizzes and earn a certificate.