
SMW-210 · Lesson 2 of 12 · 18 min
Right cones and full cone patterns
A right cone is the simplest shape developed by radial lines, and the most useful to master first, because reducers, rain caps, hoppers, conical roofs and finials are all built from it. A right cone has its apex directly above the center of its circular base, so its axis is square to the base and every element line is the same length. This lesson develops the full pattern of a right cone by drawing and by calculation, works out how to split a large cone into panels that fit the sheet, and starts the St. Brendan's turret cap that runs through the rest of the course.
The turret cap
The bell turret at St. Brendan's is a small octagonal tower over the west door, with a conical roof that had been covered in lead-coated copper in the 1950s and patched many times since. The conservation architect's drawing called for a new cone of 16-ounce copper, 48 in across at the base and 36 in high, made in eight panels joined by double-lock standing seams, with a hemmed base edge locked onto a continuous cleat and a finial ring at the top. Aggie planned to develop the full cone first, then cut it into panels, then cut off the top for the finial ring in Lesson 3, and to put the whole job together as part of the capstone.
Drawing the pattern of a right cone
The drawing method follows the radial line principle from Lesson 1 in five steps.
- Draw the elevation full size, or to a large scale, with the base line, the axis and the two outline element lines meeting at the apex. The outline elements are at their true length, the slant height.
- Draw a half plan of the base under the elevation and divide its half circle into equal spaces, six for a small cone, more for a large one. Number the points. In a right cone, these divisions are only needed for checking and for cut cones in Lesson 4.
- From a convenient center on the bench, swing an arc with a radius equal to the slant height. This arc will become the base edge of the cone.
- Step off along the arc the length of the base circumference, either by stepping the divisions of the plan with dividers, twice the six spaces, or better by calculating the arc and measuring it.
- Join the two ends of the arc to the center. The sector between them is the pattern of the cone.
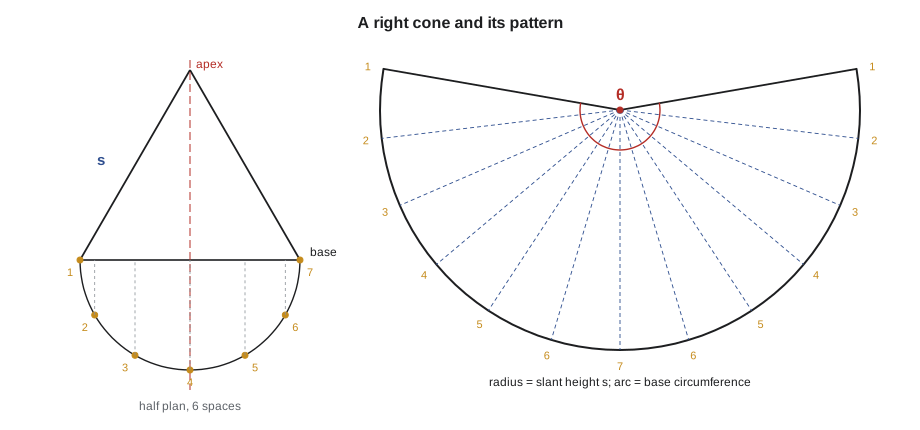
Stepping the plan divisions along the arc has the same problem SMW-120 described for a pipe: the dividers measure chords, not arcs, and stepped chords on the plan give a slightly different total than stepped chords on the pattern arc, because the two circles have different radii. For a small cone the error is small. For a large one it is not, and the sector angle method below avoids it completely.
The sector angle
The pattern of a right cone is fully described by two numbers: its radius, the slant height s, and its sector angle θ, the angle between its two straight edges. Since the pattern arc must equal the base circumference, the sector angle is a fixed fraction of a full circle: the fraction the base radius r is of the slant height.
Two quick checks come from this formula. A very flat cone, with a small height, has a slant height nearly equal to its base radius, so its sector angle approaches 360 degrees and its pattern is almost a full circle. A very steep cone has a slant height much greater than its base radius, so its sector angle is small and its pattern is a narrow wedge. A cone whose height equals its base radius, sloped at 45 degrees, has a sector angle of about 255 degrees.
With the sector angle known, the pattern can be laid out with a protractor or by calculating the chord across the ends of the arc. The chord of a sector with radius s and angle θ is twice s times the sine of half of θ. For a sector angle over 180 degrees the chord is short and awkward to use, so the usual method is to lay out the half pattern, whose angle is half of θ, or to divide the sector into smaller parts and lay out each by its chord.
The turret cap by numbers
The script below works out the slant height and the sector angle of the turret cap, checks that the arc equals the base circumference, and divides the cone into eight panels with the chord of each panel at the base.
# Right cone pattern: slant height, sector angle and panel layout
import math
d_base, height = 48, 36      # in          # base diameter and vertical height
panels = 8                   # panels around the cone
r = d_base / 2
slant = math.hypot(r, height)
theta = 360 * r / slant
print(f"slant height {slant:.2f} in")
print(f"full pattern: radius {slant:.2f} in, sector angle {theta:.2f} degrees")
print(f"base circumference {math.pi * d_base:.2f} in = arc length {math.radians(theta) * slant:.2f} in")
each = theta / panels
chord = 2 * slant * math.sin(math.radians(each / 2))
print(f"{panels} panels of {each:.2f} degrees, base chord {chord:.2f} in each (net)")slant height 43.27 in full pattern: radius 43.27 in, sector angle 199.69 degrees base circumference 150.80 in = arc length 150.80 in 8 panels of 24.96 degrees, base chord 18.70 in each (net)
The full pattern of the cap is a sector of nearly 200 degrees, more than half a circle, with a radius of about 43 1/4 in. As one piece of copper, it would need a sheet over 7 ft square, which no supplier stocks in 16-ounce copper. That is the first reason the architect specified panels. Each of the eight panels is a narrow sector of about 25 degrees, with a base chord of about 18 3/4 in, which fits comfortably on standard sheet.
Why cones are made in panels
Cones are made in panels for four reasons, and on the turret cap all four apply.
- Sheet size. A large cone pattern simply does not fit on one sheet, and splicing a single pattern is weaker and harder to form than seaming panels.
- Forming. A narrow panel can be rolled or hand-formed to the cone's curve on the bench much more easily than a whole cone can be rolled on a slip roll.
- Movement. Copper expands and contracts with temperature. Standing seams between panels let each panel move a little on its cleats, the same principle SMW-130 explained for standing seam roofs.
- Appearance. On an architectural cone the seams are a visible pattern, and the architect sets their number and spacing. Eight seams on an octagonal turret line up with the corners of the tower below, which is why the drawing called for eight.
On a panelled cone, each panel is itself a narrow sector drawn from the apex, so the same radial line method applies. The panel's straight edges are element lines, and the allowances for the standing seams are added outside them, parallel to each edge. Because the edges converge toward the apex, the panels get very narrow near the top, which is one reason most panelled cones stop at a ring or finial rather than running to a point.
Forming a cone
A small cone of light gauge can be rolled on a slip roll by setting the rolls out of parallel, so that one end of the roll gap is tighter than the other. The sheet is fed with its apex end at the tight end of the rolls. Even so, cones are harder to roll than cylinders, because the sheet tends to walk sideways, and the operator has to hold the apex end back so the element lines stay square to the rolls. Many shops use a cone roll attachment or a dedicated cone roller for production work.
Large panels like the turret cap's are usually formed by hand over a stake or a curved form, working along the element lines, which stay straight, and gradually bending the panel across them. Aggie had Kai make a plywood form, a male former cut to the cone's curve at three heights and joined by straight battens along the element lines. Each copper panel was pressed and hand-formed over it and checked with a sheet-metal template cut to the curve at the base.
Copper is soft enough that most of the forming can be done with wooden mallets, but it work-hardens as it is bent. A panel that has been bent back and forth too often becomes springy and cracks at the folds. If a panel needs heavy reworking, it can be softened again by annealing, heating it to a dull red and letting it cool. Annealing is hot work and falls under the shop's hot work rules from SMW-130.
A pyramid is a cone with flat faces
A right pyramid, such as the hipped roof of a square or octagonal tower, is the flat-faced cousin of the right cone. Its corner lines, the hips, all meet at the apex and are all the same length, so its pattern is drawn from one center as well. The difference is that the base edge is a series of straight lines, the edges of the base polygon, instead of an arc. To develop a pyramid, find the true length of one hip by revolution or the right triangle, swing an arc with that radius, and step off the base edges as chords of the arc. Join the chord ends to the center, and the faces are complete.
The base of the St. Brendan's turret below the cap is octagonal, with sides of about 8 in at the finial ring and much larger at the eaves, so a pyramid-roofed version of the cap would have had eight flat faces. The architect chose a cone because old photographs showed a cone, but Aggie made Kai develop the octagonal pyramid as well, as a comparison. The two patterns look alike, with eight panels each, but the pyramid's base edges are straight chords where the cone's are arcs.
Laying out large radii in the shop
A slant height of a meter or more is too long for most compasses and dividers. Shops swing large arcs with a trammel, a beam with two sliding points that can be clamped at any distance apart, or with a steel tape held at the center, or with a straight, rigid strip with a nail at one end and a scriber hole at the other. A string stretches and is not accurate enough for good work. For the turret cap, Kai used Walt's two-meter aluminum trammel bar, which had two points and a pencil holder.
Wherever the radius is long, the center must be held firmly. A center punch mark in the sheet, or in a scrap block clamped to the bench beside the sheet, keeps the trammel point from wandering. The arc should be swung in one steady sweep, not several short ones, because each restart is a chance to slip.
Checking the pattern
Three checks catch nearly every error in a cone pattern.
- The arc length on the pattern equals the circumference of the base at the mean diameter.
- The sector angle measured on the pattern matches the calculated angle, 360 times r over s.
- When the pattern is rolled into a cone, the two straight edges meet along a single element line with the seam allowance, and the base sits flat on a level surface without rocking.
On the turret cap, Kai first cut one panel in light galvanized scrap, formed it, and set it on a full-size plywood plan of the base with a second test panel beside it. The two panels met cleanly along their seam line and their bases followed the circle, so the pattern was right before any copper was cut. A trial panel in cheap material is standard practice for any expensive architectural job.
Common mistakes
MistakeStepping the plan divisions along the pattern arc on a large cone.
InsteadCalculate the sector angle, or the arc length, and lay it out directly.
MistakeUsing the vertical height as the pattern radius.
InsteadThe pattern radius is the slant height, the square root of r squared plus h squared.
MistakeSwinging a long arc with a string.
InsteadUse a trammel, a tape or a rigid strip, with the center punched or clamped.
MistakeCutting copper panels straight from a drawn layout.
InsteadCut and form a trial panel in scrap first, and check it on a full-size plan.
MistakeOverworking copper while forming.
InsteadForm along the element lines in gradual passes, and anneal under hot work rules if it becomes springy.
Summary and key terms
- A right cone develops into a sector with radius equal to the slant height and arc equal to the base circumference.
- The sector angle is 360 degrees times the base radius over the slant height.
- The chord across a sector is twice the radius times the sine of half the angle; large sectors are laid out in halves or panels.
- Cones are made in panels for sheet size, forming, movement and appearance; each panel is a narrow sector from the apex.
- A right pyramid develops from one center like a cone, with straight base edges instead of an arc.
- Long radii are swung with a trammel or rigid strip, and expensive patterns are proved with a trial panel.
- Right cone
- A cone whose apex is directly above the center of its circular base.
- Sector
- A region of a circle between two radii and the arc joining them.
- Sector angle
- The angle between the two straight edges of a cone pattern.
- Trammel
- A beam with two adjustable points used to swing large arcs.
- Right pyramid
- A pyramid whose apex is directly above the center of its base.
- Annealing
- Heating and cooling a work-hardened metal to soften it again.
- Panel
- One of several pieces that together make up a large cone or roof.
Practice problems
Work each problem on paper first, then reveal the answer to check.
What is the sector angle of a cone 24 in across its base and 16 in high?
Show answer
The slant height is 20 in, so the angle is 360 times 12 over 20, 216 degrees.
A cone pattern has a slant height of 20 in and a sector angle of 216 degrees. What is its chord?
Show answer
2 times 20 times the sine of 108 degrees, about 38.04 in.
Why do the turret cap's panels stop at a finial ring?
Show answer
Near the apex the panels become too narrow to seam and form.
What tool would you use to swing a 43 in radius?
Show answer
A trammel bar, or a rigid strip with a punched center.
Lesson quiz · 5 questions
Score 60% or more to complete this lesson.
Create a free account to save your progress, take quizzes and earn a certificate.