
SMW-210 · Lesson 12 of 12 · 20 min
Capstone: a copper turret cap and an air handler transition
The capstone brings the term's two threads to the bench at once. At St. Brendan's, the copper cap for the bell turret had been approved, the trial panel of Lesson 2 had fitted, and the cap was ready to make: a radial line job from apex to hem. At Ashgrove, the air handler transition of Lesson 6 was due in the mechanical room the same week: a triangulation job from true-length table to formed fitting. Aggie gave Kai both, with one condition. He was to plan each job on paper first, run the numbers, write down every check he would make, and then make and check each piece himself, with her signing off only at the end. This lesson follows the two jobs in that order.
Part 1: the turret cap, planned
The architect's drawing set the cap: a right cone 48 in across at the base and 36 in high to its notional apex, in 16-ounce copper, eight panels joined by double-lock standing seams, the base hemmed and locked onto a continuous copper cleat fixed to the turret's curb, and the top stopped at a finial ring 6 in across, which the drawing showed as a turned copper collar clamped over the panels' top edges. Before anything else, Sean measured the curb on site. Its diameter at the cleat line was within 3/16 in of the drawing, which the architect accepted, so the drawing's dimensions stood.
Kai's plan for the cap had five parts: develop one panel as a sector of a frustum, from Lessons 2 and 3; add the seam and hem allowances; nest the panels on the copper sheets; form the panels over the plywood former; and check each panel, then the assembled cap, before it went to the church. His written check list was short and specific.
- Slant height equals the square root of 600 squared plus 900 squared, at the drawing's dimensions.
- The eight panels' base chords add to slightly less than the base circumference, by the chord shortfall for eight spaces.
- Each panel's two seam edges are equal in length, and equal to the slant length between the ring cut and the base.
- Each formed panel sits on the full-size plan of the base with its neighbor, seams meeting without gaps.
- The assembled cap sits level on the curb template, with the ring opening centerd.
The panel by numbers
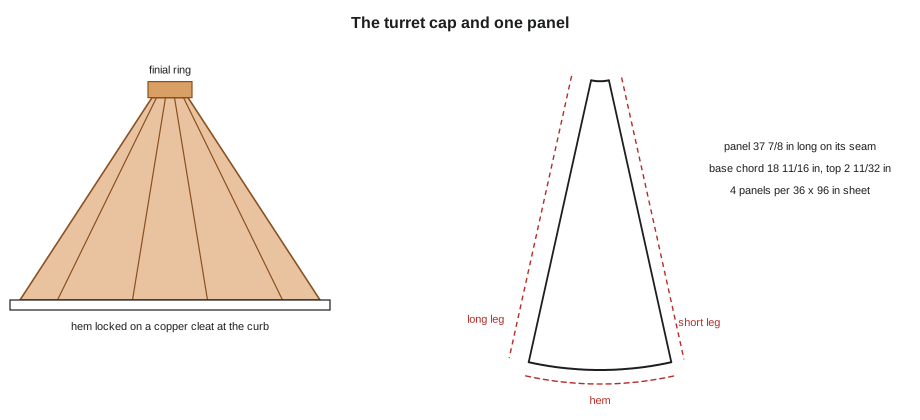
The script below develops one panel: the slant height, the pattern radius where the finial ring cuts the cone, the panel's length along its seam, its angle, its base and top chords, the blank with Keelson's allowances for the standing seams and the base hem, and how many panels nest on a copper sheet. The allowances are Keelson's own chart values for a double-lock standing seam in 16-ounce copper, one edge with a short leg and the other with the longer leg that folds over it.
# Capstone 1: copper turret cap in panels, cut off at a finial ring
import math
d_base, height, d_ring = 48, 36, 6        # in      # base diameter, full cone height, finial ring diameter
panels = 8
seam_a, seam_b, hem = 1, 1.5, 1    # in          # standing seam allowances (two edges) and base hem, Keelson chart
sheet_w, sheet_l = 36, 96      # in              # copper sheet size
r = d_base / 2
slant = math.hypot(r, height)
R2 = slant * (d_ring / 2) / r        # pattern radius where the ring cuts the cone
theta = 360 * r / slant / panels     # angle of one panel
base_chord = 2 * slant * math.sin(math.radians(theta / 2))
top_chord = 2 * R2 * math.sin(math.radians(theta / 2))
length = slant - R2
print(f"slant {slant:.2f}, ring cut at radius {R2:.2f}, panel length {length:.2f} in")
print(f"panel angle {theta:.2f} deg, base chord {base_chord:.2f}, top chord {top_chord:.2f} in (net)")
blank_base = base_chord + seam_a + seam_b
blank_top = top_chord + seam_a + seam_b
blank_len = length + hem
print(f"blank with allowances: {blank_base:.2f} at the base, {blank_top:.2f} at the top, {blank_len:.2f} long")
pair_w = blank_base + blank_top                 # two panels nested head to tail
per_row = int(sheet_w // pair_w) * 2
rows = int(sheet_l // blank_len)
per_sheet = per_row * rows
print(f"nested head to tail: {per_sheet} panels per {sheet_w} x {sheet_l} sheet -> {math.ceil(panels / per_sheet)} sheets")slant 43.27, ring cut at radius 5.41, panel length 37.86 in panel angle 24.96 deg, base chord 18.70, top chord 2.34 in (net) blank with allowances: 21.20 at the base, 4.84 at the top, 38.86 long nested head to tail: 4 panels per 36 x 96 sheet -> 2 sheets
Each panel is a narrow band of a sector, about 37 7/8 in long along its seam, 18 11/16 in across at the base and 2 11/32 in at the ring, net. With allowances, the blank is about 21 3/16 in across at the base. Nested head to tail, two panels fit across a 36 in sheet and two rows fit along its length, so four panels come from each sheet and the cap takes two sheets. Kai ordered a third sheet for the trial panel's replacement and for spoilage, which the estimate already allowed.
Laying out and cutting the copper
Kai laid the first panel out on the copper with Walt's trammel, from a center punched into a scrap block clamped beside the sheet, as in Lesson 2: the two arcs at the slant height and the ring radius, the two radial edges at the panel angle, then the seam allowances parallel to each edge and the hem allowance as an arc concentric with the base arc, as Lesson 3 required. He cut the first panel, checked it against his list, and used it as a template for the other seven, tracing each one onto the sheet in its nested position.
The panels were not identical in one respect. A double-lock standing seam has a short leg on one panel and a long leg on its neighbor, and every panel in a ring carries one of each, short on one edge and long on the other. If one panel had been traced flipped over, it would have carried two short legs and its neighbor two long ones. Kai marked each traced panel with an arrow showing which way round the cone it faced, a habit from Lesson 7's mirror-image halves, and Aggie checked the arrows before he cut.
Forming and assembling the cap
Each panel was formed over the plywood former from Lesson 2, working along the element lines with wooden mallets and checking the curve at the base and the middle with sheet templates. Two panels needed annealing after the base curve went springy, which Kai did under the shop's hot work permit with a fire watch. The seam legs were then turned on the brake with the panel held flat, before final forming, because a formed panel would not sit on the brake.
The first two panels were set on the full-size plan of the base, a plywood circle with the eight seam lines drawn on it, and their seams engaged. They met cleanly. The cap was then trial-assembled in the shop in two halves of four panels each, seamed loosely, and set on a plywood template of the curb. It sat level, with the ring opening centerd to within a couple of millimeters, which Kai measured from the ring's edge to the template's edge at four points. The halves were left unseamed for transport, as planned, and the final seams were closed on the turret, after the base hems had been locked onto the cleat.
One problem came up. When Kai checked the eight base chords against the circumference, their sum, about 149.6 in, was about 1 1/4 in short of the 150.8 in circumference. For a moment he thought the panel angle was wrong. Then he remembered Lesson 2: the chords are straight lines across a curved edge, and for eight spaces they run short of the arc by a little under 1 percent. The base arc of each panel was right; only his check method had changed. He rewrote the check on his list to compare arcs, not chords, and it passed.
Part 2: the air handler transition, planned
The Ashgrove transition was the on-center square-to-round of Lesson 6: 24 in square at the air handler's discharge, 18 in outside diameter at the round main, 18 in high, in 22-gauge galvanized steel, made in two identical halves with seams up the middle of two opposite flat triangles, a flange on the square end for the air handler, and a bead and slip on the round end for the main. Before laying it out, Kai went to the mechanical room with Sean and measured the air handler's discharge flange and the hanger position of the round main above it. Both matched the drawing, and the main's center was within 3/16 in of the opening's center, so the fitting stayed on center.
His check list for the transition followed Lesson 6 and Lesson 11.
- The true-length schedule matches both a hand-drawn true-length diagram and the script.
- On the half pattern, the square edge adds to half the square's perimeter, and the round points' chords run about 1 percent short of half the mean circumference.
- The last triangle of each half makes a right angle at the seam end.
- The two halves carry pockets on both seams and flanges on both seams respectively, so they mate.
- The formed fitting is square on its diagonals at the square end, round on two diameters at the round end, and the right height, with the round centerd.
The schedule
Kai drew the true-length diagram by hand first, on the same sheet as the plan, then ran the schedule script to confirm it. Every length agreed with his diagram to within half a millimeter on the metric drawing and a sixty-fourth of an inch on the inch drawing.
# Capstone 2: square-to-round for the air handler, schedule of true lengths and checks
import math
W, D, H, t = 24, 18, 18, 0.0336    # in
r = (D - t) / 2
A = (W/2, -W/2, 0)
rp = [(r*math.cos(math.radians(-90 + 30*k)), r*math.sin(math.radians(-90 + 30*k)), H) for k in range(4)]
M = (0, -W/2, 0)
print("true-length schedule (one quarter; the other quarters repeat it):")
print(f"  seam M-1  {math.dist(M, rp[0]):.2f} in")
for k in range(4):
    print(f"  A-{k+1}      {math.dist(A, rp[k]):.2f} in")
print(f"  step-off on the round {math.dist(rp[0], rp[1]):.2f} in, half side {W/2:.2f} in")
area = 4 * 0.5 * W * math.hypot(W/2 - r, H)          # rough check: four flat triangles
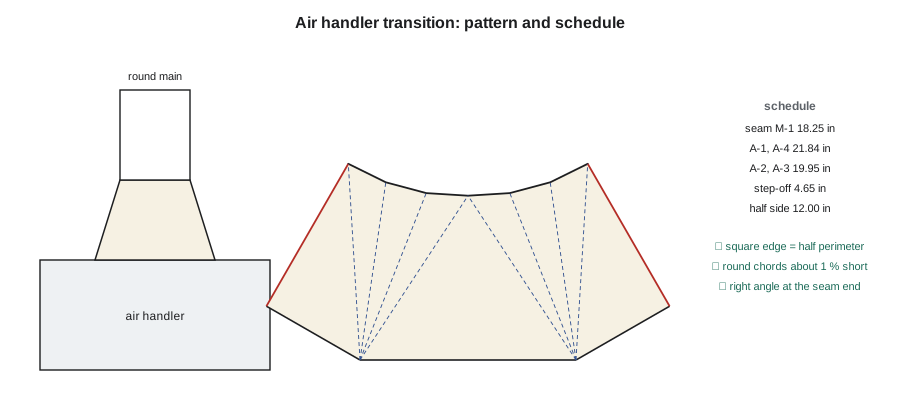
print(f"rough sheet area: flat triangles alone {area / 144:.2f} square feet (the cones add more)")true-length schedule (one quarter; the other quarters repeat it): seam M-1 18.25 in A-1 21.84 in A-2 19.95 in A-3 19.95 in A-4 21.84 in step-off on the round 4.65 in, half side 12.00 in rough sheet area: flat triangles alone 6.08 square feet (the cones add more)
With the schedule confirmed, he laid out one half pattern on the sheet by the steps of Lesson 6, starting with the flat triangle on side A-B and working outward to the two seam ends. The square edge added to the right length, the round edge passed its chord check, and the last triangle on each side made a right angle at the seam end within the accuracy of a steel square. He cut the first half, traced the second from it, and added the allowances: pockets on both seams of one half, flanges on both seams of the other, the square-end flange on both, and the round-end bead allowance swung parallel to the round edge.
Forming and fitting the transition
Kai formed the corner fans on the brake in light bumps along each fan line and smoothed them over a stake with a mallet, keeping the flat triangles flat. He closed the two seams, set the fitting on the bench and checked it. The square end was square to within 3/32 in on its diagonals, the round end measured within 1/16 in on two diameters at right angles, and the height was right. The round was centerd over the square to within 3/32 in when he dropped a plumb line from a straightedge across the round end.
In the mechanical room, the transition went onto the air handler's discharge flange with its gasket, and the round main slipped over its bead without forcing. Sean's crew sealed the seams and joints to the specification's seal class from SMW-130. The balancer's first readings at the air handler, later in the term, showed nothing unusual at the transition, which is the best result a fitting can have.
Sign-off and records
Aggie signed off both jobs at the end of the week. For each, Kai handed in a short record, which Keelson kept in the job file:
- the drawing reference and the field measurements taken before layout;
- the calculations or script output, and the hand construction that confirmed them;
- the check list, with each check marked passed and initialed, including the turret cap's revised arc check;
- any changes during the work, such as the panel arrows and the two annealed panels;
- the material used against the estimate: two sheets of copper plus one for spoilage, and one and a half sheets of galvanized for the transition.
The record is not paperwork for its own sake. When the next turret or the next air handler comes along, the numbers, the checks and the lessons are already written down. And if anything goes wrong in service, the record shows what was made, how, and who checked it.
What the capstone shows
The two jobs used different methods, radial line for the cap and triangulation for the transition, but the same habits carried both: measure the field before layout, calculate and construct, check against independent numbers, prove expensive work with a trial piece, keep track of which way patterns face, and write down what was done. Those habits will matter even more in SMW-220's duct fabrication, SMW-320's architectural work and SMW-420's software and CNC cutting, where the patterns come from machines and the checks come from people.
Common mistakes
MistakeChecking a panelled cone by adding chords and comparing them with the circumference.
InsteadCompare arcs with the circumference, or allow for the chord shortfall.
MistakeTracing standing seam panels without marking which way they face.
InsteadMark each traced panel with an arrow so short and long legs alternate around the ring.
MistakeLaying out from the drawing without a field measurement.
InsteadMeasure the curb or opening first and confirm the drawing's dimensions.
MistakeTurning seam legs after a panel is fully formed.
InsteadTurn the legs on the brake while the panel is flat, then finish forming.
MistakeHanding over a fitting with no record of its checks.
InsteadKeep the drawing, numbers, checks, changes and material in the job file.
Summary and key terms
- The turret cap is eight frustum panels from one cone, developed by radial lines with seam and hem allowances.
- Panels nest head to tail; four come from each sheet, and the cap takes two sheets plus one for spoilage.
- Standing seam panels alternate short and long legs, so every traced panel is marked with its direction.
- The air handler transition is an on-center square-to-round, scheduled by hand and by script and laid out in two mating halves.
- Both jobs were measured in the field first, checked by independent numbers and trial pieces, and recorded.
- The checks themselves need checking: chords run short of arcs, so compare arcs.
- Finial ring
- A collar at the top of a cone or roof that covers the panel ends.
- Double-lock standing seam
- A standing seam folded over twice, with a short leg on one panel and a long leg on the next.
- Curb
- The framed base on which a cap, unit or roof element sits.
- Job file
- The record of drawings, calculations, checks and changes kept for each job.
- Spoilage
- Material allowed for errors, trial pieces and damage.
Practice problems
Work each problem on paper first, then reveal the answer to check.
A cone is made in six panels with a base circumference of 120 in. Will the six base chords add to more or less than 120 in?
Show answer
Less, because each chord is shorter than its arc.
Why are the turret cap's seam legs turned before final forming?
Show answer
A formed panel will not sit on the brake.
What did Kai's field measurement at Ashgrove confirm?
Show answer
That the discharge flange and main matched the drawing and the round was on center within 3/16 in.
What goes in the job record for a capstone fitting?
Show answer
The drawing and field measurements, calculations and constructions, checks, changes and material.
Lesson quiz · 5 questions
Score 60% or more to complete this lesson.
Create a free account to save your progress, take quizzes and earn a certificate.