
RAC-120 · Lesson 10 of 12 · 21 min
Leak detection methods and leak testing
The seniors' residence chiller had been topped up twice in a year. Each time, the technician who added refrigerant had written "no leak found" on the service record. When Northfield took over the contract, Dana sent Theo with Raj, one of the company's senior technicians, to find the leak properly. It took most of a day. Raj started with the oil stains, then worked over every joint with an electronic detector, then used bubbles to pinpoint what the detector had found: a slow leak at the flare on a pressure transducer, and a second, smaller one at a relief valve that was weeping at its seat. "A leak search is a method, not a wave of a wand," Raj told Theo. "You go slowly, you go everywhere, and you confirm what you find."
Leaks are the main source of refrigerant emissions from operating equipment, and finding them is one of the most valuable skills a technician has. This lesson covers why systems leak and where, the methods for finding leaks and their sensitivities, how to search systematically, and how to test a system for tightness with nitrogen before it is charged.
Why and where systems leak
Every refrigeration system has hundreds of joints, seals and valves, and each is a possible leak path. Leaks develop for predictable reasons:
- Vibration fatigue: tubing that is not supported, or that rubs against another tube or a cabinet edge, cracks or wears through. Capillary tubes rubbing on each other are a classic example.
- Mechanical joints: flare fittings, compression fittings and threaded connections loosen with temperature cycles and vibration, especially if they were over- or under-tightened or made without proper flare tools.
- Seals and valves: Schrader cores without caps, valve stem packings, gaskets, O-rings and the seats of relief valves wear and leak.
- Corrosion: outdoor coils in salty or polluted air; evaporator coils attacked by formicary corrosion, a pitting of copper caused by organic acids from household and building chemicals; and steel components that rust.
- Brazed joints that were poorly made, with voids or incomplete penetration.
- Physical damage from lawn mowers, ladders, forklifts, ice picks in freezers and careless service.
Knowing where leaks are likely helps a technician search efficiently. The most common places are mechanical joints and access fittings, the points where tubing is supported or bent near vibrating compressors, and coils, especially evaporator coils in comfort cooling and display cases.
Signs of a leak
Before any instrument is used, a system often shows that it is leaking. A system that needs refrigerant added at all has a leak: a sealed system does not use up refrigerant. Low suction pressure, high superheat and bubbles in a liquid sight glass on a system that once ran correctly point to a loss of charge. Oil stains around fittings and on coils show where refrigerant carrying oil has escaped, because the oil stays behind. Frost in unusual places, hissing, and refrigerant alarms are other signs. The service records, as Lesson 6 explained, are evidence too: repeated additions to the same system are a leak that has not been found.
Leak detection methods
Several methods are used, and each has a range of leak sizes it can find, a way of locating the leak, and limits.
- Visual inspection looks for oil stains, damage, rubbing and corrosion. It is free, quick and finds many leaks, but only those that leave a trace.
- Bubble solution, a soap solution or a commercial leak-detecting fluid, is brushed or sprayed onto a suspected spot; escaping gas forms bubbles or foam. It pinpoints the exact location and is the standard way to confirm a leak found by other means. It needs the system to be under positive pressure and is slow over large areas. Very small leaks may need several minutes to produce visible foam.
- Electronic leak detectors draw air through a probe and sense refrigerant. Heated-sensor types react to halogen compounds; infrared types measure the absorption of infrared light by the refrigerant and are less affected by other chemicals and long-lasting; some detectors are designed for specific refrigerants such as hydrocarbons or for the A2L refrigerants. Good detectors can find leaks of a few grams a year. They locate the general area of a leak quickly but can be fooled by wind, contamination and other chemicals.
- Ultrasonic detectors listen for the high-frequency sound of gas escaping under pressure. They work with any gas, including nitrogen, and in windy places, but need a reasonably large pressure difference and are less sensitive to very small leaks.
- Fluorescent dye is added to the system and circulates with the oil; at a leak, the dye collects and glows under an ultraviolet lamp. It is useful for intermittent leaks and hard-to-reach places, but it takes time to circulate, can contaminate the system if the wrong dye or too much is used, and some equipment manufacturers do not allow it.
- Trace gas methods pressurize a system with nitrogen containing a small amount of a detectable gas, such as the hydrogen-nitrogen mixture used in some industries, and search with a detector for that gas. They are used on new installations and in manufacturing, and they avoid using refrigerant for testing.
- Pressure and vacuum tests, covered below, show whether a system leaks, but not where.
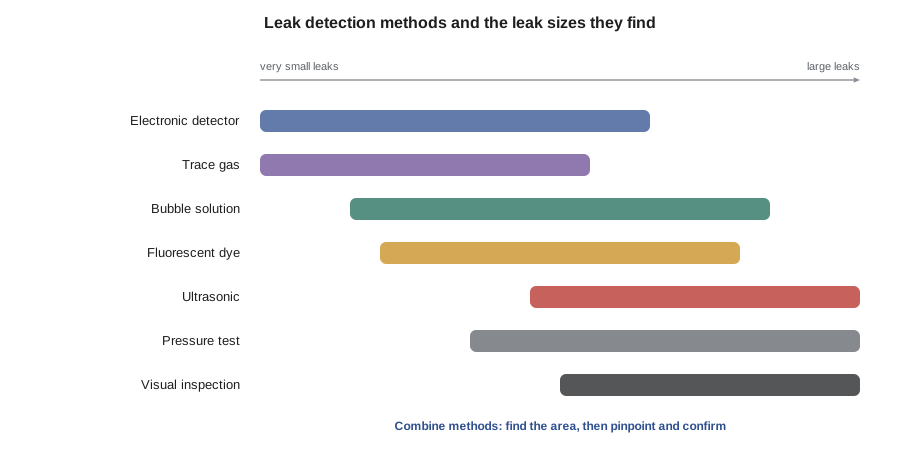
| Method | Shows where? | Typical smallest leak found | Main limits |
|---|---|---|---|
| Visual | Yes, if traces | Only leaks that leave oil or damage | Misses clean leaks |
| Bubble solution | Yes, exactly | Small, with patience | Slow over large areas; needs pressure |
| Electronic, heated sensor or infrared | Area, then spot | A fraction of an ounce a year for good detectors | Wind, contamination, false alarms |
| Ultrasonic | Yes | Medium | Needs pressure difference; less sensitive |
| Fluorescent dye | Yes | Small, over time | Circulation time; compatibility |
| Standing pressure test | No | Depends on time and gauge resolution | Temperature changes affect reading |
| Vacuum decay test | No | Depends on time | Moisture boiling off can mimic a leak |
Electronic detectors are rated by their sensitivity, expressed as the smallest leak rate they can reliably detect, often in ounces per year or grams per year, and many are tested to industry standards for detector performance. Good practice is to keep a detector calibrated and to check it against a reference leak before use. The leak inspections required under the Section 608 and AIM Act rules may be done with any method that can find leaks, including electronic detectors, bubble solution and, where installed, automatic leak detection systems.
Searching systematically
A good leak search follows a pattern. Raj's method, which Theo copied into his notebook, goes like this:
- Gather the facts: system history, past leak locations, amount of refrigerant added and how often, and current pressures. A large loss in a short time points to a big leak that can often be found quickly; a slow loss over months needs the most sensitive methods.
- Look first. Inspect every joint, valve and coil for oil, damage, rubbing and corrosion. Many leaks are found here.
- Make sure there is pressure. A leak is easiest to find when the system is at a high pressure. With the system off, the whole system sits at the standing pressure; with it running, the high side is at high pressure and the low side may be too low for detection.
- Check the detector against a reference leak, then search slowly, about 1 to 2 inches per second, with the probe close to each joint. Most refrigerants are heavier than air, so search below joints as well as around them, and shield the area from wind.
- Search in a set order, for example from the compressor along the discharge line to the condenser, then the liquid line, the metering device, the evaporator and the suction line, so that nothing is missed.
- When the detector alarms, move away, let it clear, and approach again more slowly to narrow down the spot. Then confirm with bubble solution.
- Keep searching after the first leak is found. Systems often have more than one, as the chiller did.
- Record every leak found, its location and size, and what was done about it.
Searching inside a cabinet or a coil can be hard. With the fans off, refrigerant collects inside the cabinet; a detector probe placed at a drain opening or the bottom of a cabinet can show whether there is a leak inside before panels are removed.
Pressure testing with nitrogen
A new installation, or a system that has been opened for repair, is pressure tested with dry nitrogen before it is evacuated and charged. Nitrogen is used because it is dry, inert, inexpensive and is not a regulated refrigerant, and it lets a system be tested at a pressure well above its normal standing pressure. The test is done in two parts: a pressure test to find any leaks large enough to show, and a standing test, holding the pressure for a set time and watching for any drop.
- Always use a nitrogen regulator and a relief device set below the system's test pressure. A full nitrogen cylinder is at over 2,000 psig and can burst a system or a gauge instantly.
- Test to the pressure specified by the equipment manufacturer or the applicable code, normally the low-side test pressure on the nameplate for a whole system, and never above any component's rating. Isolate or remove components that cannot take the test pressure, such as some pressure controls and transducers.
- Search every new joint with bubble solution or a suitable detector while the system is under pressure.
- Hold the pressure for a set time and record the starting and ending pressures and temperatures.
Temperature affects the reading. Nitrogen in a closed system follows the gas laws: if the system warms in the sun, its pressure rises; if it cools overnight, its pressure falls, even with no leak. To compare readings fairly, correct the final pressure to the starting temperature using absolute pressures and absolute temperatures.
Worked problem
Did the line set hold?
Theo pressure tested a new heat pump line set with nitrogen to 400 psig at 54 °F in the morning. At the end of the day it read 410 psig at 64 °F. Did it leak?
Show solution
- \[P_1 = 400 + 14.7 = 414.7\ \text{psia}, \quad P_2 = 410 + 14.7 = 424.7\ \text{psia}\]
- \[P_{2,\text{corrected}} = 424.7 \times \frac{513.7}{523.7} \approx 416.6\ \text{psia}\]
- The corrected final pressure, 416.6 psia, is slightly above the starting 414.7 psia: no measurable drop.
Answer: The rise in the gauge reading came from the sun warming the line set. Corrected for temperature, the pressure held, within the resolution of the gauge. Theo records the test and moves on to evacuation.
# Standing nitrogen pressure test with temperature correction (psig, F)
ATM = 14.7
def corrected_drop(p1_g, t1_f, p2_g, t2_f):
    p1 = p1_g + ATM
    p2 = p2_g + ATM
    p2c = p2 * (t1_f + 459.67) / (t2_f + 459.67)
    return p1 - p2c          # positive = pressure lost

tests = [("heat pump line set", 400, 54, 410, 64),
         ("walk-in cooler repair", 218, 68, 215, 61),
         ("chiller transducer flare", 145, 72, 139, 72)]
for name, p1, t1, p2, t2 in tests:
    drop = corrected_drop(p1, t1, p2, t2)
    verdict = "holding" if drop < 1 else "LEAK suspected"
print(f"{name:26s} corrected drop {drop:6.2f} psi -> {verdict}")heat pump line set corrected drop -1.89 psi -> holding walk-in cooler repair corrected drop -0.09 psi -> holding chiller transducer flare corrected drop 6.00 psi -> LEAK suspected
The walk-in cooler repair shows how temperature can mislead: its gauge dropped, but the drop is almost exactly what cooling overnight explains. The chiller flare, tested at a steady temperature, lost pressure that temperature cannot explain, and needs more searching. The threshold in the program is an example; the acceptable drop depends on the test time, the system and the gauge.
Vacuum tests
After a pressure test, the system is evacuated with a vacuum pump to remove air and moisture before charging, as RAC-110 introduced. A vacuum decay test, isolating the pump and watching a micron gauge, also shows whether the system is tight: the pressure in a tight, dry system rises a little and levels off, while a leaking system's pressure keeps rising steadily. A vacuum test cannot locate a leak, and it is a poor substitute for a pressure test, because a system under vacuum sees at most one atmosphere of pressure difference, which may not open a leak that appears under operating pressure. It is a final check, not the main leak test.
Leak testing records
Under the leak repair rules, leak inspections and verification tests must be recorded, including the date, the method and the result, and given to the owner, who keeps the records for three years. Even where no rule applies, recording where a leak was found and what was done is good practice and helps the next technician.
Theo's records for the chiller listed both leaks, the method that found each, the repair and the follow-up check, and the leak test notice he attached gave the date and result. When Raj came back a month later to check the repairs, he knew exactly where to look.
Common mistakes
MistakeWriting "no leak found" after a quick wave of the detector.
InsteadSearch systematically, slowly, everywhere, and confirm with bubbles.
MistakeStopping after the first leak.
InsteadSystems often have more than one leak; finish the search.
MistakePressure testing without a regulator and relief device.
InsteadAlways regulate nitrogen and protect against overpressure.
MistakeComparing pressure test readings taken at different temperatures without correction.
InsteadCorrect to the same temperature using absolute pressures and temperatures.
MistakeRelying on a vacuum test to prove a system is tight.
InsteadPressure test with nitrogen first; a vacuum test is a final check.
Summary and key terms
- A system that needs refrigerant has a leak; leaks come from vibration, mechanical joints, seals, corrosion, poor brazing and damage.
- Methods include visual inspection, bubble solution, electronic and ultrasonic detectors, fluorescent dye, trace gas, and pressure and vacuum tests.
- Use one method to find the area and another, usually bubbles, to pinpoint and confirm.
- Search slowly, below joints, in a set order, after checking the detector against a reference leak.
- Pressure test new or repaired systems with regulated dry nitrogen to the specified test pressure; correct readings for temperature.
- Record every leak inspection and verification test, with date, method and result.
- Formicary corrosion
- Pitting corrosion of copper tubing caused by organic acids, common in evaporator coils.
- Bubble solution
- A liquid that foams where gas escapes, used to pinpoint leaks.
- Electronic leak detector
- An instrument that senses refrigerant in air drawn through a probe.
- Reference leak
- A device that releases a known small leak rate to check a detector.
- Ultrasonic detector
- An instrument that hears the high-frequency sound of escaping gas.
- Standing pressure test
- Holding a system at a test pressure and watching for a drop.
- Vacuum decay test
- Watching a micron gauge after isolating the vacuum pump to see whether pressure rises.
- Trace gas
- A detectable gas mixed with nitrogen for leak testing.
Practice problems
Work each problem on paper first, then reveal the answer to check.
Why should a technician search below joints as well as around them?
Show answer
Most refrigerant vapors are heavier than air and fall from a leak.
A system tested at 218 psig, 68 °F reads 210 psig, 50 °F later. Has it lost pressure beyond the temperature effect?
Show answer
224.7 × 527.67 ÷ 509.67 = 232.6 psia corrected, slightly below the 232.7 start: no real loss.
Why is nitrogen used rather than refrigerant for pressure testing?
Show answer
It is dry, inert, cheap, unregulated as a refrigerant, and allows testing above standing pressure.
Name two causes of leaks at mechanical joints.
Show answer
Temperature cycling and vibration loosening fittings; poor flares; over- or under-tightening.
Lesson quiz · 5 questions
Score 60% or more to complete this lesson.
Create a free account to save your progress, take quizzes and earn a certificate.