
PHOT-440 · Lesson 7 of 12 · 29 min
Sound for photographers
Photographers have spent their careers thinking about light; most have never thought seriously about sound. Yet audiences judge video by its audio more harshly than by its picture. A slightly soft or noisy image passes unnoticed in an engaging story, while thin, echoing or distorted dialogue makes viewers stop watching within seconds. The good news is that clean dialogue for hybrid jobs depends on a few principles and a modest kit: get the microphone close, control the room, set levels with headroom, monitor with headphones and record a backup. This lesson covers the physics a photographer needs, microphone types and placement, wireless systems, recorders and levels, rooms and wind, event sound, synchronization and the law on recording conversations. CINE-101 introduces sound recording for film students, CINE-320 covers documentary sound and CRE-240 covers podcast recording chains; this lesson concentrates on hybrid client work.
Sound basics for people who think in stops
Sound level is measured in decibels (dB), a logarithmic scale like stops. For sound pressure, a change of 6 dB corresponds to doubling or halving the pressure, much as one stop doubles or halves light. A change of about 10 dB is perceived as roughly twice or half as loud. The inverse square law applies to sound from a small source in open space just as it does to light: each doubling of distance reduces the direct sound level by about 6 dB.
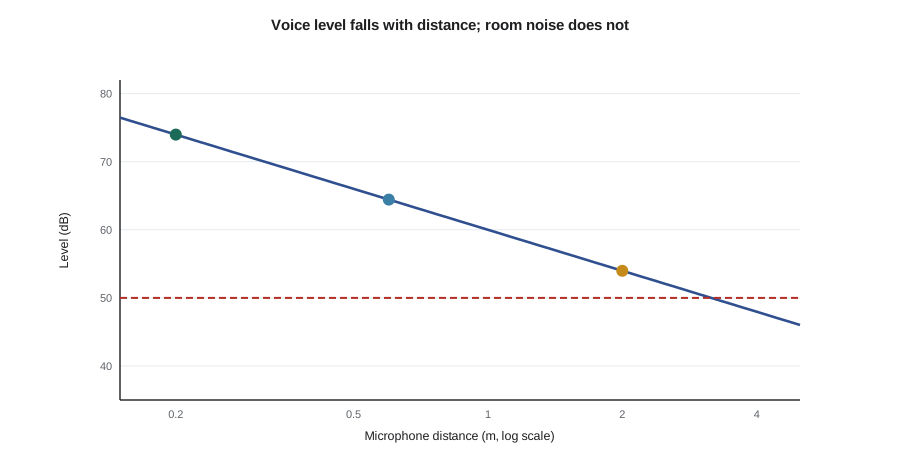
The most important consequence for hybrid shooters is that distance to the microphone matters more than the price of the microphone. Background noise, such as air conditioning, traffic and the room's reverberation, stays roughly constant wherever you put the microphone, while the speaker's direct sound drops as you move away. Moving a microphone from 2 m to 20 cm raises the voice by 20 dB relative to the background, an improvement no software can fully match.
Worked problem
Camera microphone versus lavalier
In a café, a speaker's voice reaches 60 dB at 1 m and the background noise is 50 dB everywhere. Compare the signal-to-noise ratio for an on-camera microphone at 2 m and a lavalier microphone at 20 cm.
Show solution
- At 2 m the voice is \( 60 - 20\log_{10}(2/1) \approx 60 - 6 = 54 \) dB, so the voice is only 4 dB above the noise.
- At 20 cm the voice is \( 60 + 20\log_{10}(1/0.2) \approx 60 + 14 = 74 \) dB, so the voice is 24 dB above the noise.
- The difference is 20 dB in favor of the lavalier.
Answer: The lavalier gives about 24 dB of signal-to-noise ratio against 4 dB for the camera microphone. The camera microphone recording would sound distant and noisy; the lavalier would sound clean and present.
import math
voice_at_1m = 60
noise = 50
for name, d in [('lavalier', 0.2), ('boom', 0.6), ('on-camera shotgun', 2.0), ('camera at back of room', 6.0)]:
    level = voice_at_1m - 20 * math.log10(d / 1.0)
print(f'{name:22s} {d:4.1f} m: voice {level:5.1f} dB, SNR {level - noise:5.1f} dB')lavalier 0.2 m: voice 74.0 dB, SNR 24.0 dB boom 0.6 m: voice 64.4 dB, SNR 14.4 dB on-camera shotgun 2.0 m: voice 54.0 dB, SNR 4.0 dB camera at back of room 6.0 m: voice 44.4 dB, SNR -5.6 dB
Microphone types and polar patterns
A microphone's polar pattern describes how sensitive it is to sound from different directions. Omnidirectional microphones pick up equally from all directions; most lavaliers are omnidirectional because their closeness to the mouth gives a strong signal and they are forgiving of head turns. Cardioid microphones are most sensitive at the front and reject sound from the back; they suit presenters and handheld use. Supercardioid and shotgun (interference tube) microphones are more directional at the front, which helps when the microphone must be farther away, but they still pick up sound behind the subject in the direction they point, such as a kitchen or a road.
Directional microphones are often misunderstood as zoom lenses for sound. They narrow the pickup somewhat but cannot reach across a room. A shotgun on top of a camera at 3 m will still sound distant. Its real job on hybrid shoots is natural sound and backup audio, or dialogue when it can be held on a boom pole close to the speaker, just out of frame.
| Microphone | Pattern | Best use | Watch out for |
|---|---|---|---|
| Lavalier (lapel) | Usually omni | Interviews, presenters, speeches | Clothing rustle, placement, visibility |
| Shotgun on boom | Supercardioid or lobar | Interviews, small scenes, walking talks | Needs an operator; off-axis tonal changes |
| On-camera shotgun | Supercardioid | Natural sound, backup, run-and-gun | Too far for clean dialogue |
| Handheld dynamic | Cardioid | Vox pops, noisy events | Visible in shot; handling noise |
| Stereo pair or recorder | Stereo | Ambience, music, crowd | Not for dialogue |
| Wireless kit with built-in mics | Omni capsule in transmitter | Fast setups, social clips | Visible, more room sound than a lav |
Placing and hiding lavaliers
Place a lavalier on the sternum, about a hand's width below the chin, centered or slightly toward the side the person will turn. Too high near the collar and the chin blocks sound; too low and the voice thins. If the person looks mostly to one side during the interview, place the microphone on that side. Visible placement on a tie, lapel or collar is acceptable and common in interviews and corporate pieces; hidden placement under clothing takes more care because fabric rubs against the capsule. Use tape, adhesive pads or specialized mounts to fix the microphone and a small loop of cable to relieve strain, and avoid placing it under jewelry, lanyards or stiff synthetic fabrics.
Ask permission before placing a microphone, explain what you are doing, and offer to let the person place it themselves under your guidance. Many people are uncomfortable with a stranger threading a cable under their shirt. Respect cultural and religious clothing, and offer alternatives such as a boom microphone when placement is not appropriate.
Wireless systems and frequency rules
Wireless microphone kits for hybrid work fall into two groups. Compact digital systems using the 2.4 GHz band are small, easy and license-free, often with built-in microphones, internal backup recording and phone connectivity; they are prone to dropouts in crowded venues where many devices share the band. UHF systems operating in TV-band frequencies are more robust at range and in crowded spaces, but frequency use is regulated. After the 600 MHz band was reallocated to mobile services in both countries, older UHF systems that operate in those frequencies may no longer be legal to use.
In the United States, the Federal Communications Commission (FCC) sets the rules for wireless microphones, including which frequencies unlicensed devices may use and when a license is needed. Check that any used system does not operate in the reallocated 600 MHz band.
Whatever system you use, do a walk test before the event, scan for clean frequencies or channels where the system allows, keep line of sight between transmitter and receiver where possible, and use the internal recording feature as a backup if the transmitter has one.
Recorders, levels and headroom
Digital audio levels are measured in decibels relative to full scale (dBFS), where 0 dBFS is the maximum level the recorder can represent; anything louder clips and distorts. Traditional practice for dialogue is to set gain so normal speech peaks around −12 dBFS, with louder moments reaching −6 dBFS and nothing touching 0. Many recorders offer a safety track recorded 6 to 12 dB lower, which saves sudden shouts or laughter.
Recorders and some cameras now record 32-bit float audio, which can represent an enormous dynamic range. A 32-bit float file that appears to clip on the recorder's meter can usually be turned down in post without distortion, as long as the microphone and analog input stages did not overload. This makes level setting much more forgiving for one-person crews, but it does not remove the need for good microphone placement or protect against noise, wind and echo.
| Signal | Target on the meter | Notes |
|---|---|---|
| Normal speech peaks | About −12 dBFS | Leaves room for louder moments |
| Loud speech, laughter | No higher than −6 dBFS | Safety track 6 to 12 dB lower helps |
| Room tone | About −50 to −40 dBFS | Depends on the room |
| Clipping | 0 dBFS | Distortion in fixed-point recording |
Camera audio inputs vary in quality. Many cameras add noticeable hiss when their gain is turned up. A common approach is to set the camera's input gain low and send a strong signal from the microphone or receiver, or to record to a separate recorder and synchronize later. Always monitor with closed-back headphones: you cannot judge rustle, hum, wind or wireless dropouts from a level meter.
Rooms, reverberation and wind
Hard, empty rooms produce reverberation, the persistence of sound after the source stops, which makes dialogue sound distant and hollow. Choose rooms with soft furnishings, carpets, curtains and bookshelves; avoid glass-walled boardrooms and empty halls; turn off air conditioning, fridges and buzzing lights during takes if you can; and place blankets or acoustic panels out of frame. Record 30 seconds of room tone, the sound of the room with everyone silent, at every location; editors use it to fill gaps and smooth cuts.
Wind is the enemy of outdoor sound. Even a light breeze across a microphone causes low rumbles and pops. Use foam windscreens indoors and furry windshields outdoors on every microphone, including lavaliers, and position people with their backs to the wind. A low-cut filter at about 80 to 100 Hz on the recorder or in post removes some rumble but cannot fix strong wind noise.
Event sound: speeches and the sound desk
At conferences, weddings and launches, speeches are usually amplified through the venue's public address system. The best audio often comes from the venue's mixing desk, which has the lectern and handheld microphones. Ask the audio technician for a feed, usually at line level or microphone level through an XLR cable; bring a small recorder that accepts both and set its input for the right level, or use an attenuator (pad) to drop a line-level signal into a microphone input. Also place a backup recorder or a lavalier transmitter on the lectern or the speaker, because desk feeds can be cut or poorly mixed for recording.
Arrive early and talk to the audio technician before the event; they are your ally. Ask about the running order, who will speak and whether there will be music playback, which may raise music-licensing questions if it ends up in your film.
Synchronizing sound and picture
When audio is recorded separately from the camera, the two must be synchronized in editing. Modern editing software can match a recorder's audio waveform to the camera's scratch audio automatically, so always record reference audio on the camera too. Timecode, a running clock written into both files, makes synchronization exact and is standard on larger multi-camera jobs; small wireless timecode generators now make it practical for hybrid shooters. A visible and audible clap or slate at the start of each take helps when other methods fail.
The law on recording conversations
Recording people talking raises legal questions beyond image releases. In a typical interview the subject knows they are being recorded and has agreed, so the main issue is the release covering use of their words and likeness (lesson 8). The risks arise with candid audio, such as guests' conversations picked up during events, phone or video calls recorded for a project, and hidden microphones.
In the United States, federal law and most states allow recording when one party to the conversation consents, but about a dozen states, including California, Florida, Illinois, Massachusetts, Pennsylvania and Washington, generally require the consent of all parties to a confidential conversation. When a recording crosses state lines, follow the stricter rule.
For client work, the simplest rule is transparency: tell people when audio is being recorded, place visible signage at events where you will record, and get releases from anyone whose words you plan to use.
Worked problem
Building an audio plan for a wedding ceremony
A couple wants their ceremony vows clearly audible in the highlight film. The officiant uses a venue microphone; the couple will not wear microphones. Plan the audio.
Show solution
- Primary: a lavalier on the officiant, placed on the side facing the couple, with internal backup recording in the transmitter.
- Secondary: a small recorder or second transmitter with a lavalier on the groom's lapel, hidden behind a boutonnière, with the couple's agreement.
- Tertiary: a feed from the venue desk if available, and a shotgun on a camera near the front for ambience and backup.
- Room tone: 30 seconds before guests arrive; levels around −12 dBFS on speech peaks with a safety track.
Answer: Three independent sources protect the vows: the officiant's lav, a hidden lav on the groom and a desk or camera feed. Synchronize them by waveform and timecode in the edit and choose the cleanest.
Common mistakes
MistakeRelying on the camera's built-in or on-camera microphone for dialogue
InsteadUse a lavalier or a boom microphone close to the speaker.
MistakeSetting levels so speech peaks hit 0 dBFS
InsteadAim for about −12 dBFS on speech, use a safety track or 32-bit float, and monitor.
MistakeSkipping headphones because the meters look fine
InsteadMonitor with closed-back headphones to catch rustle, hum, wind and dropouts.
MistakeForgetting room tone
InsteadRecord 30 seconds of room tone at every location.
MistakeRecording guests' private conversations without telling them
InsteadBe transparent, follow consent laws and get releases for words you use.
Summary and key terms
- Sound is judged more harshly than picture, and distance matters more than equipment price.
- Each doubling of distance reduces direct sound by about 6 dB while background noise stays constant.
- Omni lavaliers close to the mouth are the workhorse; shotguns are for booms, natural sound and backup.
- Wireless systems need walk tests, clean frequencies and attention to national frequency rules.
- Set speech peaks around −12 dBFS with headroom; 32-bit float is forgiving but not magic.
- Control rooms, wind and noise, record room tone, and get feeds and backups at events.
- Canada and most US states allow one-party consent recording, but some states require all parties' consent.
- Decibel (dB)
- A logarithmic unit for comparing sound levels.
- dBFS
- Decibels relative to the maximum level a digital recorder can represent.
- Polar pattern
- A microphone's sensitivity to sound from different directions.
- Lavalier
- A small clip-on microphone worn on the body.
- Shotgun microphone
- A highly directional microphone usually used on a boom.
- Room tone
- A recording of a room's ambient sound with no one speaking.
- Safety track
- A second recording at lower gain to protect against clipping.
- 32-bit float
- An audio format with very large dynamic range that resists clipping in post.
- Line level
- A stronger signal level used between audio devices, higher than microphone level.
- Timecode
- A running time reference recorded in files to synchronize them.
Practice problems
Work each problem on paper first, then reveal the answer to check.
How much does sound level drop from 1 m to 4 m in open space?
Show answer
About 12 dB.
Why are most lavaliers omnidirectional?
Show answer
Being close to the mouth gives a strong signal and omni is forgiving of head turns.
Where should a lavalier be placed?
Show answer
On the sternum about a hand's width below the chin, toward the side the person faces.
What level should normal speech peaks reach?
Show answer
About −12 dBFS.
Why record reference audio on the camera when using a separate recorder?
Show answer
To allow automatic waveform synchronization.
What does a low-cut filter remove?
Show answer
Low-frequency rumble such as wind and traffic.
Why record room tone?
Show answer
To fill gaps and smooth edits in dialogue.
What signal level does a venue sound desk usually provide?
Show answer
Line level or microphone level through XLR.
Is recording a conversation you take part in generally lawful in Canada?
Show answer
Yes, one-party consent applies under the Criminal Code.
Name two US states that generally require all-party consent.
Show answer
California and Florida (also Illinois, Massachusetts, Pennsylvania, Washington).
Lesson quiz · 5 questions
Score 60% or more to complete this lesson.
Create a free account to save your progress, take quizzes and earn a certificate.