
PHOT-430 · Lesson 10 of 12 · 37 min
Exhibition design and production
Exhibition design turns a checklist into a physical experience: where each work hangs, how large it is, how it is mounted or framed, what the walls look like, how visitors move and read, and what text accompanies the work. PHOT-401 introduced print size, viewing distance, hanging height, spacing and lighting for a body of work, and PHOT-301 covered archival mounting, matting, framing and glazing. This lesson builds on both with the tools exhibition designers use: scale drawings and wall elevations, precise hanging calculations, alignment and spacing systems, grids and salon hangs, choices of print presentation from framing to face-mounting and unframed methods, quantity takeoffs and costing, hanging hardware, wall color, and the production of labels and text panels. Units are given in both metric and imperial where they matter, because Canadian venues often work in both.
Principles of exhibition layout
A good layout serves the work and the visitor. Several principles guide decisions.
- Circulation: visitors should be able to move comfortably, see the whole room on entering, and find a natural route. Leave enough floor space in front of large works for viewing distance.
- Density: fewer works with generous space give each one attention; denser hangs create accumulation and energy. Density should vary deliberately, like pacing in a book.
- Scale: large works anchor walls and need distance; small works draw people close and suit intimate corners or vitrines.
- Hierarchy: key works deserve prominent positions, such as the wall facing the entrance or the end of a long sightline.
- Rest: empty wall, seating and text panels give visitors pauses.
- Consistency: a consistent center line, spacing and frame style let differences in the works themselves stand out.
Start layout work on paper or in software with a scaled floor plan and wall elevations, then refine it in the space with paper templates before hanging anything. Changes on paper are free; extra holes in a wall are not.
Scale drawings and wall elevations
A wall elevation is a scaled drawing of one wall seen straight on, showing its length and height, obstacles such as doors and outlets, and each work at its framed size and intended position. Common scales are 1:20 or 1:25 in metric drawings and 1/2 in to 1 ft in imperial drawings. Designers often make elevations in drawing or layout software using the venue's floor plan and the checklist dimensions, or by hand with paper cut-outs of each work at scale.
An elevation should record, for each work, the distance from a reference point such as the left corner of the wall to the center or edge of the frame, the center-line height, and the hanging hardware position. These dimensions let installers hang accurately without guesswork and allow the hang to be repeated at another venue on tour.
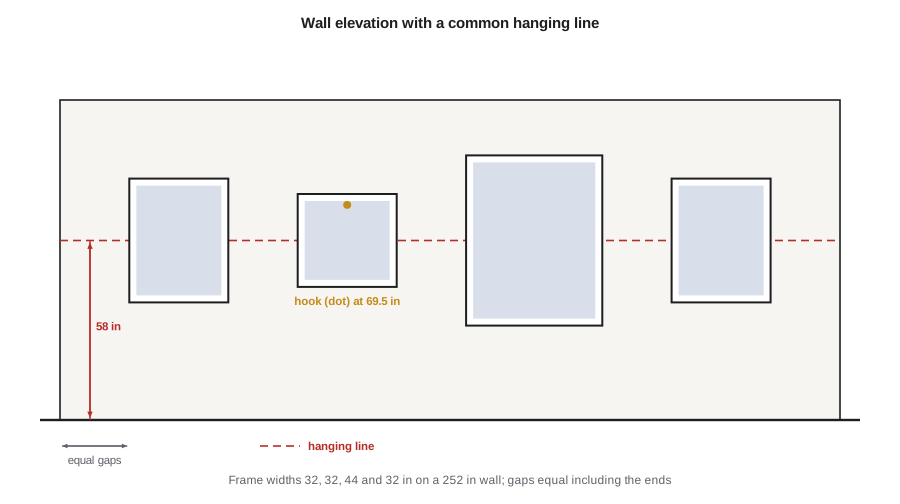
Hanging on a center line
Many galleries hang works so that their centers sit on a common horizontal line, the center line, typically at about 145 to 152 cm or 57 to 60 in above the floor, near average eye level. Hanging to a center line keeps works of different sizes visually aligned. The challenge is converting the center line into the position of the nail, hook or cleat, because frames hang from wires or D-rings some distance below their top edge.
Here \( h_{\text{center}} \) is the center-line height, \( H \) is the frame height and \( d \) is the distance from the top of the frame down to the point where the wire or hanger rests on the hook when the wire is pulled taut. Measure \( d \) on each frame, because wire tension and hanger placement vary.
Worked problem
Calculating hook height
The center line is 58 in. A frame is 30 in high, and with its wire pulled up the hanging point is 3.5 in below the top of the frame. At what height should the hook be placed?
Show solution
- Half the frame height: \( 30 / 2 = 15 \) in.
- Top of frame: \( 58 + 15 = 73 \) in above the floor.
- Hook: \( 73 - 3.5 = 69.5 \) in.
Answer: Place the hook at 69.5 in. For frames with two D-rings on a cleat or two hooks, use the D-ring position measured from the top in the same way, and check level with a spirit or laser level.
Alternatives to a center line
A center line is not the only option. Aligning the top edges of frames creates a strong horizontal that suits works of similar width but different heights. Aligning bottom edges can work when works stand above a plinth or bench line. A consistent top or bottom line is common for series of identical frames hung in a row, where the center line, top line and bottom line all coincide. Very large works may hang lower than the center line so they feel grounded; works seen mainly by seated visitors, or in spaces for children, may hang lower. Accessibility guidelines often suggest keeping the visual center of key content within a range comfortable for both standing and seated visitors, a point lesson 11 develops.
Spacing works evenly
Even spacing makes a wall feel calm and intentional. If works of known widths are to be spaced equally on a wall, with the same gap at each end as between works, the gap is:
where \( L \) is the usable wall length, \( w_i \) are the frame widths and \( n \) is the number of works. If the ends should be wider than the gaps between works, subtract the end margins from \( L \) first and divide by \( n - 1 \) instead.
Worked problem
Even spacing on a wall
A wall has 252 in of usable length. Five framed works are 32, 32, 44, 32 and 32 in wide. What gap gives equal spacing, including at the ends? What are the left-edge positions of each frame?
Show solution
- Total width: \( 32 + 32 + 44 + 32 + 32 = 172 \) in.
- Gap: \( (252 - 172) / 6 \approx 13.3 \) in.
- Left edges: 13.3, \( 13.3 + 32 + 13.3 = 58.6 \), \( 58.6 + 32 + 13.3 = 103.9 \), \( 103.9 + 44 + 13.3 = 161.2 \), \( 161.2 + 32 + 13.3 = 206.5 \) in.
Answer: A gap of about 13.3 in. Check: the last frame ends at about \( 206.5 + 32 = 238.5 \) in, leaving about 13.5 in to the end of the wall, the difference being rounding. Mark the centers for hooks at each left edge plus half the frame width.
Grids and salon hangs
Grids of identical frames, for example three rows of four, suit typologies and series. The grid should be centered on the center line, with equal horizontal and vertical gaps, often smaller than the gaps between separate works so the grid reads as one unit. The total size of the grid block is the sum of frame sizes plus gaps.
A salon hang arranges many works of different sizes close together, sometimes from low on the wall to high above eye level, recalling nineteenth-century academy exhibitions and domestic picture walls. It works best with a strong outer boundary, consistent narrow gaps and a few anchor works placed first, with smaller works filling around them. Plan salon hangs carefully on paper with templates; they look casual but are not.
Worked problem
Fitting a grid on the center line
A grid of 3 rows by 4 columns uses frames 16 in wide and 20 in high with 2.5 in gaps. The center line is 59 in. How large is the grid, and how high are its top and bottom edges?
Show solution
- Width: \( 4 \times 16 + 3 \times 2.5 = 71.5 \) in. Height: \( 3 \times 20 + 2 \times 2.5 = 65 \) in.
- Top: \( 59 + 32.5 = 91.5 \) in. Bottom: \( 59 - 32.5 = 26.5 \) in.
Answer: The grid is 71.5 × 65 in, running from 26.5 in to 91.5 in above the floor. The bottom row is low and the top row is high, so check that the ceiling height allows comfortable proportion, and consider a smaller grid if the upper images become hard to read.
Presentation options for photographs
Framing is the most familiar presentation, but photographers now use many methods, each with a different look, cost and level of protection.
| Method | Description | Advantages | Limitations |
|---|---|---|---|
| Framed with mat and glazing | Print in a window mat behind glass or acrylic | Protection, conventional elegance, reusable frames | Reflections, weight, cost |
| Float mount in a frame | Print mounted on a raised backing so its edges are visible | Shows paper edges and texture | Requires deep frame and careful mounting |
| Face-mounted to acrylic | Print bonded face-down to clear acrylic, backed with aluminum composite | Intense color and depth, no frame | Irreversible, scratches, expensive, archival concerns |
| Mounted to aluminum composite panel | Print adhered to a rigid panel, often with a hanging cleat | Clean, contemporary, frameless | Unprotected surface; mounting adhesive is usually permanent |
| Unframed with magnets, pins or clips | Print hung directly on the wall with small fixings | Light, inexpensive, intimate | Little protection; paper may curl or be handled |
| Large-format fabric or paper on wall | Wallpaper-scale prints or fabric banners | Immersive scale, easy to ship rolled | Single use for wallpaper; color and resolution limits |
| Vitrine or table display | Prints, books or ephemera under glass on a horizontal case | Shows working materials and books | Needs case and lighting; horizontal viewing |
| Projection or screen | Digital display of sequences or video | Shows many images, motion | Equipment, power, ambient light control |
The presentation should express the work's character. A delicate silver gelatin print may demand a mat, frame and anti-reflective glazing; a large color image of urban signage might suit a frameless aluminum mount; a project about archives might use vitrines with documents. Mixing methods in one exhibition can work if the choices are clearly intentional.
Mats, frames and glazing in detail
PHOT-301 discussed archival materials; here are the dimensions and choices an exhibition designer must specify.
- Mat window: the opening, usually slightly smaller than the image if the mat overlaps it, or larger if the paper edge is shown with a reveal around the print.
- Mat borders: often equal on the sides and top, with the bottom slightly wider, called bottom weighting, so the image does not look like it is sliding down.
- Frame molding: profile width and depth; deeper profiles suit float mounts.
- Rabbet: the recess at the back of the molding that holds the glazing, mat and backing; it must be deep enough for the package.
- Glazing: glass is cheaper and scratch-resistant but heavy and breakable; acrylic is light and shatter-resistant but scratches and can attract dust. Both are available with UV filtering and anti-reflective coatings, which greatly improve viewing but cost more.
Order frames in standard sizes where possible. Many framers and frame suppliers stock standard metric sizes such as 50 × 70 cm and imperial sizes such as 16 × 20 in and 24 × 30 in, which are cheaper than custom sizes and easier to reuse.
Worked problem
Sizing a mat with bottom weighting
An image is 16 × 20 in (width by height). The photographer wants to show a 0.5 in paper reveal around the image on all sides, side and top mat borders of 4 in, and a bottom border 0.75 in wider. What are the mat window and the outside frame size?
Show solution
- Window: \( 16 + 2 \times 0.5 = 17 \) in wide and \( 20 + 2 \times 0.5 = 21 \) in high.
- Outside width: \( 17 + 2 \times 4 = 25 \) in. Outside height: \( 21 + 4 + 4.75 = 29.75 \) in.
Answer: Window 17 × 21 in and frame opening 25 × 29.75 in. Choosing borders that produce a standard frame size, such as 24 × 30 in, could reduce cost; that would mean side borders of 3.5 in and adjusting top and bottom to fit.
Quantity takeoffs and costing
Once the checklist and presentation are fixed, list quantities and unit costs to build the production budget. Designers call this a takeoff. Group items so you can request quotes and compare suppliers.
Worked problem
Costing framed prints for a show
An exhibition has 12 works at 60 × 80 cm framed and 6 works at 100 × 125 cm framed. Prints cost $120 and $280 each. Frames with anti-reflective acrylic cost $260 and $640. Mats and mounting cost $45 and $90. What is the production cost, and how much would standard glass instead of anti-reflective acrylic save if it reduces frame costs by 35 percent?
Show solution
- Small works: \( 12 \times (120 + 260 + 45) = 12 \times 425 = \$5100 \).
- Large works: \( 6 \times (280 + 640 + 90) = 6 \times 1010 = \$6060 \).
- Total: \( 5100 + 6060 = \$11\,160 \).
- Frame costs: \( 12 \times 260 + 6 \times 640 = 3120 + 3840 = \$6960 \); saving at 35 percent: \( 0.35 \times 6960 = \$2436 \).
Answer: About $11,160, or about $8,720 with standard glazing. The saving is real, but reflections can seriously hurt viewing in bright galleries; a compromise is anti-reflective glazing on the large works only.
Hanging hardware and security
Hardware must be strong enough for the weight and suitable for the wall.
- Picture hooks and nails: for light frames on drywall or plaster; rated by weight.
- Wall anchors and screws: for heavier works; choose anchors suited to the wall material.
- French cleats and Z-clips: interlocking strips that hold panels flat and level, common for aluminum-mounted prints.
- Picture rails and rods: a rail near the ceiling with adjustable rods and hooks, avoiding holes in the wall for each hang.
- D-rings and wire: D-rings screwed to the frame back; wire allows adjustment but lets frames tilt forward.
- Security hardware: fittings that lock frames to the wall and require a special tool to remove, used in public spaces.
Always check the venue's rules: some allow only their rail system; some require security fittings; heritage buildings may prohibit fixings. Use bumpers on the lower corners of frames to keep them level and protect walls. Patch and paint holes after deinstallation as the agreement requires.
Wall color and the room
White walls are the default in many galleries because they recede and give a neutral context. But wall color can transform how photographs read. Mid-gray walls can make prints look brighter and reduce glare; dark walls dramatize small, luminous prints; colored walls can echo or contrast with the palette of the work. Changing wall color has costs: paint, labor and the venue's requirement to repaint afterward. Test colors with large painted boards placed behind prints under the gallery's lighting before committing.
Labels, text panels and graphics
Text gives visitors context and information. Typical exhibition texts include an introductory panel, section panels, individual labels and a credit or acknowledgment panel. PHOT-401 covered writing captions and statements; here the concern is production and legibility.
| Element | Typical content | Typical length | Production |
|---|---|---|---|
| Title wall or vinyl | Exhibition title, artist, dates | A few words | Cut vinyl lettering or printed panel |
| Introductory panel | Context and themes | 100 to 200 words | Printed panel or vinyl |
| Section panel | Introduces a group of works | 50 to 120 words | Printed panel |
| Object label | Title, date, medium, size, credit line, sometimes a short text | 5 to 70 words | Printed card, mounted board or vinyl |
| Room sheet or booklet | Checklist, essay, map | Varies | Printed handout or downloadable file |
For legibility, labels should use a clear typeface, high contrast with the background, and adequate size: many accessibility guidelines recommend label text of at least about 18 to 24 points for body copy on wall labels, larger for introductory panels. Place labels consistently, for example to the right of each work at a fixed height, or grouped on one panel per wall to reduce visual clutter. In bilingual venues, decide whether languages appear side by side or one above the other, and give them equal size and placement.
Common mistakes
MistakeHanging without a wall elevation
InsteadDraw elevations at scale with positions, center-line heights and hook heights.
MistakeCalculating hook height from the frame top without measuring wire drop
InsteadMeasure the distance from the top of each frame to its hanging point with the wire taut.
MistakeSpacing works by eye on a long wall
InsteadCalculate equal gaps and mark positions before hanging.
MistakeChoosing glazing only by price
InsteadWeigh reflections and protection; consider anti-reflective glazing for key or large works.
MistakePlacing labels inconsistently
InsteadUse a consistent label position and height, and legible type sizes.
Summary and key terms
- Layout principles include circulation, density, scale, hierarchy, rest and consistency.
- Wall elevations at scale record sizes, positions, center lines and hook heights.
- Hook height equals center line plus half the frame height minus the wire drop.
- Equal spacing divides the remaining wall length by the number of works plus one.
- Grids and salon hangs need planning with precise block sizes and consistent gaps.
- Presentation options range from framed and float-mounted prints to face-mounts, panels, unframed prints, vitrines and projection.
- Takeoffs list quantities and unit costs, revealing where savings are possible.
- Wall elevation
- A scaled drawing of a wall showing works and their positions.
- Center line
- The horizontal line on which the centers of works are aligned.
- Wire drop
- The distance from the top of a frame to its hanging point with the wire taut.
- Salon hang
- A dense arrangement of works of different sizes covering much of a wall.
- Float mount
- A print mounted on a raised backing so its edges are visible.
- Face-mounting
- Bonding a print face-down to clear acrylic.
- Bottom weighting
- Making the bottom mat border wider than the others.
- Rabbet
- The recess at the back of a frame molding that holds its contents.
- French cleat
- Interlocking angled strips used to hang panels flat and level.
- Takeoff
- A list of quantities and unit costs used for budgeting production.
Practice problems
Work each problem on paper first, then reveal the answer to check.
Center line 150 cm, frame 60 cm high, wire drop 7 cm. Where is the hook?
Show answer
\( 150 + 30 - 7 = 173 \) cm.
Center line 58 in, frame 24 in high, wire drop 3 in. Where is the hook?
Show answer
\( 58 + 12 - 3 = 67 \) in.
A 500 cm wall holds four 70 cm frames with equal gaps including ends. What is the gap?
Show answer
\( (500 - 280) / 5 = 44 \) cm.
A 2 × 3 grid of 30 cm wide frames with 5 cm gaps: how wide is it?
Show answer
\( 3 \times 30 + 2 \times 5 = 100 \) cm.
Name two presentation methods that need no frame.
Show answer
Aluminum composite mount, face-mount, magnets or pins, fabric or wallpaper prints.
What is bottom weighting?
Show answer
Making the lower mat border wider than the others.
Give one advantage and one drawback of acrylic glazing.
Show answer
Light and shatter-resistant; scratches and attracts dust.
Ten frames at $200 with anti-reflective glazing; standard glazing saves 30 percent. What is the saving?
Show answer
\( 0.3 \times 2000 = \$600 \).
Why use security hardware in public spaces?
Show answer
It locks frames to the wall and deters theft.
Why test wall colors with painted boards?
Show answer
To see how colors affect prints under the gallery's lighting before painting.
Lesson quiz · 5 questions
Score 60% or more to complete this lesson.
Create a free account to save your progress, take quizzes and earn a certificate.