
PHOT-311 · Lesson 11 of 12 · 25 min
Post-production, retouching ethics and virtual staging
Post-production is where architectural images are finished: lens corrections applied, verticals straightened, exposures blended, color matched and distractions removed. It is also where the most difficult ethical questions arise. How much may a photographer change before an image stops being a truthful record of a building or a property? This lesson sets out a practical post-production workflow for architectural images, explains the main editing tasks, and then examines retouching ethics, virtual staging, AI-generated content and the disclosure rules that increasingly apply.
A post-production workflow
A consistent workflow saves time and keeps a set of images coherent.
- Import and back up: copy raw files to two places immediately and rename them by project and view.
- Select: choose the frames for each view, including brackets and flash frames for blending.
- Raw development: apply the lens profile for distortion and vignetting, set white balance, set exposure and contrast, and remove chromatic aberration. Synchronize settings across frames of the same view.
- Geometry: straighten verticals and horizontals with transform tools or guided corrections, and crop to the final aspect ratio.
- Blending: merge HDR brackets or blend flash, ambient and window frames with masks (lesson 8).
- Color: correct casts locally, match white balance across the set, and check neutrals such as white walls and gray concrete with a color picker.
- Cleanup: remove dust spots, temporary distractions and reflections of the photographer or equipment.
- Final adjustments: local contrast, sharpening for the output size and noise reduction in shadows.
- Review: compare the set side by side for consistency in color, brightness and geometry; check at 100 percent for artifacts and halos around windows.
- Export: output to the client's specifications, with color profiles (usually sRGB for web, larger spaces or profiles specified by printers for print), metadata, captions and credits.
Geometry corrections in practice
Even with a shift lens, small corrections are almost always needed. Use guided tools that let you draw along verticals and horizontals that should be straight, and check the result on several lines, not just one. Watch for stretching of upper floors in strong corrections and use the aspect control to restore proportions. Check that circles stay round; a round window or a table should not become an ellipse because of correction.
Lens corrections should be applied before perspective corrections. Profiles for most lenses are built into raw processors; for tilt-shift lenses, profiles may not account for shifted positions, so manual vignetting correction is often needed at large shifts.
Color management
Architectural clients care about accurate color: an architect specified a particular stone, a paint color or a timber stain, and a supplier wants the product to look exactly right. Calibrate the monitor regularly with a hardware device, work in a controlled viewing environment and use a color reference target in the scene when color is critical. Neutral surfaces, such as white ceilings and gray concrete, are useful reference points but may carry color from bounce light; decide whether to show that color or neutralize it.
Consistency across a set matters as much as accuracy. The same white wall should not be warm in one image and cool in the next. Many photographers use a reference image for each project and match others to it.
What may be changed? Three levels
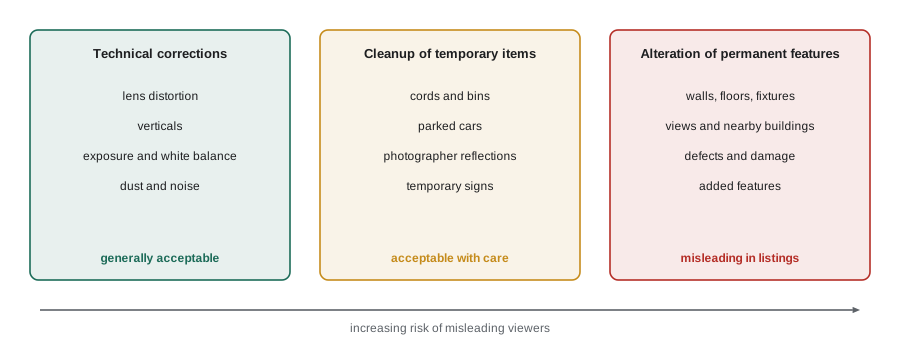
It helps to think of retouching in three levels, from the uncontroversial to the questionable.
- Technical corrections: lens distortion, verticals, exposure, white balance, noise, dust and sensor spots. These make the image look more like what a person sees and are accepted everywhere.
- Cleanup of temporary elements: cords, light switches in some design work, a parked car, rubbish bins, a construction sign, a stain on a carpet that the cleaner missed, reflections of the photographer. These remove things that are not part of the building or property and could reasonably have been moved. Accepted in most contexts, with judgment.
- Alteration of permanent features or context: removing power lines, neighboring buildings, cracks or water damage; adding a view, a fireplace, a lawn, a pool or a window; changing a facade color or flooring; replacing a dull sky with a dramatic sunset. These change what the building or property is. In design work, some may be acceptable with the architect's agreement if they represent the design honestly, such as removing a temporary hoarding. In real estate and in any advertising that a buyer relies on, altering permanent features is misleading and may be unlawful.
Design photography and the architect's intent
In architectural design photography, the photograph represents the design, so architects sometimes ask for edits that remove elements beyond their control: a neighbor's satellite dish, a utility pole, construction cranes in the distance, signage added by a tenant. Many photographers accept such edits for portfolio use, while others refuse, and award programs may have their own rules about manipulation. Agree in writing on what will be retouched and keep originals. Never misrepresent a building as built when it is not, for example by compositing an unbuilt wing into a photograph without labeling it as a rendering.
Editorial publications usually have strict policies against altering the content of photographs beyond technical corrections. If an image will be published editorially, follow the publication's rules.
Virtual staging
Virtual staging adds furniture, rugs, art and accessories digitally to photographs of empty rooms. It costs far less than physical staging and helps buyers imagine how a room can be used. It is legitimate when it is clearly labeled and does not hide or change the property itself.
Good virtual staging respects the room: the furniture fits the real dimensions, shadows and reflections match the light, and nothing covers defects such as damaged floors, stains or cracks. Poor virtual staging places a sofa over a damaged floor, adds a rug that hides a stain, puts a television on a wall that cannot support it, or uses furniture so small that the room looks larger than it is.
Best practice includes:
- Labeling each virtually staged image clearly, often with a visible watermark or caption such as 'virtually staged'.
- Including the original empty-room image in the listing next to the staged version, where the listing service allows.
- Keeping the original files and a record of the edits.
- Adding only movable furnishings, never permanent features such as built-in cabinets, lighting fixtures, fireplaces, windows or flooring.
- Matching the scale of furniture to real room dimensions.
In the United States, California's AB 723 has required disclosure of digitally altered images in real estate advertising, with access to the unaltered image, since 1 January 2026; other states and many MLSs are adopting similar rules, and the NAR Code of Ethics requires a true picture in advertising. The FTC Act's prohibition on deceptive practices also applies.
AI tools and generated content
Generative AI tools can now remove objects, extend skies, change seasons, add furniture, replace views and even generate entire rooms. Some features are simply faster versions of established retouching, such as removing a cord. Others create content that never existed, such as a lush lawn in place of mud or a view of the lake from a window that faces a parking lot. The ethical test is the same as for any retouching: would a reasonable viewer be misled about the building or property?
Practical guidance for photographers:
- Use AI tools for technical and cleanup tasks, and check results carefully for artifacts, such as warped lines, invented textures or impossible geometry.
- Do not use generative tools to change permanent features, views or surroundings in images that buyers or tenants will rely on.
- Disclose AI-generated or significantly altered content where rules require it, and label renderings and AI images as such.
- Consider content credentials, metadata standards that record how an image was created and edited, which some software and platforms now support.
- Check the terms of AI tools: some claim rights to uploaded images, which may conflict with client confidentiality and licenses.
Delivering and archiving
Deliver images in the formats and sizes agreed, usually high-resolution files for print and smaller files for web, named and numbered in a logical order. Embed copyright metadata and captions. Archive raw files, edited masters and blend layers according to a backup plan, such as three copies on two kinds of media with one off-site (PHOT-310 lesson 12). Architectural clients often return years later for new licenses or award submissions, and real estate disputes may require proof of what the original images showed.
Worked problem
Time budget for a design image
A design interior uses five brackets plus three flash frames. Raw development and synchronization take 10 minutes, blending 30 minutes, geometry and cropping 8 minutes, color matching 12 minutes, cleanup 15 minutes and final review and export 5 minutes. A real estate image using a standard flambient process takes 6 minutes of outsourced editing at $1.20 per image. What does each cost if the photographer values her time at $90 per hour?
Show solution
- Design image time: 10 + 30 + 8 + 12 + 15 + 5 = 80 minutes.
- Design cost: 80 / 60 × $90 = $120.
- Real estate image cost: $1.20 outsourced plus perhaps 1 minute of checking, 1 / 60 × $90 = $1.50, total about $2.70.
Answer: About $120 of editing time per design image against about $2.70 per real estate image, a difference of more than forty times that must be reflected in pricing.
| Edit | Design portfolio | Real estate listing |
|---|---|---|
| Lens and vertical corrections | Yes | Yes |
| Remove cords, bins, temporary signs | Yes | Yes |
| Replace gray sky | Often, with agreement | Only if not misleading; follow disclosure rules |
| Remove power lines or neighbors | Sometimes, with agreement | No |
| Virtual furniture | Rarely | Yes, clearly labeled |
| Change flooring, walls or views | Only as a labeled rendering | No |
Explaining edits to clients
Clients sometimes ask for edits that cross ethical or legal lines without realizing it: an agent asks for a greener lawn, or a developer wants a neighboring building removed. Explain the problem calmly, offer acceptable alternatives such as reshooting in better conditions or physically staging the space, and put any agreed edits in writing. A short written editing policy, shared with every client, prevents most disagreements and protects the photographer if an image is later challenged.
Renderings and photographs
Architects increasingly combine renderings and photographs in marketing material. A rendering of an unbuilt phase placed beside a photograph of the completed phase should be clearly labeled. Photographers are sometimes asked to provide background plates, photographs of an empty site or the surrounding street, for renderers to insert proposed buildings into; these are legitimate commissions, but the resulting composite images are renderings, not photographs, and should be labeled as such by whoever publishes them.
Keeping a record of edits
Non-destructive editing, using adjustment layers and raw processor settings rather than changing pixels permanently, makes it possible to show exactly what was changed in each image. For real estate and commercial work where accuracy may be questioned, keeping layered master files or a simple log of edits for each image provides evidence of what the original showed and what was done to it.
Output for print and web
Images destined for print need more care than web images. Printers may specify a color space and profile, a resolution such as 300 pixels per inch at the final size, and sharpening suited to the paper. Web images need sRGB, sensible compression and sizes that balance quality with loading speed; listing services often specify maximum dimensions and file sizes. Exporting presets for each common destination saves time and prevents errors.
Common mistakes
MistakeApplying perspective correction before the lens profile.
InsteadCorrect lens distortion first, then geometry.
MistakeMatching color image by image without a reference.
InsteadChoose a reference image and match the set to it on a calibrated monitor.
MistakeRemoving a crack or water stain from a listing photo.
InsteadNever hide defects or alter permanent features.
MistakeDelivering virtually staged images without labels.
InsteadLabel staged images and provide originals where allowed.
MistakeTrusting AI edits without inspection.
InsteadCheck every AI edit at 100 percent for warped lines and invented content.
Summary and key terms
- A consistent workflow runs from backup and raw development to geometry, blending, color, cleanup, review and export.
- Apply lens profiles before perspective corrections and check proportions after strong corrections.
- Calibrated monitors and reference images keep color accurate and consistent.
- Retouching ranges from technical corrections to cleanup of temporary items to alteration of permanent features.
- Design edits should be agreed with the architect; editorial publications restrict manipulation.
- Virtual staging is legitimate when clearly labeled and when it does not hide the property's condition.
- AI tools follow the same ethical test: would a reasonable viewer be misled?
Practice problems
Work each problem on paper first, then reveal the answer to check.
What should happen to raw files immediately after import?
Show answer
Back them up to two places.
Which comes first, lens profile or perspective correction?
Show answer
Lens profile.
Why use a reference image for a set?
Show answer
To keep color consistent across images.
Give an example of a technical correction.
Show answer
Straightening verticals or correcting white balance.
Give an example of a cleanup edit.
Show answer
Removing a cord or a bin.
Why is removing a power line from a listing image a problem?
Show answer
It alters the surroundings that a buyer relies on.
Two good practices for virtual staging?
Show answer
Label it and include the original image.
What test applies to AI edits?
Show answer
Would a reasonable viewer be misled?
Editing minutes for a 70-minute design image at $90 per hour cost?
Show answer
70 / 60 × 90 = $105.
Why archive originals for years?
Show answer
For later licenses, award entries and to prove what images showed.
Lesson quiz · 5 questions
Score 60% or more to complete this lesson.
Create a free account to save your progress, take quizzes and earn a certificate.