
PHOT-201 · Lesson 9 of 12 · 28 min
Viewfinders, metering and exposure technology
How a camera shows the scene and measures light shapes how a photographer works. Optical and electronic viewfinders offer different experiences, and modern electronic viewfinders and rear screens can show exposure, histograms, highlight warnings and focus aids directly in the image. Metering systems have evolved from single averaging cells to multi-zone and recognition-based systems that analyze the whole scene. PHOT-101 covered how to use metering modes and histograms; this lesson looks at the technology behind them: optical and electronic viewfinders, rear screens, how metering systems work, exposure previews and their limits, histograms and zebras, auto ISO, bracketing, and in-camera multi-shot modes such as HDR and live composite.
Optical viewfinders
An optical viewfinder (OVF) shows the scene directly through glass. In an SLR, the image comes through the lens via the mirror and pentaprism, so it shows exactly the framing and focus of the lens, but at the brightness of the lens's maximum aperture rather than the final exposure, and with no preview of white balance or exposure. Rangefinders and some compacts use a separate optical window beside the lens, with frame lines showing the field of view. Optical viewfinders have no lag, consume no power, show the full dynamic range the eye can see, and are favored by some photographers for the direct connection they provide with the scene. Their key specifications are magnification, coverage (the percentage of the final frame visible) and eyepoint (how far the eye can be from the eyepiece, important for spectacle wearers).
Electronic viewfinders
An electronic viewfinder (EVF) shows the image from the sensor on a small high-resolution display, usually OLED, viewed through magnifying optics. It previews the final image, including exposure, white balance, picture style and depth of field, and can overlay histograms, level indicators, focus peaking and highlight warnings. It shows a bright image in dim light and lets photographers review images without taking the eye away. Early EVFs suffered from lag, low resolution, smearing and blackout during bursts; modern high-end EVFs offer resolutions of around 9 million dots or more, refresh rates of 120 Hz or higher, and blackout-free shooting with stacked sensors. Remaining drawbacks include power consumption, a slight delay, limited dynamic range of the display, and the difference between the display's rendering and the final processed raw image.
| Feature | Optical viewfinder | Electronic viewfinder |
|---|---|---|
| Exposure preview | No | Yes |
| Lag | None | Small, a few milliseconds in good EVFs |
| Low-light view | Dim | Brightened |
| Overlays | Limited | Histogram, peaking, levels, warnings |
| Power use | None | Significant |
| Dynamic range of view | Eye's full range | Limited by the display |
Rear screens
Rear LCD or OLED screens show live view and playback. Tilting and fully articulating screens help with low and high angles, video and self-portraits; touch screens allow focus point selection and menu navigation. Screen brightness is adjustable and affects how bright images appear in playback, a common cause of misjudged exposure, so the histogram is a more reliable guide than appearance. Screens are hard to see in bright sun, when an EVF or a hood helps.
How metering works
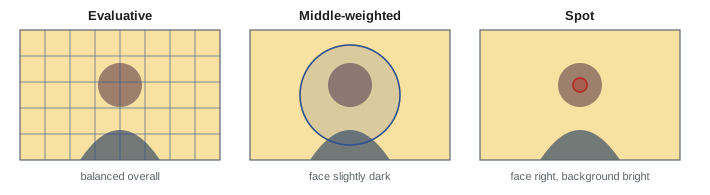
Camera meters measure reflected light and calculate the exposure that would render the metered area as a mid-tone. In SLRs, a separate metering sensor in the viewfinder housing measures the image on the focusing screen; early meters used a few zones, while modern SLR meters use RGB sensors with hundreds of thousands of pixels that can recognize faces and colors. Mirrorless cameras meter directly from the image sensor, using every pixel. Evaluative, matrix or multi-zone metering divides the scene into zones, compares the pattern of brightness, color, focus position and distance with a database of scenes or a trained model, and chooses an exposure intended to look right: for example, recognizing a bright sky at the top of the frame and avoiding underexposing the landscape below. Center-weighted and spot metering measure a defined area, giving predictable results that skilled photographers can interpret. Highlight-weighted metering, offered by some cameras, protects the brightest areas from clipping, useful on stage and in high-contrast scenes.
Exposure preview and its limits
An EVF's exposure preview shows how the camera's JPEG would look, which is valuable but can mislead. The preview reflects the picture style, contrast and white balance settings, not the raw data, so highlights may look clipped when the raw file still holds detail, or shadows may look blocked when they can be recovered. Some cameras offer a "flat" or log-like view, or let photographers set a neutral picture style to make the preview and histogram closer to the raw data. When using flash, the preview cannot show the flash's contribution, so cameras disable exposure preview in flash modes or show a setting effect that represents ambient light only.
Histograms, highlight warnings and zebras
The histogram shows the distribution of tones from black on the left to white on the right. A histogram piled against the right edge indicates clipped highlights; against the left edge, crushed shadows. RGB histograms show each color channel separately, revealing when one channel, often red in sunsets or flowers, has clipped while the overall histogram looks fine. Highlight warnings, or "blinkies", flash the clipped areas in playback. Zebras, borrowed from video, overlay stripes on areas above a chosen brightness in live view, before the picture is taken. Because these tools are based on the JPEG rendering, testing your camera tells you how much extra headroom the raw file has, often about half a stop to a stop.
Auto ISO
Auto ISO lets the camera vary ISO to achieve correct exposure while the photographer chooses aperture and shutter speed, a combination sometimes called manual mode with auto ISO. It is useful when light changes quickly and both depth of field and motion control matter, such as at events, sports and wildlife. Settings include the maximum ISO the camera may use and, in aperture priority, the minimum shutter speed, which many cameras can link to the focal length to follow the reciprocal rule automatically. Exposure compensation still works in manual mode with auto ISO on most modern cameras, adjusting the ISO the camera chooses.
Worked problem
Setting auto ISO for a wedding reception
A photographer moves between a dim dance floor and a brighter dining area. They want f/2 for subject isolation and at least 1/250 s to freeze dancers, and find noise acceptable up to ISO 6400. How should the camera be set?
Show solution
- Mode: manual with f/2 and 1/250 s.
- Auto ISO on, maximum ISO 6400.
- If the camera reaches ISO 6400 and the image is still dark, it will underexpose; check the indicator and consider a slower shutter speed or flash.
- Use exposure compensation to bias for skin tones, for example +0.3 EV for dark backgrounds.
Answer: Manual mode at f/2 and 1/250 s with auto ISO capped at 6400, plus exposure compensation as needed.
Bracketing
Exposure bracketing takes a series of frames at different exposures, typically three, five or more, spaced one or two stops apart. It insures against misjudged exposure and provides the raw material for HDR merging, in which software combines the frames into one image with the highlight detail of the darkest frame and the shadow detail of the brightest. Most cameras can bracket automatically, ideally from a tripod with a self-timer or remote release to avoid movement; handheld bracketing works with fast frame rates and alignment in software. Bracketing also applies to focus (Lesson 7), white balance and flash power.
In-camera multi-shot modes
Cameras increasingly perform multi-frame processing themselves, borrowing techniques from smartphones. In-camera HDR merges brackets into a single JPEG. Live composite modes, used for star trails, light painting and fireworks, take repeated short exposures and add only new bright areas to the accumulated image, letting the photographer watch the image build without overexposing the background. Live time and live bulb modes show the developing exposure during long exposures. Live ND modes simulate a neutral density filter by averaging many short frames, smoothing water and clouds without a physical filter. Multiple-exposure modes combine frames creatively. These features save time in the field, but the results are usually JPEGs or composite raw files with fewer processing options than separate frames merged later.
Viewfinder specifications explained
Viewfinder specifications can be confusing. EVF resolution is usually quoted in dots, where each dot is one red, green or blue subpixel, so a 3.69-million-dot finder has about 1.23 million full-color pixels, roughly 1280 × 960. Magnification describes how large the view appears compared with the naked eye, quoted with a 50 mm lens on full frame; 0.8× or more feels large and immersive, while values below 0.6× feel like looking down a tunnel. Some manufacturers quote magnification for an equivalent lens or sensor size, so comparisons should be careful. Refresh rate affects how smooth moving subjects appear and how easy it is to follow action; 60 Hz is acceptable for slow subjects, while 120 Hz or 240 Hz modes help with sports and wildlife at the cost of battery life and sometimes resolution. Diopter adjustment lets photographers with mild short or long sight see the viewfinder sharply without glasses.
Spot metering and the zone system idea
Spot metering measures a small area, usually 1 to 5 % of the frame, and is the most precise way to meter a specific tone. Because any meter assumes that what it measures should be a mid-tone, the photographer must decide how bright the metered area should be and adjust accordingly. This idea comes from the zone system, developed by Ansel Adams and Fred Archer around 1940 for black-and-white film, which divided tones into zones one stop apart, from pure black to pure white, with middle gray as zone V. A photographer spot-metering a sunlit snowfield, for example, knows that the meter will render it gray, and adds about 1⅔ to 2 stops so that it appears bright white with texture. Spot-metering a dark coat and subtracting a stop or more keeps it dark. With practice, this approach gives consistent, predictable results, and spot meters on cameras that link the metering spot to the autofocus point make it easy to meter a subject's face.
Worked problem
Placing a tone with spot metering
A photographer spot-meters a white wedding dress in shade, and the meter suggests 1/250 s at f/4, ISO 400. How should the exposure be adjusted so the dress appears white with detail?
Show solution
- The meter suggests an exposure that would render the dress as a mid-tone gray.
- White with detail sits about 1⅔ to 2 stops above middle gray.
- Add about 1⅔ stops: 1/250 s becomes about 1/80 s at f/4, or keep the shutter speed and raise ISO to about 1250.
- Check the histogram and highlight warnings to confirm that the dress is not clipped.
Answer: Give about 1⅔ stops more than the meter suggests, for example 1/80 s at f/4, ISO 400, then confirm with the histogram.
Handheld meters
Handheld light meters remain useful despite sophisticated in-camera metering. A handheld meter can measure incident light, the light falling on the subject, by pointing a white dome from the subject's position toward the camera; incident readings are unaffected by the subject's brightness, so a black cat and a white cat in the same light receive the same exposure. Incident metering is especially valuable in studio work with flash, since flash meters measure the burst of light from strobes, allowing photographers to set lighting ratios between key and fill lights precisely before taking a picture. Spot meters with a 1° angle let landscape photographers measure distant tones and calculate the scene's brightness range. PHOT-210 covers metering for studio lighting in detail.
Exposure compensation and metering locks
Exposure compensation shifts the camera's chosen exposure in semi-automatic modes, usually in one-third-stop steps over a range of ±3 to ±5 stops. Auto exposure lock (AE-L) holds a meter reading so that the photographer can meter one area and recompose, useful with center-weighted or spot metering. Some cameras let photographers fine-tune each metering mode permanently if their camera consistently overexposes or underexposes compared with their preference. Understanding when the camera's metering will be fooled, as in snow, backlit scenes, dark venues or subjects against bright skies, and what correction to apply comes with experience, but the histogram is the final check.
Dual-display and waveform tools
Some cameras now offer waveform monitors, a video tool that shows brightness across the width of the frame, letting photographers see exactly which parts of the scene approach clipping. False color displays, also borrowed from video, map brightness levels to colors, so skin at the right level appears in one color and clipped highlights in another. These tools take practice but give much more precise exposure information than a histogram, particularly for hybrid photographers who also shoot video.
Common mistakes
MistakeJudging exposure by rear-screen brightness.
InsteadUse the histogram and highlight warnings.
MistakeTrusting EVF preview with flash.
InsteadExposure preview does not show flash; check results.
MistakeIgnoring RGB histograms with saturated colors.
InsteadCheck for single-channel clipping.
MistakeLeaving auto ISO maximum too high.
InsteadCap it at your acceptable noise level.
MistakeBracketing handheld at slow speeds for HDR.
InsteadUse a tripod or fast bursts with alignment.
Summary and key terms
- Optical viewfinders have no lag; EVFs preview exposure and add overlays.
- Modern EVFs offer high resolution, fast refresh and blackout-free shooting.
- Metering systems analyze zones, color, focus and recognized subjects.
- Exposure previews and histograms reflect the JPEG, not the raw file.
- RGB histograms, highlight warnings and zebras reveal clipping.
- Auto ISO with manual aperture and shutter suits changing light.
- Bracketing and multi-shot modes extend dynamic range and creative options.
- OVF
- Optical viewfinder.
- Coverage
- Percentage of the frame visible in the viewfinder.
- Eyepoint
- Eye distance from which the whole view is visible.
- Refresh rate
- How often a display updates per second.
- Evaluative metering
- Multi-zone metering analyzing the whole scene.
- Highlight-weighted metering
- Metering that protects the brightest areas.
- RGB histogram
- Separate histograms for each color channel.
- Zebras
- Stripes marking areas above a brightness level.
- Auto ISO
- Camera-selected ISO within set limits.
- Live composite
- Adding only new bright areas over repeated exposures.
Practice problems
Work each problem on paper first, then reveal the answer to check.
Name two advantages of optical viewfinders.
Show answer
No lag, no power use, full dynamic range view.
Name two advantages of EVFs.
Show answer
Exposure preview, overlays, bright low-light view.
Why is the rear screen unreliable for exposure?
Show answer
Its brightness setting affects appearance.
Where do mirrorless cameras meter?
Show answer
From the image sensor.
When is highlight-weighted metering useful?
Show answer
On stage or in high contrast.
Why may raw files hold more highlight detail than the histogram shows?
Show answer
The histogram reflects the JPEG rendering.
What does an RGB histogram reveal?
Show answer
Clipping in a single color channel.
What does auto ISO in manual mode control?
Show answer
ISO, while you set aperture and shutter.
What is HDR merging?
Show answer
Combining bracketed frames for wider dynamic range.
What does live composite do?
Show answer
Adds only new bright areas to the image.
Lesson quiz · 5 questions
Score 60% or more to complete this lesson.
Create a free account to save your progress, take quizzes and earn a certificate.