
HSE-110 · Lesson 3 of 12 · 25 min
Secondary assessment, the recovery position and handover
Once you have dealt with immediate threats to life, or confirmed that there are none, you move to the secondary assessment. This is a more careful, systematic look at the casualty to find all their injuries or the likely nature of their illness, gather information about what happened and monitor how they are changing. It guides the care you give and gives paramedics or the receiving clinic information they cannot get any other way. In this lesson you will learn the three parts of the secondary assessment, how to place a person in the recovery position, how to monitor and how to hand over.
The secondary assessment is not a medical examination. You are not diagnosing; you are looking, asking, recording and caring. If at any point you find a life-threatening problem, such as breathing becoming abnormal or new heavy bleeding, stop and deal with it, and make sure emergency services have been called.
Part 1: asking questions
If the casualty is responsive, start by talking to them. Their own account is often the most useful information you will get. Ask what happened, where it hurts and how they feel. Many first aid programs teach the memory aid SAMPLE to structure the questions:
- S, signs and symptoms: what you can see (signs) and what the person feels (symptoms), such as pain, nausea, dizziness or numbness.
- A, allergies: to medications, foods, insect stings or latex.
- M, medications: what they take, including prescribed medicines, inhalers, insulin, blood thinners and over-the-counter products, and whether they carry any with them.
- P, past medical history: conditions such as heart disease, diabetes, epilepsy or asthma, and previous similar episodes.
- L, last oral intake: when they last ate or drank, which matters for diabetes and possible surgery.
- E, events leading up to the incident: what they were doing, whether they felt unwell before a fall, and whether they hit their head.
If the person cannot answer, ask bystanders and co-workers what they saw. Look for medical alert bracelets, necklaces or wallet cards, and for medications in pockets or bags, but respect privacy and tell the person what you are doing if they can hear you.
Part 2: checking vital signs
Vital signs are measurements that show how the body's essential systems are working. First aiders usually check level of response, breathing and skin; some programs also teach checking the pulse. What matters most is not a single reading but how the signs change over time, so record the time of each check.
| Vital sign | How to check | What may be a concern |
|---|---|---|
| Level of response | Talk to the person; use AVPU | Any drop from alert, confusion or increasing drowsiness |
| Breathing | Watch the chest; count breaths for 30 seconds and double | Very fast, very slow, noisy, strained or irregular breathing |
| Pulse | Feel at the wrist or side of the neck; count for 30 seconds and double | Very fast, very slow or irregular pulse |
| Skin | Look at color and feel temperature and moisture | Pale, gray or bluish skin; cold and clammy; hot and dry; flushed |
Normal adult breathing at rest is roughly 12 to 20 breaths a minute, and a normal adult resting pulse is roughly 60 to 100 beats a minute. Fit people may have slower pulses, and fear, pain and exertion raise both rates. You do not need to interpret the numbers precisely. Paramedics will be very interested in the trend: for example, a pulse rising from 88 to 124 over 15 minutes, with skin becoming paler and the person more confused, suggests shock is developing.
Part 3: the head-to-toe check
A head-to-toe check looks for injuries the person may not mention, especially when they are focused on one painful injury or are not fully alert. Explain what you are doing and get consent. Work systematically from the head down, looking and gently feeling for bleeding, swelling, deformity, tenderness and wounds, and comparing one side of the body with the other. Do not move a person you suspect has a head, neck or back injury in order to check them: look and feel where you can reach.
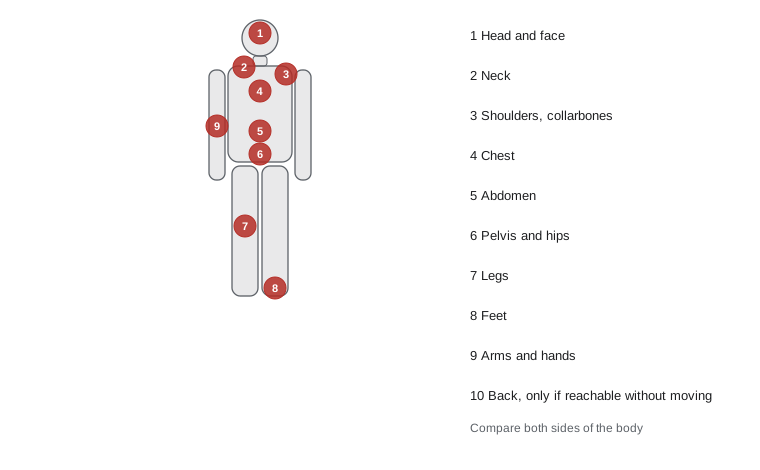
- Head and face: wounds, swelling, blood or clear fluid from the ears or nose, unequal pupils.
- Neck: pain, tenderness, deformity; medical alert necklace.
- Shoulders, collarbones and chest: pain, deformity, uneven chest movement, pain on breathing.
- Abdomen and pelvis: tenderness, rigidity, wounds; do not rock or press hard on the pelvis.
- Legs and feet: wounds, deformity, swelling; ask the person to wiggle toes and say whether they can feel your touch.
- Arms and hands: as for legs; check for a medical bracelet.
- Back: check only if you can reach without moving the person.
The recovery position
An unresponsive person who is breathing normally is at risk of their airway becoming blocked by the tongue, vomit or blood if they lie on their back. The recovery position rolls them onto their side so that the tongue falls forward and fluids drain from the mouth. It is used when you have to leave the person, for example to call for help, or when you cannot watch the airway constantly. Certified training teaches the exact technique; the principles are that the position is stable, the head is tilted to keep the airway open, the mouth points downwards, there is no pressure on the chest that restricts breathing and the person can be turned onto their back quickly if breathing stops.
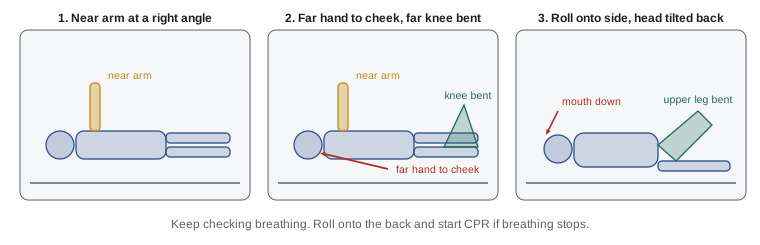
For a person with a suspected spinal injury who is breathing normally, current guidance is to leave them in the position found if the airway is clear and you can stay with them, and to roll them onto their side only if you must leave them or if vomit or blood threatens the airway. If you must roll them, keep the head, neck and body in line as much as you can. Keep checking breathing at least every minute or two. If breathing stops or becomes abnormal, roll the person onto their back and start CPR.
Pregnant casualties in later pregnancy are best placed on their left side to reduce pressure on major blood vessels. Very young children can be placed in a similar side position; infants are usually held face down along your forearm with the head lower than the body and supported.
Monitoring
Stay with the casualty until help arrives or they recover. Repeat your checks of response, breathing, pulse and skin every few minutes, or more often if the person is seriously ill, and record each set of findings with the time. Watch especially for changes in level of response, which can be the first sign of a head injury getting worse, low blood sugar or shock. Keep the person warm with a blanket or coat over and under them if you can, protect them from rain, sun and onlookers, and reassure them. Do not give anything to eat or drink to a person who is seriously injured, may need surgery or is not fully alert.
Worked problem
Spotting a worrying trend
A worker who fell from a loading dock is lying still, responsive, with pain in the thigh. You record: at 10:02 alert, breathing 18 a minute, pulse 92, skin normal; at 10:07 alert but anxious, breathing 22, pulse 108, skin pale and cool; at 10:12 responds to voice only, breathing 26, pulse 124, skin pale, cold and clammy. Calculate the changes and decide what they suggest.
Show solution
- Pulse change over 10 minutes: \(124 - 92 = 32\) beats a minute faster.
- Breathing change: \(26 - 18 = 8\) breaths a minute faster.
- Level of response has fallen from A to V, and skin has become pale, cold and clammy.
- Together, a rising pulse and breathing rate, worsening skin signs and falling response suggest shock, possibly from internal bleeding from a thigh fracture.
- Action: make sure 9-1-1 has been called and tell the dispatcher about the changes, keep the person lying down and still, keep them warm, give nothing by mouth and continue to monitor.
Answer: Pulse up 32 and breathing up 8 in 10 minutes, with paler skin and falling response, suggests developing shock. This is an emergency: update 9-1-1, keep the person still and warm and keep monitoring.
Handover
When paramedics or other responders arrive, give a short, organized handover. Many services use a structure such as MIST (mechanism, injuries, signs, treatment) or simply ask for the key facts. Say what happened, what you found, how the signs have changed and what care you gave, including times, such as when a tourniquet was applied or when an epinephrine auto-injector was used. Hand over your written notes if you made any. Then help as directed, for example by holding equipment, guiding the crew or managing bystanders.
If the person does not need emergency services but should see a health care provider, help arrange safe transport. A person who has been seriously hurt, who has had a head injury, who feels faint or who has taken medication should not drive themselves. Follow your workplace procedure for transport, which may use a taxi, a company vehicle with a second person or an ambulance.
Special considerations
Adapt the assessment to the person. Children may be frightened and may not describe symptoms clearly; get down to their level, explain simply and involve a parent or guardian if one is present. Older adults may have medical conditions and medications that change how injuries show themselves: an older person may have serious injuries after a fall from standing height, may feel less pain, or may be on blood thinners that make bleeding worse. People with hearing loss, visual impairments, cognitive impairments or limited English or French need extra time, simple language, visual cues or an interpreter; a co-worker who speaks their language can help, but keep personal medical information private. Respect religious and cultural practices around touch and clothing where possible, and explain why you need to look at or touch an area before you do it.
Intoxication, from alcohol or drugs, makes assessment harder because it can hide signs of head injury, low blood sugar or shock and can make the person uncooperative. Never assume that confusion is simply due to intoxication; treat the person as possibly injured or ill and call for medical help if in doubt.
Write things down if you can. A simple note on paper, a glove or a phone with the times of vital signs, what the person told you and what you did is far more reliable than memory in a stressful situation, and it makes the handover faster and more accurate.
Common mistakes
MistakeFocusing only on the obvious injury.
InsteadDo a systematic head-to-toe check to find hidden injuries.
MistakeTaking one set of vital signs and stopping.
InsteadRepeat checks every few minutes and record times, because trends matter most.
MistakeLeaving an unresponsive breathing person on their back while you go for help.
InsteadPlace them in the recovery position first if you must leave them.
MistakeGiving water to a seriously injured person who asks for it.
InsteadGive nothing by mouth; moisten the lips if needed and explain why.
MistakeLetting an injured worker drive themselves to a clinic.
InsteadArrange safe transport according to the workplace procedure.
Summary and key terms
- The secondary assessment gathers history, checks vital signs and looks for all injuries, after life threats are dealt with.
- SAMPLE structures questions: signs and symptoms, allergies, medications, past history, last intake, events.
- Vital signs include level of response, breathing, pulse and skin; trends over time are more important than single values.
- The head-to-toe check is systematic and compares both sides; do not move a person with a suspected spinal injury to examine them.
- The recovery position keeps the airway clear in an unresponsive person who is breathing normally.
- Monitor continuously, keep the person warm and give nothing by mouth if seriously injured.
- Hand over clearly, including times of treatments, and arrange safe transport for those who need care.
- Secondary assessment
- A systematic check for all injuries and information after immediate threats are managed.
- Sign
- Something the first aider can see, hear or feel, such as swelling or pale skin.
- Symptom
- Something the casualty feels and reports, such as pain or nausea.
- SAMPLE
- A memory aid for questions: signs and symptoms, allergies, medications, past history, last intake, events.
- Vital signs
- Measurements of essential body functions: level of response, breathing, pulse and skin.
- Head-to-toe check
- A systematic physical check from the head downwards for injuries.
- Recovery position
- A stable side-lying position that protects the airway of an unresponsive breathing person.
- Medical alert identification
- A bracelet, necklace or card that records a serious medical condition.
- Handover
- A structured report to arriving responders about what happened and what care was given.
- MIST
- A handover structure: mechanism, injuries, signs, treatment.
Practice problems
Work each problem on paper first, then reveal the answer to check.
When do you start the secondary assessment?
Show answer
After dealing with, or ruling out, immediate threats to life.
What does the A in SAMPLE stand for?
Show answer
Allergies.
What is the difference between a sign and a symptom?
Show answer
A sign is something you observe; a symptom is something the casualty feels and reports.
You count 11 breaths in 30 seconds. What is the breathing rate?
Show answer
22 breaths a minute.
Why record the time of each set of vital signs?
Show answer
Because trends over time show whether the person is getting better or worse.
Name three things the recovery position achieves.
Show answer
It keeps the airway open, lets fluids drain from the mouth and is stable.
What should you do if a person in the recovery position stops breathing normally?
Show answer
Roll them onto their back and start CPR.
Why not give a seriously injured person a drink?
Show answer
They may vomit, choke or need surgery.
What should you include in a handover?
Show answer
What happened, what you found, how signs changed and what care you gave, with times.
Which side is preferred for a casualty in later pregnancy?
Show answer
The left side.
Lesson quiz · 5 questions
Score 60% or more to complete this lesson.
Create a free account to save your progress, take quizzes and earn a certificate.