
DCT-120 · Lesson 12 of 12 · 21 min
Capstone: a job safety analysis for a rack installation in a live hall
The last session of the safety block is a real job. Corvid AI is expanding into four more cabinet positions in Hall D, D-41 to D-44, and Stonebridge's crew must receive, move, place and anchor four pre-integrated liquid-cooled racks, while qualified trades connect power from the busway and coolant from the row manifold. The rest of Hall D is running at full load beside them. Anjali gives Jamal the task of writing the job safety analysis, JSA, for the Stonebridge part of the job, with Roz as his reviewer and Dmitri as the shift lead who will approve it. This lesson walks through the analysis step by step, drawing on every earlier lesson, and ends with the work itself.
What a job safety analysis is
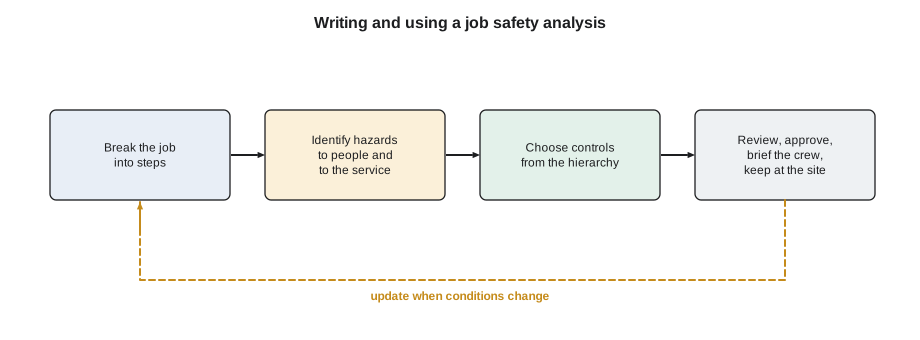
A job safety analysis, also called a job hazard analysis, breaks a job into steps, identifies the hazards of each step, and sets the controls for each hazard before work starts. OSHA publishes guidance on job hazard analysis and expects employers to identify and control the hazards of their work, and Stonebridge's program requires a written JSA for any non-routine job involving heavy equipment, work at height, energy isolation or work beside live infrastructure.
A good JSA is written by people who will do the work, with input from those who know the hazards, and is reviewed with the whole crew at the start of each shift. It is not a form to file: it is a plan that the crew keeps at the work location and updates when conditions change.
Step 1: gather information
Jamal starts with what he knows and what he needs to find out:
- The equipment: four racks, each about 3,300 lb, crated, arriving on two trucks, with a coolant manifold and power shelves already fitted. The vendor's installation guide gives the lifting and moving instructions.
- The route: loading dock, staging room, vestibule, corridor, ramp and Hall D, the same route used in lesson 7, with the vestibule door closer to be removed again.
- The location: positions D-41 to D-44 at the end of row 4, slab floor, seismic frames already installed, busway tap-off positions above, manifold valves capped.
- The surroundings: rows 1 to 4 running at full load; row 4's last four racks are live Corvid AI production racks; one CDU of the row's two is scheduled for maintenance next week, not this week.
- The people: four Stonebridge technicians, the rigging contractor's two-person crew, Corvid AI's engineer, and later an electrician and a mechanical technician for the connections.
- The permits: a permit to work for the rigging, the electrician's permit for connecting tap-offs, and the mechanical contractor's permit for connecting the manifold; the change request for the busway work.
# Gather the numbers the JSA depends on (values from the plan; ratings illustrative)
rack_kg, crate_kg = 1500, 1820
route_limits = {"dock plate": 4500, "staging floor": 6000, "ramp to Hall D": 2000, "Hall D slab": 10000}
door_mm = {"vestibule outer": 1220, "vestibule inner, closer removed": 1170, "Hall D double door": 1830}
rack_w_mm, rack_d_mm = 600, 1200
load_on_route = {"dock plate": crate_kg + 900, "staging floor": crate_kg, "ramp to Hall D": rack_kg + 150, "Hall D slab": rack_kg}
for k, lim in route_limits.items():
    v = load_on_route[k]
    print(f"{k:18s} load {v * 2.2046:6.0f} lb vs rating {lim * 2.2046:6.0f} lb  {'OK' if v <= lim else 'EXCEEDS'}")
for k, w in door_mm.items():
print(f"{k:32s} {w / 25.4:5.1f} in clear width vs rack {rack_w_mm / 25.4:.1f} in margin {(w - rack_w_mm) / 25.4:.1f} in")dock plate load 5997 lb vs rating 9921 lb OK staging floor load 4012 lb vs rating 13228 lb OK ramp to Hall D load 3638 lb vs rating 4409 lb OK Hall D slab load 3307 lb vs rating 22046 lb OK vestibule outer 48.0 in clear width vs rack 23.6 in margin 24.4 in vestibule inner, closer removed 46.1 in clear width vs rack 23.6 in margin 22.4 in Hall D double door 72.0 in clear width vs rack 23.6 in margin 48.4 in
Step 2: break the job into steps
Jamal breaks the Stonebridge part of the job into eight steps:
- 1. Prepare the route and the destination: barriers, floor protection, signage, door closer removal.
- 2. Receive the crates at the dock and move them to staging.
- 3. Uncrate in staging and inspect the racks.
- 4. Move each rack along the route into Hall D.
- 5. Position, level and anchor each rack to its seismic frame.
- 6. Support the qualified trades while they connect power and coolant (Stonebridge escort and watch duties only).
- 7. Leak and power checks before Corvid AI powers up.
- 8. Clean up, restore the route and close the tickets.
Step 3: identify the hazards
For each step, Jamal asks the two questions from lesson 1: what could hurt someone, and what could interrupt a customer? He walks the route and the destination with Roz to see the hazards rather than imagine them, and talks to the rigging contractor and Carmen Ortiz about what has gone wrong on earlier installations.
| Step | Hazards to people | Hazards to the service |
|---|---|---|
| 1 Prepare | Trips over floor protection; pinched fingers removing the door closer | Door left open breaks the security and fire separation |
| 2 Receive | Forklift and pallet truck movement; dock edge; heavy crate | Truck blocking the generator fuel route |
| 3 Uncrate | Banding springing back; cutting tools; crate panels falling; dust | Dust tripping aspirating detection if done in the hall |
| 4 Move | Rack tipping on the ramp; crushed feet and hands; strain from pushing | Collision with the live racks at the end of row 4 |
| 5 Anchor | Drilling noise and dust; pinch points at the frame; heavy rack shifting | Dust; vibration near live racks |
| 6 Trades | Arc flash and shock at the busway tap-off; pressurized coolant at the manifold | Wrong tap-off on the wrong busway; coolant leak onto live row 4 |
| 7 Checks | Coolant spray if a quick disconnect fails under pressure | Leak or power fault affecting the row |
| 8 Clean up | Trips, cuts from packaging, lifting debris | Packaging left in the hall; doors not restored |
Step 4: choose the controls
For each hazard, Jamal chooses controls starting at the top of the hierarchy. Where a hazard can be eliminated, he eliminates it: uncrating happens in staging, not in the hall; the busway feeds to positions D-41 to D-44 are switched off and locked out by the electrician before the tap-offs are fitted, so no live tap-off work is needed; the row manifold valves for the new positions stay closed until the coolant connections are complete and tested. Engineering controls follow: floor protection along the route, barriers separating the work area from the live racks of row 4, drip trays under the new manifold connections. Then administrative controls: the move plan, the crew briefing, spotters, a speed limit for the move, the escort and watch duties. Personal protective equipment covers what remains: safety footwear, gloves, hearing protection for drilling, eye protection for uncrating and coolant work, and arc-rated clothing for the electrician's verification.
# Score each hazard before and after controls (likelihood x severity, 1 to 5 each)
hazards = [
    ("rack tips on ramp",                 3, 5, 1, 5, "check castor rating, 4-person crew, nobody downhill, slow"),
    ("collision with live row 4",         3, 4, 1, 4, "barrier at row end, spotter, path marked on floor"),
    ("banding springs back",              3, 3, 1, 3, "cut by rigger standing aside, face shield"),
    ("arc flash at tap-off",              2, 5, 1, 5, "busway feed locked out and verified before tap-off work"),
    ("wrong busway isolated",             2, 5, 1, 5, "labels read aloud and confirmed against MOP"),
    ("coolant leak onto row 4",           2, 4, 1, 4, "valves closed until tested, drip trays, leak kit at site"),
    ("dust trips detection",              3, 2, 1, 2, "uncrate in staging; drill with dust extraction; impairment if needed"),
]
print(f"{'hazard':34s} before  after  main controls")
for name, l0, s0, l1, s1, ctl in hazards:
    b, a = l0 * s0, l1 * s1
    flag = "  <- still high, re-plan" if a >= 10 else ""
print(f"{name:34s} {b:5d} {a:5d} {ctl}{flag}")hazard before after main controls rack tips on ramp 15 5 check castor rating, 4-person crew, nobody downhill, slow collision with live row 4 12 4 barrier at row end, spotter, path marked on floor banding springs back 9 3 cut by rigger standing aside, face shield arc flash at tap-off 10 5 busway feed locked out and verified before tap-off work wrong busway isolated 10 5 labels read aloud and confirmed against MOP coolant leak onto row 4 8 4 valves closed until tested, drip trays, leak kit at site dust trips detection 6 2 uncrate in staging; drill with dust extraction; impairment if needed
The scores are only a way of checking that every hazard has been brought down to a level the crew is comfortable with. The severity of a tipping rack or an arc flash cannot be reduced, so the controls aim at making those events very unlikely, and at keeping people out of the place where they would be hurt.
Step 5: protect the live service
Because the job is beside live production racks, the JSA has a section for the service, agreed with Dmitri:
- The redundancy board must show both of row 4's CDUs and both busway feeds of the live racks available before work starts each day; if either is degraded, the job stops.
- The busway feed isolated for the new positions is checked against the single-line diagram to confirm it does not also feed live racks.
- No work at the row 4 manifold until the mechanical contractor confirms the isolation of the new branch, and a leak kit and a second person stand by during connection.
- Customer notification: Corvid AI is told the work windows, and its engineer is present for the coolant and power connections.
- Aspirating detection sensitivity is not changed and no detection is impaired unless the fire protection contractor and the impairment procedure require it for the drilling.
Step 6: review, approve and brief
Roz reviews the draft. She adds two things Jamal missed: the ramp is shared with the generator yard maintenance crew that week, so the move times must be booked with them, and the hall lights in the far bay switch off on motion sensors, so the crew needs headlamps for the anchoring. Dmitri approves the JSA and attaches it to the change request. On the morning of the work, Jamal briefs the crew at the work site: the steps, the hazards, the controls, who does what, the stop work rule, the emergency exits and assembly point, and what to do on a leak alarm or a fire alarm in Hall D. Everyone signs the briefing sheet, including the contractors and Carmen.
# Pre-start check: can the job begin today?
checks = {
    "redundancy board: row 4 CDUs and busway feeds all available": True,
    "permits issued and posted (rigging, electrical, mechanical)": True,
    "change request approved and customer notified": True,
    "route walked today; ramp booked with generator crew": True,
    "barriers set at row 4 end; floor protection laid": True,
    "leak kit and absorbents at D-41": True,
    "crew briefed and briefing sheet signed": False,
}
missing = [k for k, v in checks.items() if not v]
for k, v in checks.items():
    print(("[x] " if v else "[ ] ") + k)
print("START" if not missing else "HOLD: " + "; ".join(missing))[x] redundancy board: row 4 CDUs and busway feeds all available [x] permits issued and posted (rigging, electrical, mechanical) [x] change request approved and customer notified [x] route walked today; ramp booked with generator crew [x] barriers set at row 4 end; floor protection laid [x] leak kit and absorbents at D-41 [ ] crew briefed and briefing sheet signed HOLD: crew briefed and briefing sheet signed
Step 7: doing the work
The installation takes two days. The racks move along the route one at a time, each with four people and a spotter, at walking pace. On the third rack, the spotter calls stop at the bottom of the ramp because a cart has been left in the corridor beyond the Hall D door; the move pauses for two minutes while it is cleared. In the hall, each rack is positioned on its seismic frame, leveled and anchored. The electrician locks out the busway feed for the new positions, verifies absence of voltage live-dead-live, and installs the tap-offs under her permit while Jamal keeps the barrier at the arc flash boundary of the open busway section. The mechanical technician connects the manifold branch with the valves closed, pressure-tests it, and opens the valves slowly while Jamal and Carmen watch the connections with torches. One quick disconnect weeps a few drops during the pressure test; it is replaced before the rack is filled.
Before Corvid AI powers up, Jamal checks that the leak detection cable under each new rack reports to the monitoring system, that the A and B tap-offs are labeled correctly, and that the drip trays are clean and dry. Carmen powers the racks up one at a time while Dmitri watches the CDU loads and the row temperatures.
Step 8: closing the job
At the end, the crew restores the vestibule door closer, removes the floor protection, takes the barriers down, sweeps the area and confirms that no packaging is left in the hall. Jamal updates the JSA with what they learned: the cart in the corridor, the weeping coupling and the motion-sensor lights. He closes the tickets with photos and files one near-miss report, for the cart, which leads to a rule that the corridor is closed to carts during heavy moves. Anjali asks him to present the JSA at the next safety committee meeting as an example for new technicians.
Worked problem
What the JSA changed
Comparing the plan with what happened, Roz asks Jamal which controls mattered most.
Show solution
- Uncrating in staging kept dust, banding and packaging out of a hall full of sensitive detection and live equipment.
- Locking out the busway feed meant nobody worked on live busway, which eliminated the worst electrical hazard of the job.
- Keeping the manifold valves closed until the branch was tested meant the weeping coupling leaked a few drops of water during a test, not coolant at full pressure beside live racks.
- The spotter and the stop rule caught the cart in the corridor.
- Checking the redundancy board each morning meant the job would have stopped automatically if anything in row 4 had been degraded.
Answer: Four racks were installed with no injury, no damage and no interruption to the live racks in row 4. The JSA was not paperwork; it was the plan that made the job uneventful.
Common mistakes
MistakeWriting the JSA at a desk without walking the route.
InsteadWalk the route and the work site with the people who will do the job.
MistakeListing PPE as the main control for every hazard.
InsteadStart at the top of the hierarchy: eliminate, isolate, then procedures, then PPE.
MistakeForgetting the service hazards.
InsteadInclude what could interrupt live customers next to the work.
MistakeFiling the JSA and never looking at it again.
InsteadKeep it at the work site and update it when conditions change.
MistakeBriefing only Stonebridge staff.
InsteadBrief and sign up everyone at the site, including contractors and the customer's engineer.
Summary and key terms
- A JSA breaks a job into steps, identifies hazards to people and to the service, and sets controls before work starts.
- Gather information first and walk the route and the work site.
- Choose controls from the top of the hierarchy: eliminate hazards such as live busway work and in-hall uncrating wherever possible.
- Protect the live service with redundancy checks, confirmed isolations, closed valves and customer notification.
- Review, approve and brief the whole crew; keep the JSA at the site and update it.
- Close the job cleanly and feed lessons back through near-miss reports and the safety committee.
- Job safety analysis
- A written breakdown of a job into steps, with the hazards and controls for each step.
- Crew briefing
- A meeting at the work site before work to go through the JSA with everyone involved.
- Single-line diagram
- A simplified drawing of the electrical system showing how power flows from source to load.
- Pressure test
- A test of a new pipe or hose connection at pressure, with valves to the live system closed.
- Spotter
- A person who watches a move or task and warns of hazards the operators cannot see.
Practice problems
Work each problem on paper first, then reveal the answer to check.
Name the four main parts of writing a JSA.
Show answer
Break the job into steps, identify hazards, choose controls, review and brief.
Why did the JSA require the busway feed to be locked out before tap-offs were fitted?
Show answer
It eliminated live busway work, the highest electrical hazard of the job.
Which service hazard did the redundancy board check control?
Show answer
Working beside row 4 while its cooling or power had no redundancy.
Why was the quick disconnect leak only a small event?
Show answer
The branch valves were closed and the branch was pressure-tested before filling with coolant.
Lesson quiz · 5 questions
Score 60% or more to complete this lesson.
Create a free account to save your progress, take quizzes and earn a certificate.