
APP-320 · Lesson 11 of 12 · 27 min
Static, handling and board replacement
▶ Video coming soon A video version of this lesson is on the way.
The power board for Ignatius Bromley's induction cooktop (lesson 2) arrived on Friday, October 16, and Hiro took it out on the van in its sealed silver bag. At the house he switched the cooktop's breaker off, locked the panel cover with a tag, proved the terminal block dead and lifted the glass top. He measured the old board's bus capacitor: 2 V. He clipped an antistatic wrist strap to his wrist and its other end to the cooktop's bare metal chassis, photographed every connector and the routing of each wire, then unplugged the connectors by their housings and lifted the old board out by its edges. He opened the new bag only when he was ready to fit the board, checked its part number against the work order, moved the heat sink pad across exactly as the instructions showed, plugged every connector back to match the photographs, and slid the old board into the empty bag for the warranty return. The cooktop powered up, passed its self-test and boiled a pot of water on each zone.
This lesson explains electrostatic discharge and how to prevent it, how boards should be stored, carried and handled, and a complete procedure for replacing a control board: confirming the cause, recording settings, safe removal, fitting, configuration, testing, documentation and returning the old part.
What electrostatic discharge is
When two materials rub and separate, such as shoes on a carpet, a sleeve on a car seat or a board being slid out of a plastic bag, electrons move from one to the other and leave both charged. A person walking across a carpet in dry winter air can build up several thousand volts, and sometimes over 10,000 V, without noticing (typical figures). When the charged person touches something conductive, the charge jumps across in a tiny spark: an electrostatic discharge, or ESD. People feel a discharge only above about 3,000 V. Many electronic parts on a control board can be damaged by discharges far smaller than that, sometimes under 100 V (typical).
ESD damage is sneaky. Sometimes a part fails at once. More often the discharge weakens a part without destroying it, and the board passes its test, goes back into the customer's machine and fails weeks later. A technician who has never seen a spark may still be killing boards. That is why makers ship boards in protective bags, print handling warnings on the packaging and, in some warranty programs, decline boards returned with signs of mishandling.
Worked problem
How small the energy is
A common way to model a person for ESD is about 100 pF of capacitance. How much energy does such a person store at 3,000 V, the level at which a discharge is first felt? Energy in a capacitor is half the capacitance times the voltage squared.
Show solution
- \[E = \tfrac{1}{2} C V^2 = 0.5 \times 100 \times 10^{-12} \times 3{,}000^2 = 0.00045 \text{ J}\]
- That is 0.45 mJ, released in a few billionths of a second.
Answer: About 0.45 mJ: far too little to hurt a person, but delivered so fast, and into such tiny parts, that it can puncture the thin insulating layers inside a chip. Discharges you never feel carry less energy still and can do the same damage.
Winter makes it worse. Dry indoor air in a heated house in Columbus in January lets charges build up much more than humid summer air does. The same habits apply all year, but the risk is highest exactly when furnaces are running.
Preventing ESD
Preventing ESD means keeping the technician, the board and the appliance at the same electrical potential while the board is handled, so no charge has a reason to jump. The tools are simple.
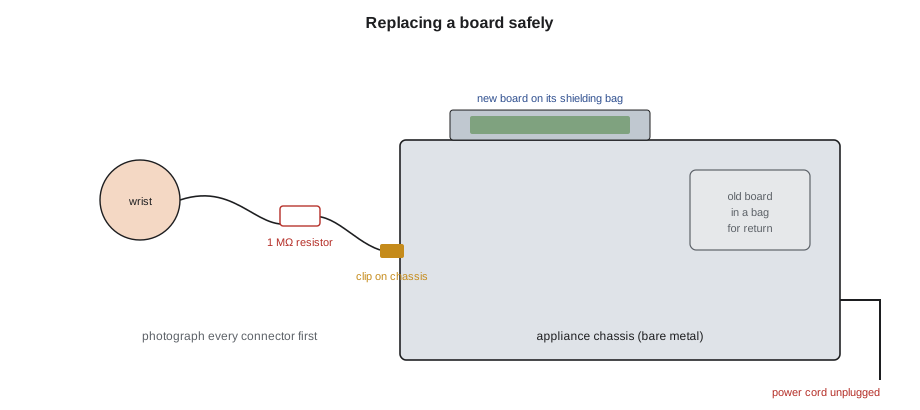
- Wrist strap. A conductive band on the wrist with a coiled cord and a clip. The cord contains a resistor, usually 1 MΩ, that drains charge slowly and limits current if the technician touches something live. The clip goes on bare metal of the appliance chassis, so the technician and the appliance are at the same potential. The appliance should be unplugged or switched off at its breaker for the work itself; the strap equalizes charge, it does not make live work safe.
- Touch first. If a strap is not available, touch the appliance's bare metal chassis before touching the board, and keep one hand on it while working. This is a poor substitute, but better than nothing.
- Bags. New boards come in static-shielding bags, usually silvery and slightly see-through, which carry charge around the board instead of through it. Pink or blue antistatic bags only stop the bag itself from charging; they do not shield. Keep the board in its shielding bag until it is fitted, and put the old board into that bag for return.
- Handling. Hold boards by their edges or their plastic frame. Do not touch the connector pins, the chips or the tracks. Do not lay a board on a carpet, a seat or a plastic sheet; lay it on its bag or on the appliance's metal top.
- Clothing and tools. Avoid synthetic sweaters and fleece when handling boards. Use tools that are not charged by friction, and do not rub a board clean with a dry cloth.
Worked problem
Why the strap has a resistor
A wrist strap's cord has a 1 MΩ resistor. If the technician accidentally touches a live 120 V terminal while wearing the strap clipped to a grounded chassis, what current could flow through the strap path?
Show solution
- \[I = \frac{120}{1{,}000{,}000} = 0.00012 \text{ A} = 0.12 \text{ mA}\]
Answer: About 0.12 mA, far below a dangerous level. The resistor drains static charge slowly enough not to cause a damaging spark and limits the current through the strap if something live is touched. A strap with no resistor, or a bare wire wrapped round the wrist, removes that protection; never improvise one.
Storing and carrying boards
Boards spend time on the van before they reach a customer, and how they are kept matters. Ade's rules for the vans are short. Boards stay in their original box and shielding bag until used. Boxes are stored flat, not under heavy parts, and away from the van's heater outlet and the summer sun. Damp boxes, crushed boxes and bags that have been opened and refolded are reported, not used without checking. When a board comes back unused, it goes back to the parts counter in its sealed bag, so it is not mistaken for a used board.
Extreme temperature is a hazard too. A board that has spent a winter night in an unheated van can collect condensation when carried into a warm house. Let it warm up in its sealed bag for a few minutes before opening it, so moisture forms on the bag, not the board.
Before replacing a board
The rule from lesson 1 bears repeating: a board is replaced only when measurement shows it is at fault and the cause of any damage has been found. Before ordering, Dee confirms the supply to the board, checks the inputs and loads its outputs serve, looks for water, heat and burned parts, and checks the software version and any service bulletin. Before fitting, she confirms the new part is the correct current service part for the model and serial number (lesson 3).
She also records what the old board knows that the new one will not. That may include the model configuration, any calibration offsets such as an oven temperature adjustment, the customer's settings, the software version and the fault history. Some boards hold the model configuration on a separate plug-in key or in the user interface board, so it transfers automatically; others need it entered or downloaded. The new board's instruction sheet and the tech sheet say which.
A board replacement procedure
Makers give their own steps for each board, and those come first. A typical procedure, which Penfold uses as its checklist, runs as follows.
- Make safe. Unplug the appliance or switch off and lock out its breaker. For gas appliances, follow the gas procedure as well; on Penfold's calls the gas work is Hiro's. Measure any bus or bulk capacitors until they read near zero (lesson 2).
- Document. Photograph the board, every connector and the harness routing before anything is unplugged. Note any jumpers, keys or switches on the old board.
- Protect. Put on the wrist strap and clip it to the appliance's bare metal chassis.
- Remove. Unplug connectors by their housings, releasing any latch or secondary lock; never pull wires. Remove screws and clips, and lift the board out by its edges.
- Transfer. Move any parts the instructions say to move: brackets, heat sinks with their thermal pads, configuration keys, shields or covers.
- Fit. Take the new board from its bag, check the part number, fit it and its fasteners, and reconnect every connector to match the photographs. Check that each connector is fully seated and latched, and that the harnesses follow their original routing and ties.
- Configure and update. Enter the model configuration, restore calibration offsets and update the software as the instructions require (lessons 8 and 10).
- Test. Restore power, run the component test for the outputs the board controls, then a quick test or full cycle. Measure where the fault was measured before.
- Finish. Clear the fault history after testing, restore the customer's settings, refit all covers and panels, and complete the work order with the measurements, the part number, the software version and the photographs.
- Return. Put the old board in the new board's shielding bag with any required tag or form, for warranty or core return as the maker requires.
Worked problem
Planning time for a board replacement
A main board replacement on a front-loader takes about 15 minutes to remove the top panel and old board, 15 minutes to fit and reconnect the new one, 10 minutes to configure and update, and 20 minutes to run the component test and a quick cycle. Penfold's labor rate is 110 dollars an hour. How long is the job, and what is the labor?
Show solution
- Time:
- \[15 + 15 + 10 + 20 = 60 \text{ minutes}\]
- Labor:
- \[1 \text{ h} \times 110 = 110 \text{ dollars}\]
Answer: About an hour and 110 dollars of labor (sample times; Penfold quotes many board replacements at a flat rate). Testing is a third of the job, and skipping it is how a missed second fault turns into a second visit.
When the new board does not fix it
Occasionally a new board does not cure the fault, or fails quickly. Before ordering another, stop and recheck. Was the cause of the original failure fixed? Is every connector fully seated, and is any connector on the wrong header? Is the configuration correct? Is the software current? Is the board receiving its correct supply? Does the fault history now show a different code? Many "bad new boards" are a second fault that the first board's failure was hiding, or a step missed in the procedure. Technical support (lesson 9) can help, and they will want the measurements.
Hiro's induction call closed the loop neatly. Before fitting the new power board, he had checked each induction coil's resistance and insulation and the cooling fan, so he knew the new board would not meet the same fault. After fitting it, he ran each zone and checked the fan. Then he wrote the bus voltage he measured before removal, the coil readings and the new board's software version on the work order, and put the old board in the silver bag for the maker.
Warranty, cores and returns
Returning the old board is part of the job. Under a maker's warranty, the failed part usually belongs to the maker, who may ask for it back to study the failure or to confirm the claim. Penfold's parts counter tags each returned board with the work order number, the model and serial, the fault and the measurements, and ships it in the new board's shielding bag. Some boards are sold on an exchange basis, with a core charge refunded when the old board is returned; others are simply recycled as electronic waste under the local rules. A board removed in error, for example during diagnosis, that tests good on the next call is not returned to stock without the parts manager's approval, because it may have been damaged in handling.
Customers sometimes ask to keep the old board. On a paid, non-warranty repair the old part normally belongs to the customer, and it can be left with them, in its bag, with a note that it is a failed part. On a warranty repair, explain that the maker requires its return.
Worked problem
Credit from a core return
A remanufactured board costs 280 dollars with a 60-dollar core charge, refunded when the old board is returned. What is the net cost if the core is returned, and what if it is lost?
Show solution
- With the core returned:
- \[280 - 60 = 220 \text{ dollars}\]
- With the core lost: 280 dollars.
Answer: Returning the core saves 60 dollars, which is why the old board goes straight into the new board's bag and onto the parts counter, not into the van's scrap bin.
Common mistakes
MistakeHandling a board without a wrist strap or touching the chassis first.
InsteadStrap to the appliance's bare metal chassis before opening the bag.
MistakeUsing a pink antistatic bag to carry a board.
InsteadKeep boards in their silvery static-shielding bags.
MistakePulling connectors by their wires.
InsteadRelease the latch and pull by the housing.
MistakeSkipping photographs before unplugging.
InsteadPhotograph every connector and the routing first.
MistakeOrdering a second board when a new one does not fix the fault.
InsteadRecheck connectors, configuration, software, supply and the original cause first.
Summary and key terms
- ESD can damage board parts with discharges far too small to feel.
- Damage may be immediate or may cause a failure weeks later.
- A wrist strap with a 1 MΩ resistor, clipped to the chassis, keeps technician and appliance at the same potential.
- Keep boards in static-shielding bags and handle them by the edges.
- Store boards flat, dry and away from heat, and let cold boards warm in their bags.
- Replace a board only when measurement proves it and the cause of damage is fixed.
- Record configuration, calibration and settings, photograph connectors, then follow the maker's procedure.
- Configure, update, test, document and return the old board as required.
- Electrostatic discharge
- A sudden flow of static charge between objects at different potentials.
- Wrist strap
- A conductive band with a resistor that drains static charge to the work.
- Static-shielding bag
- A metallized bag that carries charge around a board.
- Antistatic bag
- A bag that does not charge itself but does not shield its contents.
- Latent damage
- ESD damage that weakens a part so it fails later.
- Core return
- Returning an old part to the maker or supplier, often for credit.
- Configuration key
- A plug-in part that holds a board's model setting.
Practice problems
Work each problem on paper first, then reveal the answer to check.
About what voltage must a discharge reach before a person feels it?
Show answer
About 3,000 V.
Where should a wrist strap's clip be attached?
Show answer
To bare metal of the appliance chassis.
Why does a wrist strap cord contain a resistor?
Show answer
To drain charge slowly and limit current if something live is touched.
What should be done before unplugging any connector on a board?
Show answer
Photograph the connectors and routing.
A new board does not fix the fault. What should be checked before ordering another?
Show answer
Connectors, configuration, software, supply and the original cause.
Lesson quiz · 5 questions
Score 60% or more to complete this lesson.
Create a free account to save your progress, take quizzes and earn a certificate.