
PLB-310 · Lesson 9 of 12 · 21 min
Radiant floor heating: design and installation
Before the concrete topping went down in the Kingsway café, the floor was a sea of red and blue tubing. Maya spent two days with Luis and Raj laying loops at a steady spacing, stapling them to the insulation, and pressure testing every circuit before the concrete truck arrived. "Once the pour starts, nobody gets to fix a kink," Luis said, walking the floor with a marker and a camera. "This floor will heat this room for fifty years. We get one chance to do it right." This lesson covers why radiant floors are so comfortable, how they are designed, the main installation methods, and the details that decide whether a radiant floor works.
Why radiant floors are comfortable
A radiant floor turns the whole floor into a large, gentle emitter. Because the heat comes from the surface people stand on and is delivered mostly by radiation, the room feels warm at a lower air temperature than with convective heat, often a degree or two lower. The air near the floor is warm and the air near the ceiling is not much warmer, the reverse of what happens with baseboard or forced air, where warm air rises and stratifies. There are no visible emitters, no drafts and no noise.
Radiant floors also work at very low water temperatures, often 30 to 45 °C, because the emitter is so large. That makes them ideal for condensing boilers and heat pumps. The trade-off is response time: a concrete slab holds a lot of heat, so it takes hours to warm up or cool down. Radiant slabs suit steady heating and work best with outdoor reset control that adjusts the water temperature gradually, rather than deep night setbacks.
How much heat a floor can deliver
A heated floor transfers heat to the room at about 10.8 W per square metre for each degree that the floor surface is warmer than the room. That rate, the combined radiation and convection coefficient, sets a hard limit on output, because the floor surface cannot be too warm for comfort. Common guidance, including the European standard for floor heating, limits the surface to about 29 °C in occupied areas and about 33 °C in bathrooms and along perimeter strips where people seldom stand. With a 21 °C room, a 29 °C floor delivers about 86 W/m².
If a room's heat loss divided by its usable floor area is higher than that limit, the floor alone cannot heat the room comfortably, and supplemental heat, such as a panel radiator or fan coil, is needed. Areas covered by cabinets, tubs and built-in furniture are not heated floor, so the usable area is often smaller than the room's area.
Floor coverings act as insulation between the warm slab and the room. Tile and stone have very little resistance and are ideal. Hardwood adds some resistance and must be a product rated for radiant heat, kept within the manufacturer's surface temperature limit. Carpet with a thick pad adds a lot, often a thermal resistance of 0.2 m²·K/W or more, which forces higher water temperatures and can make a heat pump system impractical. The floor coverings must be known before the floor is designed.
Installation methods
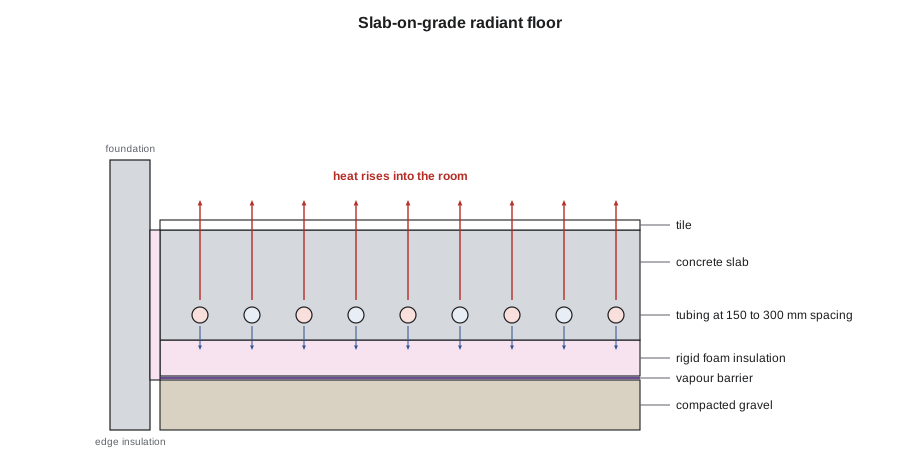
Slab-on-grade systems embed the tubing in a concrete slab poured on the ground or, as at Kingsway, in a concrete topping over the structural slab. Insulation under the slab and around its edges is essential; without it, a large share of the heat goes into the ground. The tubing is fastened to the insulation or to reinforcing mesh at the design spacing, usually 150 to 300 mm (6 to 12 in), and kept at a consistent depth.
Thin-pour systems lay the tubing on a wood subfloor and cover it with a thin layer of gypsum-based or concrete underlayment, about 40 mm (1.5 in) thick. They respond faster than a full slab and suit additions and renovations where the structure can carry the extra weight. The floor height rises, which affects doors and transitions.
Dry systems avoid pouring anything. Tubing runs in grooved panels with aluminium heat transfer plates on top of the subfloor, or is clipped beneath the subfloor between joists with aluminium plates pressing it against the underside. Joist-space systems are common in retrofits where the floor above cannot be raised, but they deliver less heat and need warmer water, and the joist bays below must be insulated so the heat goes up.
Tubing, loops and manifolds
Radiant tubing is almost always PEX or PEX-aluminium-PEX with an oxygen diffusion barrier. Plain plastic tubing lets oxygen slowly pass through its wall into the water, and that oxygen corrodes iron and steel components in the system. Oxygen barrier tubing, made to standards such as DIN 4726, keeps the water almost oxygen-free. Tubing without a barrier should never be used in a heating system with ferrous parts unless a heat exchanger separates the circuits.
Each loop starts and ends at a manifold. A loop's length is limited by its pressure drop: long loops need more head and give uneven heat from start to end. Common maximum lengths are about 90 m for 1/2-inch tubing and about 75 m for 3/8-inch tubing, including the leader lengths running from the manifold to the area being heated. The tubing length needed for an area is roughly the area divided by the spacing, so a 10 m² room at 150 mm spacing needs about 67 m of tubing.
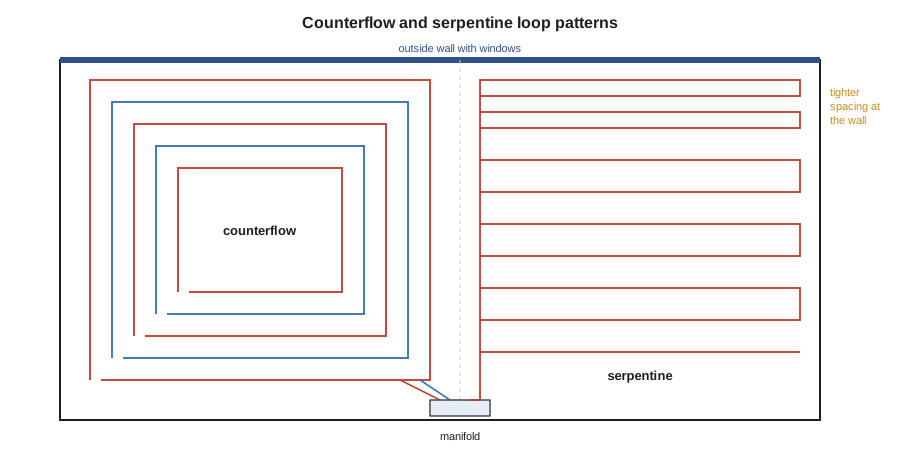
Loops in the same zone should be close to equal in length so they share flow evenly, or the manifold's balancing valves or flow meters must be set to give each loop its share. Tubing is laid in a counterflow or serpentine pattern. In a counterflow, or spiral, pattern, supply and return tubes run side by side, so the floor temperature evens out across the area. A serpentine pattern sends the hottest water to one end first, which can be used deliberately to put more heat along a cold outside wall or under a large window.
Worked problem
Designing the café floor
The café's heated area, excluding the kitchen line and counters, is 85 m², and its design heat loss is 5.1 kW. The floor will be tile. Is the floor surface temperature acceptable, about what average water temperature is needed, and how many 1/2-inch loops are needed at 150 mm spacing?
Show solution
- Required output: 5,100 ÷ 85 = 60 W/m².
- Floor surface temperature: 21 + 60 ÷ 10.8 = 26.6 °C, below the 29 °C limit.
- Resistance from water to room: tile 0.01, slab around tubing at 150 mm about 0.05, surface 1 ÷ 10.8 = 0.093, total about 0.15 m²·K/W.
- Average water temperature: 21 + 60 × 0.15 ≈ 30 °C, so a supply of about 33 °C with a 6 K drop.
- Tubing: 85 ÷ 0.15 ≈ 570 m. Each loop can be up to 90 m, but about 10 m of that is leader, so each loop covers about 80 m of floor: 570 ÷ 80 ≈ 7.1, so 8 loops.
Answer: The floor works comfortably at about 33 °C supply water, which the injection mixing station from Lesson 6 provides. Eight loops of nearly equal length run back to a manifold in a closet beside the kitchen.
# Radiant floor check: surface temperature, water temperature and loop count
import math
def radiant(load_w, area_m2, r_cover, spacing_m, t_room=21.0, r_slab=None, max_loop=90.0, leaders=10.0):
    q = load_w / area_m2
    t_floor = t_room + q / 10.8
    r_slab = r_slab if r_slab is not None else 0.05 + (spacing_m - 0.15) * 0.2
    t_water = t_room + q * (r_cover + r_slab + 1 / 10.8)
    tubing = area_m2 / spacing_m
    loops = math.ceil(tubing / (max_loop - leaders))
    return q, t_floor, t_water, tubing, loops

for cover, r in [("tile", 0.01), ("hardwood", 0.07), ("carpet and pad", 0.20)]:
    q, tf, tw, tube, n = radiant(5100, 85, r, 0.15)
print(f"{cover:15s} {q:4.0f} W/m2 floor {tf:4.1f} C avg water {tw:4.1f} C {tube:4.0f} m in {n} loops")tile 60 W/m2 floor 26.6 C avg water 30.2 C 567 m in 8 loops hardwood 60 W/m2 floor 26.6 C avg water 33.8 C 567 m in 8 loops carpet and pad 60 W/m2 floor 26.6 C avg water 41.6 C 567 m in 8 loops
The script shows how much the floor covering matters. The same café floor under thick carpet would need water several degrees warmer than under tile; with a heat pump, those degrees cost efficiency every hour of the season. When owners choose flooring after the radiant design is done, the designer must check the new covering against the design.
Before, during and after the pour
The tubing is pressure tested before it is covered, usually with air or water at a pressure set by the manufacturer and the specification, often around 700 kPa, and held for a set time with no loss. At Kingsway, Luis kept the loops under pressure with a gauge on the manifold during the whole pour, so that any damage from a boot, a wheelbarrow or a concrete pump hose would show up at once as a drop in pressure, while the concrete was still wet and the tube could be repaired.
Tubing is never cut and joined under a slab unless an approved, buried-rated coupling is unavoidable, and every coupling is recorded on the drawings. Where tubing passes through a control joint or expansion joint in the slab, it is sleeved so the slab's movement does not shear it. Maya photographed every room from several angles with a tape measure in the frame, so that anyone drilling into the floor later could see where the tubes run. Those photos went into the handover file along with the loop schedule, the test record and the manifold flow settings.
After the pour, concrete must cure before the floor is heated. The manufacturer of the concrete or underlayment specifies how long to wait and how slowly to raise the temperature, typically starting with low water temperatures and increasing in steps over days, so the slab does not crack.
Radiant floors in houses and retrofits
In houses, radiant floors are most common in basements, where a slab is being poured anyway, in bathrooms and kitchens with tile, and in new houses built around a heat pump. A basement slab with insulation underneath turns a cold concrete floor into the most comfortable room in the house. In a retrofit, a thin pour over an existing wood floor or a joist-space system under it can add radiant heat to one or two rooms without changing the rest of the system.
Bathroom floors are a special case. Owners often want a warm floor even in summer, when the house needs no heat, and the floor area is small and partly covered by the tub, vanity and toilet. Small electric mats under tile are often used for comfort alone, while a hydronic loop works well when it can run with the rest of the heating. The heat output of a bathroom floor is rarely enough to heat the room by itself on a cold day, so a towel warmer or small radiator usually helps.
Whatever the method, a radiant floor needs controls that respect its slow response. A slab thermostat with a floor sensor protects wood floors from overheating. Outdoor reset, covered in the next lesson, matches the water temperature to the weather so the slab is never far from where it needs to be. Owners should be told that a radiant floor feels different from a radiator: it never feels hot to the touch, and it should be left at a steady setting rather than turned up and down.
Common mistakes
MistakeDesigning the floor before the floor coverings are known.
InsteadConfirm coverings first; carpet and pad can raise the required water temperature sharply.
MistakeLeaving out insulation under or at the edges of a slab.
InsteadInsulate below and at the edges so heat goes up, not into the ground.
MistakeUsing tubing without an oxygen barrier in a system with iron parts.
InsteadUse oxygen barrier PEX or separate the circuits with a heat exchanger.
MistakeMaking loops much longer than the limit or very unequal.
InsteadKeep loops within the length limit and close to equal, and balance them at the manifold.
MistakePouring concrete over tubing that is not under pressure.
InsteadPressure test before the pour and keep the loops pressurized during it.
Summary and key terms
- Radiant floors deliver mostly radiant heat at low water temperatures and give even, quiet comfort.
- Output is about 10.8 W/m² per degree of floor-to-room difference, limited by a surface temperature of about 29 °C in occupied areas.
- Floor coverings add resistance; tile is best and thick carpet is worst.
- Methods include slab-on-grade, thin pour and dry panel or joist-space systems.
- Use oxygen barrier PEX, equal loops within length limits and a balanced manifold.
- Pressure test before and during the pour, sleeve tubing at joints and record tube locations.
- Radiant floor
- A heated floor that warms a room mainly by radiation from its surface.
- Oxygen diffusion barrier
- A layer in plastic tubing that stops oxygen passing through the tube wall into the water.
- Manifold
- A pair of headers that supply and collect the loops of a radiant zone.
- Loop
- One continuous run of tubing from the supply manifold to the return manifold.
- Counterflow pattern
- A layout in which supply and return tubes alternate, evening out floor temperature.
- Thin pour
- A thin layer of gypsum or concrete underlayment poured over tubing on a wood subfloor.
- Leader
- The length of tubing between the manifold and the area a loop heats.
Practice problems
Work each problem on paper first, then reveal the answer to check.
A floor must deliver 70 W/m² to a 21 °C room. What is its surface temperature?
Show answer
21 + 70 ÷ 10.8 ≈ 27.5 °C.
How much 150 mm spaced tubing does a 12 m² room need?
Show answer
12 ÷ 0.15 = 80 m, plus leaders.
Why does carpet raise the water temperature a radiant floor needs?
Show answer
It adds thermal resistance between the slab and the room.
Why must radiant tubing have an oxygen barrier?
Show answer
Oxygen passing through the wall corrodes iron and steel components.
Why are loops kept under pressure during a pour?
Show answer
Any damage shows up immediately as a pressure drop while it can still be repaired.
What is the main drawback of a radiant slab's large mass?
Show answer
Slow response to changes in demand.
Lesson quiz · 5 questions
Score 60% or more to complete this lesson.
Create a free account to save your progress, take quizzes and earn a certificate.