
PHOT-499 · Lesson 9 of 12 · 30 min
The final output: exhibition, book or screen
The final output is where the body of work meets its public, and it carries the largest single weight in the course. Most capstones end in a group exhibition in week 13, with each student's work installed in an allocated space, often accompanied by a book dummy or a screen-based piece. PHOT-430 taught the full craft of photobook design and production and of exhibition planning, design, installation and lighting, and PHOT-301 taught fine printing; PHOT-440 covered video delivery for hybrid pieces. This lesson is about delivering those outputs within the capstone's fixed timeline: choosing the right form, ordering and proofing, working with labs, framers and printers, installing, opening and documenting the show.
Choosing the form of the output
The output should serve the work, not the other way round. Ask how the work is best experienced: as large objects in space, in a sequence held in the hands, on a screen with time and sound, or in a combination. Consider your allocated space, budget and lead times, and the professional destination you are aiming for: documentary editors may care most about a strong book dummy and a digital edit, while galleries and grant juries want to see how the work holds a wall. Many capstones combine a modest wall presentation with a book dummy that carries the fuller edit, which is what Amara chose.
| Form | Strengths | Main demands | Lead time drivers |
|---|---|---|---|
| Framed prints | Presence, scale, conventional gallery form | Printing, framing, hanging, budget | Lab and framer |
| Unframed prints (pinned, float-mounted, clipped) | Lower cost, direct, flexible | Careful handling and installation | Lab |
| Book dummy | Full sequence, portable, lasting | Design, prepress, proof | Print-on-demand or bindery |
| Screen or projection | Time, sound, motion, large edit | Equipment, loop file, room control | Equipment booking |
| Combination | Different edits for different modes | Coordination and consistency | All of the above |
The output timeline
Output tasks sit on the critical path identified in lesson 3. Count back from the opening: installation needs the finished pieces a day or two before; framing typically needs one to two weeks after prints arrive; labs need several working days plus shipping; book proofs from print-on-demand services commonly take one to three weeks including shipping; and every external step should have a buffer. Ask suppliers for current lead times when you request quotes, because they lengthen in busy seasons when every graduating class orders at once.
| Week | Task |
|---|---|
| 9 | Final edits fixed; quotes from two labs and two framers; book design begins |
| 10 | Test prints of four images on two papers; choose paper; flatplan approved |
| 10 | Book files uploaded; proof ordered |
| 11 | Full print order placed; frames ordered; labels and wall text designed |
| 12 | Prints collected and inspected; framing; book proof checked |
| 12 | Installation over two days; lighting adjusted |
| 13 | Opening night; final critique and defence |
Test prints and proofing
Never send a full order to a lab without test prints. Choose three or four images that represent the range of the work, such as a dark interior, a skin-tone portrait, a bright scene and the image with the most delicate colour, and print them at final size or as large strips on the papers you are considering. View them under lighting similar to the venue's. Compare with your soft proofs (PHOT-301 lesson 6 and PHOT-430 lesson 6) and adjust masters if shadows block up, colours shift or the paper's texture changes the feel. Record which paper, profile and settings you approved so that the full order matches.
Worked problem
Costing the print and framing order
Amara's lab charges 38 per 40 by 50 cm print on cotton rag paper, with a 10 per cent student discount, plus a flat 20 shipping fee. Her framer quotes 62 per frame for 11 frames and 45 per float mount for 4 prints, after the change in lesson 5. Three of the eighteen wall images are shown unframed, pinned with magnets. Tax is added at 13 per cent. What is the total, before contingency?
Show solution
- Prints: \( 18 \times 38 \times 0.9 = 615.60 \), plus shipping 20, giving 635.60.
- Framing and mounting: \( 11 \times 62 + 4 \times 45 = 682 + 180 = 862 \).
- Subtotal: \( 635.60 + 862 = 1497.60 \); with 13 per cent HST, as in Ontario: \( 1497.60 \times 1.13 \approx 1692.29 \).
Answer: About 1,692 including HST. Tax rates differ by province (GST, HST or GST plus PST), so use your own. The total is above the 1,500 budgeted for prints and framing, so the 120 of headroom recovered in lesson 5 matters.
The arithmetic shows why output budgets drift: discounts, shipping, a change in presentation and tax all move the total. Get written quotes that include every charge, and confirm whether educational pricing applies before ordering.
Working with labs, framers and printers
Suppliers are partners. Give them clear specifications in writing: file names, sizes, paper, finish, borders, quantities, delivery date and contact details, plus a reference print or proof where colour matters. Follow their file requirements exactly, including colour space, resolution and sharpening; PHOT-430 lesson 7 explains what printers and labs typically ask for. Inspect everything on delivery under good light, in clean conditions, before signing off, and report problems immediately. A professional, courteous relationship pays off when you need a rush job or a reprint.
| Item | Specification |
|---|---|
| Files | NS_4120_print_40x50.tif to NS_5532_print_40x50.tif, 18 files |
| Size and border | 40 x 50 cm, 2 cm white border included in file |
| Paper | Cotton rag matte, 310 gsm, as test print T3 |
| Colour | Files in Adobe RGB with embedded profile; lab profile used for soft proof |
| Finish | No coating; interleave with tissue |
| Delivery | Collect Tuesday week 12, before 16:00 |
| Contact | Mobile number and email; approve substitutions by phone only |
The book dummy
A book dummy is a finished or near-finished prototype of a book. For a capstone it is often produced through a print-on-demand service, which allows a single copy at modest cost, or hand-bound from inkjet prints. PHOT-430 lessons 3 to 7 cover structure, design, materials, prepress and production. In the capstone timeline the key risks are late design, files that fail the service's checks, and a proof that arrives with problems and no time to reorder. Upload files early enough to receive one proof, correct it and order a second if needed.
Worked problem
Print-on-demand unit costs
A print-on-demand service charges a base price of 18 per hardcover book plus 0.32 per page for premium colour pages, with shipping of 14 per order. Amara orders two copies of her 40-page dummy: one for the exhibition and one for her portfolio. Later she considers a small run of 20 copies for subjects and partners. What are the unit costs?
Show solution
- Per book: \( 18 + 40 \times 0.32 = 18 + 12.80 = 30.80 \).
- Two copies: \( 2 \times 30.80 + 14 = 75.60 \), or 37.80 each.
- Twenty copies with one shipping charge: \( 20 \times 30.80 + 14 = 630 \), or 31.50 each.
Answer: About 37.80 each for two copies and 31.50 each for twenty. Print-on-demand pricing barely falls with quantity; for runs of a few hundred, PHOT-430 lesson 7 shows when offset printing becomes cheaper per copy.
Screen-based and hybrid pieces
A screen piece can be a projected sequence, a monitor showing a loop, or a short film made with the methods of PHOT-440. Plan the equipment early: what the venue provides, what you must book from the school, how it is mounted, powered and secured, and whether sound is allowed or needs headphones. Make a loop file that plays without menus or interruptions, test it on the actual equipment in the actual space, and check brightness, colour and audio levels there. Include captions for any spoken content, and a short label explaining duration and loop.
Amara dropped her audio slideshow in week 7 to save time, but she kept a small screen near the end wall that showed, as a silent loop, the subjects' own quotes typed over black, timed at a comfortable reading speed. It cost almost nothing, used material she already had, and gave the workers' voices a place in the room.
Planning the installation
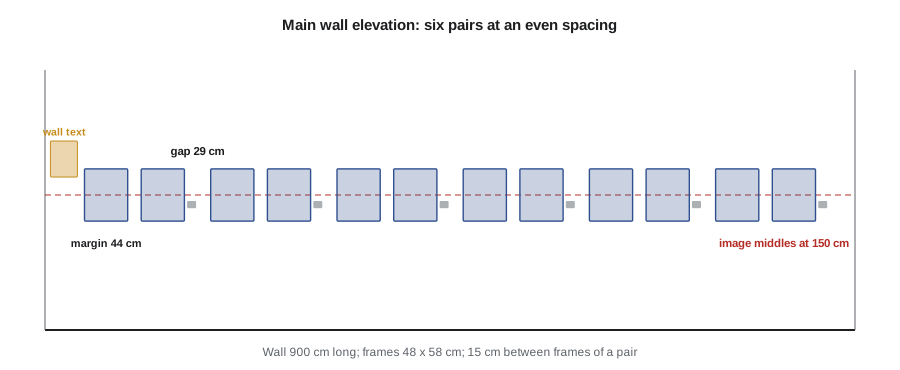
Plan the installation on paper before you arrive. Measure your allocated wall or space, draw an elevation to scale, and lay out the images with their sizes, gaps and the centre line at which the middle of each image hangs. Many galleries hang to a centre line of about 145 to 152 cm (57 to 60 in) from the floor, but follow the venue's standard. Equal gaps look orderly; varied gaps can group pairs. Leave room for the wall text and labels. Mark positions with low-tack tape on the day, hang from the centre outward, and check levels and heights with a laser level or tape measure.
Worked problem
Spacing images along a wall
Amara's main wall is 900 cm long. She is hanging 8 pairs of framed prints, each frame 48 cm wide, with 15 cm between the two frames of a pair. She wants equal gaps between pairs and equal margins at each end, with the end margins 1.5 times the gap between pairs. How wide is each gap?
Show solution
- Width of one pair: \( 48 + 15 + 48 = 111 \) cm. Eight pairs: \( 8 \times 111 = 888 \) cm.
- Remaining space: \( 900 - 888 = 12 \) cm, far too little for gaps and margins.
- With 6 pairs instead: \( 6 \times 111 = 666 \) cm, leaving 234 cm. There are 5 gaps between pairs and 2 end margins of 1.5 gaps each: \( 5g + 3g = 8g = 234 \), so \( g \approx 29 \) cm and each margin about 44 cm.
Answer: Eight pairs do not fit on a 900 cm wall. Six pairs fit with gaps of about 29 cm and end margins of about 44 cm; Amara moves two pairs to the end wall, which also gives the sequence a pause at the corner.
def layout(wall, widths, inner, margin_ratio, pair=True):
    units = [widths[i] + inner + widths[i + 1] for i in range(0, len(widths), 2)] if pair else widths
    used = sum(units)
    n_gaps = len(units) - 1
    g = (wall - used) / (n_gaps + 2 * margin_ratio)
    if g <= 0:
        return None
    x, pos = margin_ratio * g, []
    for u in units:
        pos.append((round(x, 1), round(x + u, 1)))
        x += u + g
    return round(g, 1), pos
for pairs in (8, 7, 6):
    r = layout(900, [48] * (2 * pairs), 15, 1.5)
print(pairs, 'pairs:', 'does not fit' if r is None or r[0] < 20 else f'gap {r[0]} cm, first pair at {r[1][0]}')8 pairs: does not fit 7 pairs: does not fit 6 pairs: gap 29.2 cm, first pair at (43.9, 154.9)
The calculator confirms that seven pairs technically fit but with gaps too tight to read the pairs as separate units, which is why the code treats a gap under 20 cm as not fitting. Amara's printed elevation goes into her installation kit with a tape measure, level, pencil, low-tack tape, hanging hardware, cotton gloves, a lint-free cloth, spare labels and a small first-aid kit.
Installation day and lighting
Arrive with everything you need and a printed plan. Unwrap prints and frames on a clean surface, wearing cotton or nitrile gloves, and check each for damage. Hang the anchors of the layout first, such as the first and last images or the centre pair, then fill in. Check from a distance and from the entrance. Adjust lighting so that light falls evenly on each piece without glare on glazing; PHOT-430 lesson 11 covers lighting angles, illuminance and accessibility. Install labels and wall text last, level with each other and at a readable height. Photograph the finished installation for your portfolio before the opening crowd arrives.
| Before hanging | During | After |
|---|---|---|
| Inspect every piece under good light | Hang anchors first, then fill in | Photograph the installation wide and in detail |
| Lay out pieces against the wall in order | Check level and centre line on each | Clean glazing and floor |
| Confirm wall text and label positions | Step back and view from the entrance | Test lights, screen and loop |
| Check tools and hardware | Adjust gaps by eye if needed | Leave contact details with the venue |
The opening and the run
The opening is a professional event as well as a celebration. Invite the people in the work and the site partners, as well as family, friends, potential employers and local press; lesson 10 covers announcing the show online. Prepare a short spoken introduction to your work in case you are asked, and be ready to talk about it with visitors. Have a simple price list or a contact card ready if you will sell prints, following the pricing methods in PHOT-410 and any rules your school has about sales. During the run, check the installation regularly for damage or problems.
Documenting and closing
Documentation outlives the exhibition. Photograph the installation with even light, square to the walls, at a time when the space is empty, and add a few images with visitors for atmosphere. Record a short video walk-through if possible. At the close, de-install carefully, wrap pieces, patch and paint walls if the venue requires it, and return borrowed equipment. Deliver promised prints and book copies to subjects and partners promptly; it is the last step of keeping your word, and many professional relationships begin there.
Common mistakes
MistakeOrdering the full print run without test prints
InsteadMake test prints of representative images under venue-like light and record the approved settings.
MistakeLeaving book proof orders until the last weeks
InsteadUpload files early enough to receive, correct and reorder a proof.
MistakeArriving at installation without a scaled plan
InsteadDraw an elevation with sizes, gaps and the centre line, and bring a complete installation kit.
MistakeForgetting tax, shipping and presentation changes in output costs
InsteadGet written quotes with every charge and recalculate after any change.
MistakeTreating the opening as the end of the project
InsteadDocument the installation, de-install carefully and deliver promised prints and books.
Summary and key terms
- Choose the output form that serves the work, the space and your professional goals.
- Output tasks sit on the critical path; count back from the opening with buffers.
- Test prints of representative images prevent costly full-order mistakes.
- Give suppliers written specifications and inspect deliveries before signing off.
- Order book proofs early enough for one round of correction.
- Plan installations with a scaled elevation, centre line and calculated spacing.
- Document the installation and keep promises to subjects after the show.
- Output
- The finished form in which the body of work is presented.
- Test print
- A print made to check paper, colour and tone before a full order.
- Book dummy
- A prototype of a book, made as a single copy or small run.
- Print-on-demand
- Printing single copies or small quantities as ordered.
- Float mount
- Mounting a print so it appears to float in front of a backing, often without a mat.
- Elevation
- A scaled drawing of a wall showing the layout of works.
- Centre line
- The height at which the centres of hung images are aligned.
- Loop file
- A video or slideshow file prepared to play continuously without interruption.
- Installation shot
- A photograph documenting work as installed.
- De-installation
- Taking down an exhibition and restoring the space.
Practice problems
Work each problem on paper first, then reveal the answer to check.
Ten prints cost 40 each with a 15 per cent discount and 25 shipping. What is the cost?
Show answer
\( 10 \times 40 \times 0.85 + 25 = 365 \).
Four frames 50 cm wide hang on a 400 cm wall with equal gaps and margins equal to the gaps. How wide is each gap?
Show answer
\( (400 - 200)/5 = 40 \) cm.
A book costs 15 plus 0.30 per page. What does a 48-page copy cost?
Show answer
\( 15 + 14.40 = 29.40 \).
Which images make good test prints?
Show answer
A representative range: dark, skin tones, bright and delicate colour.
What centre line height do many galleries use?
Show answer
About 145 to 152 cm (57 to 60 in).
Name four items in an installation kit.
Show answer
Tape measure, level, low-tack tape, gloves, hardware, cloth and spare labels.
Why test a loop file on the venue's equipment?
Show answer
Brightness, colour, audio and playback can differ from your computer.
Why upload book files early?
Show answer
To allow a proof, a correction and a reorder within the timeline.
What should installation shots look like?
Show answer
Even light, square to the walls, the space empty, plus a few with visitors.
What is the last step of keeping your word to subjects?
Show answer
Delivering promised prints and book copies promptly.
Lesson quiz · 5 questions
Score 60% or more to complete this lesson.
Create a free account to save your progress, take quizzes and earn a certificate.