
PHOT-330 · Lesson 8 of 12 · 27 min
Wildlife photography: fieldcraft, gear and technique
Wildlife photography combines natural history, patience and fast technique. The subject moves, decides when to appear and must not be disturbed. The best wildlife photographers are often naturalists first: they understand an animal's habits, seasons and signs, and they put its welfare ahead of the picture. This lesson covers fieldcraft and behaviour, lenses and reach, the arithmetic of how large an animal will appear in the frame, autofocus and shutter speed for action, hides and vehicles, composition and light for wildlife, and the ethical basics that Lesson 10 develops in detail.
Know the animal
Good wildlife images start long before you lift the camera. Learn where and when your subject feeds, rests, breeds and travels; what time of day it is active; how it reacts to people; and what signs of stress look like. Field guides, local naturalists, park staff, research papers and citizen-science databases are valuable sources. Many species are most active at dawn and dusk, which coincides with the best light, but also the hours when animals may be most sensitive to disturbance.
Signs of stress or disturbance vary by species but commonly include an animal stopping feeding to stare at you, raising its head repeatedly, flicking ears or tail, moving away, alarm calls, a bird flushing from its nest or perch, and, in larger mammals, bluff charges, huffing or jaw-popping in bears. If an animal changes its behaviour because of you, you are too close. Back away slowly.
Fieldcraft
Fieldcraft is the set of skills for getting close to wildlife without disturbing it: moving slowly and quietly, staying low, using cover, approaching at an angle rather than directly, avoiding eye contact with nervous animals, and wearing muted clothing that blends with the background. Wind direction matters for mammals with a keen sense of smell, such as deer, moose and bears: approach from downwind so your scent is carried away. Patience is the most important skill. Many professionals sit for hours in one place and let animals come to them, which produces more natural behaviour than chasing.
Roads and trails let animals become habituated to people and vehicles, which can make them appear tame. Habituation is not the same as being safe: habituated animals, especially bears, elk and coyotes, can become dangerous, and animals that lose their fear of people are often relocated or destroyed. The phrase “a fed bear is a dead bear” sums up why feeding or luring wildlife is so harmful.
Lenses and reach
Most wildlife photography needs long focal lengths to fill the frame from a respectful distance. Common choices include 100 to 400 mm and 150 to 600 mm zooms, 500 and 600 mm primes, and 800 mm lenses for small birds. Crop-sensor cameras multiply the effective field of view by their crop factor, about 1.5 or 1.6 for APS-C, which many wildlife photographers find useful. Teleconverters, which fit between lens and camera, multiply focal length by 1.4 or 2, at the cost of one or two stops of light and some sharpness and autofocus speed.
| Setup | Effective focal length (full-frame equivalent) | Light loss |
|---|---|---|
| 600 mm on full frame | 600 mm | — |
| 600 mm on APS-C (1.5×) | 900 mm field of view | — |
| 600 mm f/4 + 1.4× teleconverter | 840 mm at f/5.6 | 1 stop |
| 600 mm f/4 + 2× teleconverter | 1,200 mm at f/8 | 2 stops |
| 400 mm on micro four thirds (2×) | 800 mm field of view | — |
How big will the animal be?
The fraction of the frame an animal fills depends on its size, distance and focal length. On a full-frame sensor 36 mm wide, the width of the scene at distance \( d \) is \( W = 36d/f \), as in Lesson 3. Rearranging gives the focal length needed for an animal of length \( L \) to fill a chosen share \( k \) of the frame width:
with \( d \) and \( L \) in the same units and \( f \) in millimetres.
Worked problem
Photographing a bear from a legal distance
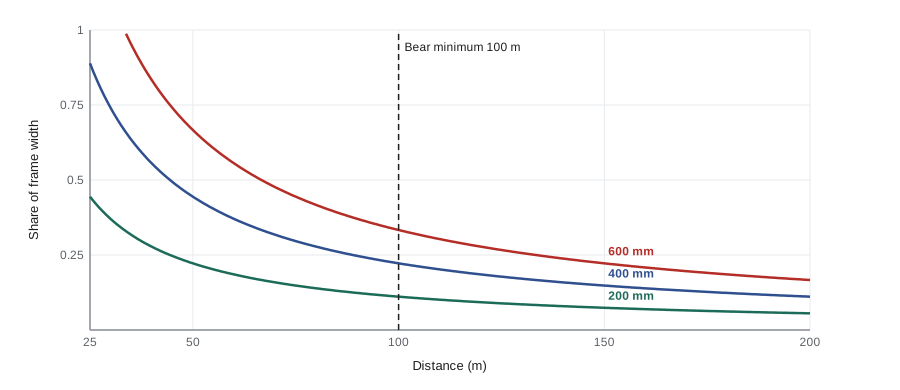
In Banff National Park, visitors must stay at least about 100 m from bears. A grizzly bear about 2 m long is 100 m away. What focal length on full frame makes the bear fill one third of the frame width? What if the photographer uses an APS-C camera?
Show solution
- \( f = 36 \times 100 \times (1/3) / 2 = 600 \) mm.
- On APS-C (crop 1.5), the same framing needs 600 / 1.5 = 400 mm.
Answer: About 600 mm on full frame or 400 mm on APS-C. Even with a long lens, a bear at the minimum distance will not fill the frame; environmental portraits showing habitat are often stronger than tight frames anyway. Never move closer to fill the frame.
Small birds are even more demanding. A songbird 12 cm long at 8 m needs about \( 36 \times 8 \times 0.3 / 0.12 = 720 \) mm on full frame to fill 30 percent of the width. That is why bird photographers often use 600 to 800 mm with crop sensors, and why feeders and hides, used ethically, are common.
Autofocus for wildlife
Modern autofocus systems with subject detection for animals, birds and eyes have transformed wildlife photography. Typical settings are continuous autofocus (AF-C or AI Servo), with a zone or tracking area, and animal-eye detection on. Back-button focus, introduced in Lesson 4, lets you keep focus tracking on a moving animal without the shutter release interfering, or hold focus while waiting for a pose. Adjust tracking sensitivity: low sensitivity keeps focus on a bird even if a branch crosses in front; high sensitivity switches quickly to a new subject.
Autofocus struggles with low contrast, low light, busy backgrounds such as branches in front of a perched bird, and small subjects against a bright sky. A single-point focus area placed precisely on the eye, or manual focus through foliage, can solve these problems.
Shutter speed for wildlife
Animals move unpredictably, and long lenses magnify camera shake. A rough guide for handheld sharpness, sometimes called the reciprocal rule, is a shutter speed of at least 1 over the effective focal length, for example 1/600 s at 600 mm on full frame, though stabilization allows slower speeds for still subjects. For action, the subject's motion matters more than camera shake.
| Subject and action | Typical shutter speed |
|---|---|
| Resting mammal, stabilized lens | 1/125 to 1/500 s |
| Walking mammal | 1/500 to 1/1,000 s |
| Running deer or wolf | 1/1,600 to 1/3,200 s |
| Large bird in flight (eagle, heron) | 1/1,600 to 1/2,500 s |
| Small bird in flight or hummingbird wings | 1/4,000 s or faster, or flash |
Worked problem
Freezing a bird in flight
A bald eagle flies across the frame at 13 m/s, 30 m away, photographed with a 600 mm lens on a full-frame camera with 4.4 µm pixels. How much does it blur at 1/1,000 s and at 1/2,500 s?
Show solution
- Blur on the sensor: \( b = v t f / d \).
- At 1/1,000 s: \( 13 \times 0.001 \times 0.6 / 30 = 0.00026 \) m = 260 µm, about 59 pixels.
- At 1/2,500 s: 260 × (1,000 / 2,500) ≈ 104 µm, about 24 pixels.
Answer: About 59 pixels at 1/1,000 s and 24 pixels at 1/2,500 s. Panning with the bird cancels most of the body's motion, which is why panning technique and continuous autofocus are essential; the wing tips, which move faster than the body, will still show some blur, often a pleasing sign of motion.
Fast shutter speeds at the long end of a zoom often require high ISO in early-morning light. Modern sensors handle ISO 3,200 to 6,400 well, and noise reduction software has improved, so many wildlife photographers use auto ISO with a minimum shutter speed and accept noise rather than blur.
Supports, hides and vehicles
Long lenses are heavy. A sturdy tripod with a gimbal head lets the lens balance and swing freely to follow movement; a monopod gives mobility; a beanbag on a car window or the ground gives a stable low position. Shooting from ground level, at the animal's eye height, creates intimate images with soft foregrounds and backgrounds.
Hides, also called blinds, conceal the photographer. They range from simple camouflage netting to portable tents and permanent wooden structures at wetlands or feeding sites. Animals often accept a hide that has been in place for a while. Vehicles act as mobile hides: many animals tolerate cars better than people on foot. In many parks, though, you must stay in your vehicle near certain animals, must not stop in traffic lanes, and must not block roads. Creating "bear jams" by stopping on highways is dangerous and in some parks illegal.
Hides and vehicles still require care. Do not use them to approach closer than allowed, and leave if animals show signs of stress.
Composition and light for wildlife
Wildlife images benefit from the same compositional thinking as landscapes. Give a moving animal space to move into in the frame; place the eye on a third or at a strong point; keep backgrounds clean by changing your angle or using a wide aperture; and include habitat when it tells a story. Eye contact and catchlights, the small reflections of light in the eyes, bring images to life. Behaviour, such as feeding, interaction, play or territorial displays, is usually more interesting than a static portrait.
Light for wildlife follows landscape principles: the soft, warm light of early and late day is flattering, while backlight can outline fur and feathers with a rim of light. Overcast light suits dark animals and forest species. Harsh midday light creates strong shadows under brows and dark eyes, though it can work for some birds on open water.
Environmental portraits and storytelling
An environmental portrait shows an animal small in its landscape: a caribou herd crossing tundra, a heron in a vast marsh, a mountain goat on a cliff face. Such images often say more about the species and its habitat than a frame-filling close-up, and they can be made from greater distances with shorter lenses, reducing disturbance. Combining wide habitat shots, mid-range behaviour images and close details builds a wildlife story, the approach used in conservation and editorial assignments.
Ethics in brief
Lesson 10 covers wildlife ethics and law in depth, but the basic rules apply to every outing: keep a respectful distance and obey park minimums; never feed, bait or lure animals in ways that harm them or are prohibited; do not disturb nests, dens or young; avoid playing calls or recordings during breeding season and where prohibited; and be cautious about sharing exact locations of sensitive species, which can attract crowds or poachers. If an animal is disturbed, the picture has already failed.
Keeping a wildlife field log
Many wildlife photographers keep a log of sightings: date, time, place, weather, species, behaviour and distance. Over seasons, the log reveals patterns, such as when a heron feeds at a particular pond or when deer cross a meadow, which helps you plan without searching blindly. Logs can also be shared with citizen-science projects that track species and contribute to conservation.
Common mistakes
MistakeMoving closer to fill the frame.
InsteadKeep the legal and ethical distance and use a longer lens, crop or an environmental composition.
MistakeMistaking habituated animals for safe ones.
InsteadTreat all wild animals as wild and keep your distance.
MistakeUsing 1/500 s for birds in flight.
InsteadStart around 1/2,000 s or faster and pan with the bird.
MistakeStopping on a highway to photograph roadside wildlife.
InsteadPull fully off the road where permitted or keep driving.
MistakeMaking only tight portraits.
InsteadShow behaviour and habitat to tell a fuller story.
Summary and key terms
- Know the animal's habits and signs of stress; if behaviour changes, you are too close.
- Fieldcraft means moving slowly, staying low, using cover, watching the wind and waiting.
- Long lenses, crop sensors and teleconverters add reach; teleconverters cost light.
- Focal length to fill share \( k \) of the frame: \( f = 36dk/L \) on full frame.
- Continuous autofocus with animal-eye detection and back-button focus suit wildlife.
- Birds in flight need about 1/2,000 s or faster; blur is \( vtf/d \).
- Hides and vehicles reduce disturbance; environmental portraits often tell better stories.
Practice problems
Work each problem on paper first, then reveal the answer to check.
Effective focal length of 400 mm on APS-C (1.6×)?
Show answer
640 mm field of view.
What does a 2× teleconverter do to a 300 mm f/4 lens?
Show answer
It becomes 600 mm at f/8, losing 2 stops.
Focal length on full frame for a 1 m deer at 50 m to fill half the width?
Show answer
36 × 50 × 0.5 / 1 = 900 mm.
Frame width at 30 m with 500 mm on full frame?
Show answer
36 × 30 / 500 = 2.16 m.
Blur of a bird at 10 m/s, 20 m, 400 mm, 1/2,000 s?
Show answer
10 × 0.0005 × 0.4 / 20 = 100 µm.
Reciprocal-rule shutter speed for 600 mm handheld?
Show answer
About 1/600 s or faster (stabilization can allow slower).
Why approach mammals from downwind?
Show answer
So your scent is carried away from them.
Give two signs that a bird is disturbed.
Show answer
It stops feeding to stare, gives alarm calls or flushes.
What does back-button focus allow?
Show answer
Tracking or holding focus independently of the shutter release.
Why are environmental portraits useful?
Show answer
They show habitat and can be made from farther away, reducing disturbance.
Lesson quiz · 5 questions
Score 60% or more to complete this lesson.
Create a free account to save your progress, take quizzes and earn a certificate.