
PHOT-330 · Lesson 5 of 12 · 31 min
Filters: polarizers, neutral density and graduated filters
Filters were once essential in film photography, when colour correction and contrast control had to happen in camera. Digital processing has replaced many of them, but three kinds remain central to landscape and nature work because their effects cannot be fully recreated afterwards: circular polarizers, neutral density (ND) filters and, to a lesser extent, graduated neutral density filters. This lesson explains how each works, how to calculate the exposure changes they cause, how to choose and care for them, and when exposure blending in software is a better choice than a graduated filter.
How filters attach
Filters come in two main systems. Screw-in filters thread onto the front of the lens; they are compact, quick to fit and seal well, but you need a different size for each lens diameter unless you use step-up rings. Square or rectangular filter systems use a holder clipped to an adapter ring on the lens; slot-in filters, usually 100 mm wide, can be stacked and slid up and down, which is essential for graduated filters. Many photographers carry a screw-in polarizer and a holder system for NDs and graduated filters. Magnetic systems that snap filters onto a ring are a newer option that speeds changes in cold weather.
Filter quality matters. A cheap filter adds a colour cast, reduces sharpness or causes flare, undermining an expensive lens. Look for optical glass, good coatings and neutral colour, and test new filters by comparing frames with and without them.
Circular polarizers
Light reflected from non-metallic surfaces such as water, wet leaves, glass and rock becomes partly polarized: its waves vibrate more in one direction. Light from blue sky at about 90 degrees from the sun is also strongly polarized by scattering in the atmosphere. A polarizing filter passes light vibrating in one direction and blocks light at right angles, so rotating it selectively cuts these reflections and darkens parts of the sky.
The effects are distinctive and cannot be reproduced reliably in software:
- Removing reflections from water reveals rocks, plants and fish below the surface, or deepens the colour of a lake.
- Cutting glare on wet foliage makes forest greens and autumn colours richer, especially on overcast or rainy days.
- Darkening blue sky at right angles to the sun increases contrast with clouds.
- Reducing haze slightly, by cutting polarized scattered light.
Modern cameras need a circular polarizer, which adds a second layer that converts the polarized light back into circularly polarized light so autofocus and metering systems work correctly. The word circular refers to this optical design, not the filter's shape.
Polarizers have limits. The sky effect is strongest 90 degrees from the sun and absent when shooting toward or directly away from it. With wide-angle lenses covering a large angle of sky, the darkening varies across the frame, producing an uneven dark band. Polarizers also cut light, usually by about 1 to 2 stops, which lengthens exposures. Sometimes you want reflections, such as a mirror image of a mountain in a calm lake, so rotate the filter to keep them or remove it.
Worked problem
Where will the sky darken most?
At 17:00 the sun is in the west-southwest at an azimuth of 245° and an elevation of 20°. A photographer wants maximum polarization in the sky behind a mountain. Roughly which compass directions near the horizon give the strongest effect?
Show solution
- The strongest polarization lies on a great circle 90 degrees from the sun.
- Near the horizon, with the sun low, that circle passes roughly 90 degrees to either side of the sun's azimuth.
- 245° − 90° = 155° (south-southeast) and 245° + 90° = 335° (north-northwest).
- Because the sun is 20° up, the circle tilts slightly, but these horizon directions are a good estimate.
Answer: Looking roughly south-southeast (about 155°) or north-northwest (about 335°) gives the strongest sky darkening. A quick field method: point your index finger at the sun and extend your thumb at right angles; rotating your hand around the pointing finger, the thumb sweeps through the band of maximum polarization.
Neutral density filters
An ND filter reduces the amount of light reaching the sensor evenly across all colours, without changing composition. Its purpose is to allow longer exposures or wider apertures in bright light: smoothing water and clouds, blurring moving people out of a scene, or using a wide aperture for shallow depth of field in sun. ND strength is described in several ways that photographers must translate:
| Stops | Factor (filter factor) | Optical density | Light transmitted |
|---|---|---|---|
| 1 | ND2 | 0.3 | 50 % |
| 3 | ND8 | 0.9 | 12.5 % |
| 6 | ND64 | 1.8 | 1.6 % |
| 10 | ND1000 (strictly 1,024) | 3.0 | 0.1 % |
| 15 | ND32000 | 4.5 | 0.003 % |
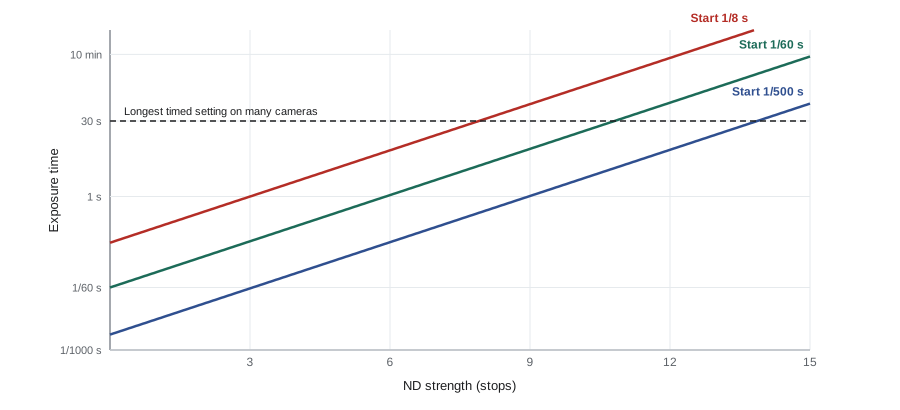
The relationships are: a filter of \( n \) stops has a factor of \( 2^n \) and an optical density of about \( 0.3n \). The new exposure time is the original time multiplied by the factor:
Worked problem
Exposure with a 10-stop ND
Without a filter, a seascape meters at f/11, ISO 100, 1/60 s. What exposure time is needed with a 10-stop ND, and with a 6-stop ND?
Show solution
- 10 stops: factor \( 2^{10} = 1{,}024 \).
- \( t = 1/60 \times 1{,}024 ≈ 17.1 \) s.
- 6 stops: factor \( 2^6 = 64 \); \( t = 64/60 ≈ 1.07 \) s.
Answer: About 17 seconds with the 10-stop filter and about 1 second with the 6-stop. Most cameras' longest automatic setting is 30 s; beyond that, use bulb mode with a remote timer. Very dense filters may also need slight extra exposure because real filters are not exactly their rated strength.
Long exposures with dense ND filters bring practical issues. The viewfinder becomes black, so compose and focus before fitting the filter. Light can enter through the viewfinder eyepiece during long exposures on DSLRs, causing streaks, so close the eyepiece shutter or cover it. Some dense filters add a colour cast, often warm or magenta; set a custom white balance or correct in processing. Long exposures increase sensor noise and hot pixels; long-exposure noise reduction, which takes a dark frame of equal length, helps at the cost of doubling the time.
Variable ND filters
Variable ND filters combine two polarizing layers; rotating one against the other changes the density, often over a range of about 2 to 8 stops. They are popular for video, where a fixed shutter speed is needed and light changes. For stills, they are convenient but can produce an uneven dark cross or X pattern at high densities and with wide-angle lenses, and they cannot be used with a separate polarizer easily. Most landscape photographers prefer fixed NDs for long exposures.
Graduated neutral density filters
A graduated ND (grad) filter is dark at the top and clear at the bottom, with a transition in between. Sliding it in a holder so the dark part covers a bright sky and the clear part covers the darker land balances the exposure in a single frame. Grads come in different strengths, commonly 1, 2 and 3 stops (0.3, 0.6 and 0.9 density), and different transitions: soft-edge grads have a gradual transition for uneven horizons such as mountains or trees; hard-edge grads have a sharp transition for flat horizons such as seascapes; reverse grads are darkest just above the transition for sunrises and sunsets where the brightest part of the sky is at the horizon.
Worked problem
Choosing a grad strength
Spot-metering a sunset scene, the sky just above the horizon reads 1/250 s at f/11 and the shadowed foreground reads 1/15 s at f/11. How many stops of difference are there, and which grad would balance them?
Show solution
- Exposure ratio: (1/15) / (1/250) = 250/15 ≈ 16.7.
- Stops: \( \log_2 16.7 ≈ 4.1 \) stops.
- A modern sensor can often hold about 2 stops of this difference comfortably with careful processing, so a 2- or 3-stop grad would bring the scene within range.
Answer: About 4 stops. A 3-stop (0.9) reverse grad suits a sunset with the brightest band at the horizon; a 2-stop grad would leave the sky brighter and rely more on processing. Bracketing as backup is wise.
Grads are less essential than they were. Modern sensors capture a wide dynamic range, and exposure blending and HDR merging in software handle uneven horizons, such as trees or mountains poking into the sky, better than any physical grad. Grads still offer advantages: a single frame avoids ghosting from moving clouds, water or branches; the result is visible in the field; and processing is simpler.
Exposure blending and bracketing
The alternative to grads is to take several frames at different exposures and combine them. Exposure bracketing means shooting, for example, three or five frames at 1- or 2-stop intervals. Exposure blending combines them manually with masks, while HDR merging uses software to merge them automatically into a high dynamic range image that is then tone-mapped. Blending can follow complex horizons exactly and preserves both bright and dark detail. Its risks are ghosting where things moved between frames, and unnatural results if tone mapping is pushed too far (Lesson 12 covers honest editing).
Worked problem
How many brackets?
A forest scene has a range of about 14 stops from the deepest shadow to a bright patch of sky. The camera can capture about 11 stops of useful range in one frame. With 2-stop spacing, how many frames are needed?
Show solution
- The extra range needed beyond one frame: 14 − 11 = 3 stops.
- With 2-stop spacing, each extra frame adds 2 stops of coverage.
- Extra frames: 3 / 2 = 1.5, rounded up to 2.
- Total frames: 1 + 2 = 3 (for example, −2, 0 and +2 stops).
Answer: Three frames at 2-stop spacing. Many photographers bracket five frames anyway in tricky light, because the cost is only storage.
Other filters
A few other filters still have niche uses. Light pollution filters cut certain wavelengths emitted by older sodium streetlights, though they help less with modern broad-spectrum LED lighting. Diffusion or mist filters soften highlights for a dreamy look. UV and clear protective filters protect the front element from salt spray and dust; opinions differ on whether they degrade image quality, and they can cause flare at night. Infrared filters pass only infrared light and allow striking black-and-white or false-colour landscapes, though modified cameras do this better.
Using filters in cold, wet and windy conditions
Filters bring practical challenges outdoors. In cold weather, gloves make small threads hard to handle and filters can fog when moved from a warm car to cold air or from cold air into warmth. Salt spray at the coast coats filters quickly; carry several microfibre cloths and a blower. Wind can vibrate a filter holder or tripod during long exposures, so weigh down the tripod, shield it with your body and use a remote release. Keep filters in a padded case and check that the holder does not cause vignetting with wide-angle lenses: stacking filters or adding a polarizer to a holder can darken the corners.
Testing and caring for filters
Test each new filter by photographing a neutral grey card or white wall with and without it, at the same settings, and comparing the colour and sharpness. Store filters in a padded case, clean them with a blower and microfibre cloth rather than a shirt, and replace scratched filters, which cause flare and soft spots.
Common mistakes
MistakeUsing a polarizer at full strength with an ultra-wide lens on a clear sky.
InsteadWatch for uneven sky darkening and reduce the effect or remove the filter.
MistakeForgetting that a polarizer can remove reflections you want.
InsteadRotate it while watching; keep reflections when they make the picture.
MistakeCalculating ND exposure by adding stops to the shutter speed number.
InsteadMultiply the time by \( 2^n \) for an \( n \)-stop filter.
MistakeLeaving the DSLR eyepiece open during a long ND exposure.
InsteadClose or cover the eyepiece to stop light leaks.
MistakeUsing a hard-edge grad over mountains or trees.
InsteadUse a soft-edge grad, or bracket and blend for complex horizons.
Summary and key terms
- Circular polarizers cut reflections from water and foliage and darken sky about 90 degrees from the sun.
- Polarizer effects cannot be reliably recreated in software but are uneven with ultra-wide lenses.
- An \( n \)-stop ND multiplies exposure time by \( 2^n \); density is about \( 0.3n \).
- A 10-stop ND turns 1/60 s into about 17 s.
- Long ND exposures need careful composition beforehand, eyepiece covers and colour correction.
- Graduated NDs balance bright skies with darker land; soft, hard and reverse grads suit different horizons.
- Bracketing and blending handle complex horizons, with care to avoid ghosting.
Practice problems
Work each problem on paper first, then reveal the answer to check.
Exposure with a 6-stop ND if the meter reads 1/125 s?
Show answer
64/125 ≈ 0.5 s.
What density is a 3-stop ND?
Show answer
About 0.9.
Factor for a 15-stop ND?
Show answer
\( 2^{15} = 32{,}768 \).
Meter reads 1/30 s; what does a 10-stop ND give?
Show answer
1,024/30 ≈ 34 s, so use bulb mode.
Where in the sky is polarization strongest?
Show answer
About 90 degrees from the sun.
Why does a polarizer help on rainy forest days?
Show answer
It cuts glare from wet leaves, revealing richer colour.
Sky meters 1/500 s and foreground 1/60 s. Stops of difference?
Show answer
log₂(500/60) ≈ 3.1 stops.
Which grad suits a flat ocean horizon?
Show answer
A hard-edge grad.
Scene range 15 stops, camera 11 stops, 2-stop spacing. Frames?
Show answer
1 + ⌈4/2⌉ = 3 frames.
Name one advantage of a grad over blending.
Show answer
A single frame avoids ghosting from movement.
Lesson quiz · 5 questions
Score 60% or more to complete this lesson.
Create a free account to save your progress, take quizzes and earn a certificate.