
PHOT-330 · Lesson 11 of 12 · 30 min
Safety in the field
Landscape and nature photographers often work alone, in the dark, in bad weather, far from help and with their attention on a viewfinder rather than their surroundings. Every year photographers are injured or killed by falls from cliffs, waves on rocky coasts, thin ice, hypothermia, wildlife encounters, lightning and getting lost. This lesson covers trip planning and communication, weather and cold, hiking pace and daylight, wildlife encounters with an emphasis on bears, water and ice, avalanches and mountain terrain, wildfire smoke, and caring for camera equipment in cold and wet conditions. It is an awareness lesson: for backcountry travel, winter travel, avalanche terrain and first aid, take formal training such as wilderness first aid and avalanche skills courses.
Plan and communicate
Most outdoor emergencies become serious because nobody knew where the person was or because the person was unprepared. Before any trip:
- Leave a trip plan with someone reliable: where you are going, your route, when you expect to return and when they should call for help.
- Check conditions: weather forecasts, avalanche bulletins in winter, trail and road reports, tide tables on coasts, fire bans and closures.
- Carry essentials: navigation (map, compass, GPS or phone with offline maps and a spare battery), headlamp with spare batteries, extra warm layers, rain gear, food and water, a first-aid kit, a knife or multi-tool, fire-starting materials, an emergency shelter or blanket, and sun protection.
- Carry a way to call for help: cell coverage is unreliable in the backcountry, so many photographers carry a satellite messenger or personal locator beacon. Some recent phones can send emergency messages by satellite.
- Know your limits and turn back when conditions or energy demand it. The picture is never worth the risk.
Working alone is common in nature photography, but it raises the stakes of any accident. When possible, travel with a partner on risky outings, and let your check-in contact know if your plans change.
Pace, daylight and getting back
Photographers often hike to viewpoints in the dark before sunrise or return after sunset. Planning time accurately avoids rushing on difficult ground in the dark. A traditional estimate for hiking time is Naismith's rule: allow about 1 hour for every 5 km of horizontal distance, plus 1 hour for every 600 m of ascent. Heavy camera packs, snow, rough ground and photography stops all slow you down, so add generous margins.
Worked problem
Timing a sunrise hike
A viewpoint is 6 km from the trailhead with 450 m of climb. Sunrise is at 06:40 and the photographer wants to arrive 45 minutes early. Using Naismith's rule plus 30 percent for a heavy pack and darkness, when should they start?
Show solution
- Distance time: 6 / 5 = 1.2 hours.
- Climb time: 450 / 600 = 0.75 hours.
- Total: 1.95 hours; plus 30 percent: 1.95 × 1.3 ≈ 2.5 hours.
- Arrival target: 06:40 − 0:45 = 05:55.
- Start: 05:55 − 2:30 = 03:25.
Answer: About 03:25. If that seems extreme, choose a closer viewpoint or camp nearby where it is permitted. Starting late and rushing in the dark on a steep trail is a common cause of accidents.
A rough field method for remaining daylight is to hold your hand at arm's length with fingers horizontal between the horizon and the sun: each finger width is about 15 minutes before sunset at mid-latitudes. It is less reliable at high latitudes, where the sun sets at a shallow angle and twilight lasts longer.
Cold, wind chill and hypothermia
Cold is a major hazard for photographers in Canada and the northern United States, who often stand still for long periods waiting for light. Wind greatly increases heat loss. Weather services report a wind chill value that expresses how cold the combination of temperature and wind feels on exposed skin.
Environment and Climate Change Canada reports wind chill as a number without units, equivalent to a temperature in degrees Celsius, using the formula below, with air temperature \( T \) in °C and wind speed \( V \) in km/h at 10 m height.
Worked problem
Wind chill on a winter lakeshore
At dawn, the air temperature is −15 °C with a wind of 30 km/h. What is the wind chill?
Show solution
- \( V^{0.16} = 30^{0.16} ≈ 1.723 \).
- \( W = 13.12 + 0.6215(−15) − 11.37(1.723) + 0.3965(−15)(1.723) \).
- \( = 13.12 − 9.32 − 19.59 − 10.25 ≈ −26.0 \).
Answer: A wind chill of about −26. Environment Canada advises that frostbite risk is high at wind chills of about −28 and below, with exposed skin able to freeze in 10 to 30 minutes; at −26, cover exposed skin and limit time in the wind.
Hypothermia occurs when the body's core temperature falls. Early signs include shivering, clumsiness, slurred speech and poor judgment, the last of which makes it dangerous for people alone. Wet clothing, from rain, sweat or a fall in water, speeds heat loss dramatically. Prevention means dressing in layers (a wicking base layer, insulating mid layers and a windproof, waterproof shell), avoiding cotton, changing out of sweaty layers when you stop, keeping a dry spare layer in the pack, eating and drinking regularly, and using hand and toe warmers. Frostbite most often affects fingers, toes, ears, nose and cheeks; photographers' fingers are particularly at risk from handling cold metal tripods and cameras, so use liner gloves inside mitts and tripod leg wraps.
Batteries and equipment in the cold
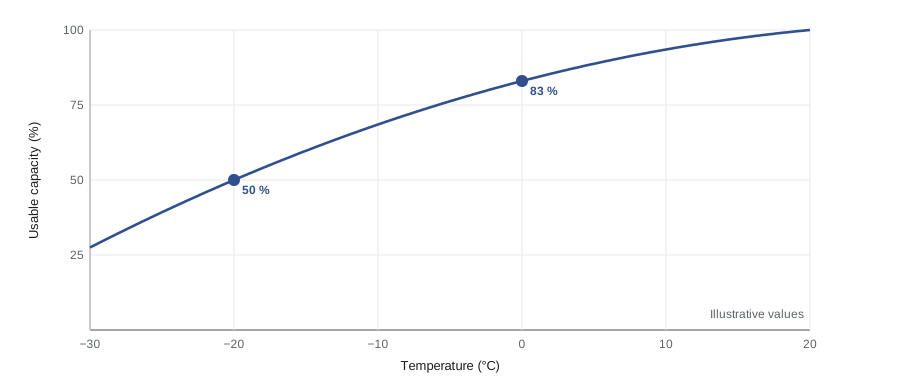
Lithium-ion camera batteries lose capacity in cold weather, because the chemical reactions slow down. A battery that lasts a whole day at room temperature may last only an hour or two in deep cold, and it may recover when warmed. Carry several spares in an inside pocket close to your body, and swap them as they fade.
Worked problem
How many batteries for a winter night shoot?
A camera battery gives about 600 frames or 2.5 hours of continuous long-exposure shooting at room temperature. On a −20 °C night, assume usable capacity falls to about half. How many batteries are needed for a 4-hour star-trail sequence plus about an hour of other shooting?
Show solution
- Runtime per battery in the cold: 2.5 × 0.5 = 1.25 hours.
- Total time: 4 + 1 = 5 hours.
- Batteries: 5 / 1.25 = 4.
- Add a spare for safety: 5 batteries, or use an external power bank with a dummy battery adapter.
Answer: About four, plus at least one spare, kept warm in an inside pocket. For long sequences, an external power supply avoids battery changes that might move the camera.
Condensation is the other cold-weather problem. Bringing a cold camera into a warm car or building makes moisture condense on and inside it, which can fog lenses and damage electronics. Before going inside, put the camera in a sealed plastic bag or closed camera bag and let it warm slowly over an hour or two. Remove memory cards first if you want to download images right away. Never breathe on a cold lens to clean it, because the moisture can freeze.
In cold conditions, LCD screens respond slowly, lubricants in older lenses stiffen and plastic parts become brittle. Tripod leg locks can freeze; lever locks are often easier with gloves than twist locks.
Wildlife encounters
Lesson 10 covered distances for the animals' sake. Here the concern is your safety. Most wildlife avoids people, but encounters with bears, moose, elk, bison and cougars can be dangerous. Key practices include:
- Make noise in dense brush, near streams and in areas with poor visibility, so you do not surprise animals at close range.
- Carry bear spray in bear country, keep it accessible on your belt or chest rather than in a pack, and know how to use it; it is effective at a range of several metres and is designed to create a cloud between you and a charging bear. Check local rules for carrying and transporting it.
- Travel in groups where possible; groups are less likely to be approached.
- Never approach animals with young, carcasses or food sources, and avoid moose and elk during calving and rutting seasons.
- If you meet a bear, stay calm, do not run, speak in a firm voice, keep your group together and back away slowly. Responses to an attack depend on the species and situation, which is why training and park guidance are essential.
Photographers are at particular risk because they wait quietly, move slowly at dawn and dusk and concentrate on the viewfinder. A long lens can make an animal look farther away than it is; check distances with your own eyes.
Water, waves, ice and tides
Water hazards kill many outdoor photographers. On coasts, large waves can surge far above normal levels without warning; never turn your back on the sea, stay off wet rocks near the water's edge and avoid rock ledges in storms. Lesson 2 explained how to read tides; plan routes so a rising tide cannot cut off your retreat. Rivers and waterfalls have slippery, algae-covered rocks and strong currents, and cold water quickly causes cold shock and loss of strength.
Frozen lakes and rivers offer superb winter compositions, but ice thickness varies. Ice is weaker near inflows, outflows, pressure ridges and springs, and moving water under river ice keeps it thin.
Canadian Red Cross and Lifesaving Society guidance commonly cites at least 15 cm of clear, solid ice for walking alone and more for groups or vehicles. White or grey ice is weaker than clear blue ice. Check local advice, test ice with an auger or ice chisel, carry ice picks and a throw rope, and avoid ice in spring or after thaws.
Mountains, cliffs and avalanches
Falls from cliff edges, often while composing or backing up for a wider view, are a leading cause of photographer deaths. Keep a safe distance from edges, never step backward while looking through the viewfinder, use your tripod as a stable reference, and be especially careful on wet, icy or loose ground.
In winter mountains, avalanches are a serious hazard, and photographers are often drawn to the steep, snowy terrain where they occur. Avalanches can also run onto valley trails and roads from slopes far above. Anyone travelling in avalanche terrain needs formal training, a transceiver, probe and shovel, and partners carrying the same.
Avalanche Canada publishes daily avalanche forecasts for much of western Canada, and Parks Canada forecasts for the mountain national parks; both use the North American Public Avalanche Danger Scale from 1 (low) to 5 (extreme). Avalanche Skills Training (AST) courses are the standard entry training.
Lightning is another mountain hazard. Summer thunderstorms often build in the afternoon; start early and be off exposed ridges before storms develop. A common guide is that if the time between a lightning flash and its thunder is 30 seconds or less, the storm is within about 10 km and you should seek safer terrain immediately, waiting 30 minutes after the last thunder before returning.
Wildfire smoke and heat
Summer wildfires are now common across much of western and northern North America. Smoke creates dramatic red suns and hazy layers, but fine particles harm the lungs, and fires can move fast.
Use the Air Quality Health Index (AQHI), a 1 to 10+ scale published by Environment and Climate Change Canada, and FireSmoke Canada forecasts to plan outings. Respect fire bans and area closures, which can carry large fines, and never photograph close to active fires; leave immediately if told to evacuate.
Heat brings its own risks in deserts and on open terrain: carry plenty of water, avoid midday exertion, and recognize signs of heat exhaustion and heat stroke.
| Hazard | Key prevention | Training or resource |
|---|---|---|
| Getting lost or injured alone | Trip plan, navigation, satellite messenger | Navigation and wilderness first aid courses |
| Cold and wind | Layers, dry spares, check wind chill | Weather service wind chill advice |
| Wildlife | Noise, distance, bear spray | Park bear safety guidance |
| Coastal waves and tides | Tide tables, never turn your back on the sea | Local tide and surf advisories |
| Ice | Check thickness, ice picks, throw rope | Local ice safety guidance |
| Avalanches | Forecasts, training, rescue gear | Avalanche courses and bulletins |
| Lightning | Early starts, leave ridges, 30-30 rule | Weather forecasts |
| Smoke and fire | Air quality index, closures, evacuate | Air quality and fire information sites |
Common mistakes
MistakeHeading out alone without telling anyone your plan.
InsteadLeave a trip plan and carry a way to call for help.
MistakeStepping backward while looking through the viewfinder near an edge.
InsteadKeep a safe distance from edges and move only while looking where you step.
MistakeKeeping spare batteries in a cold outside pocket.
InsteadKeep them warm in an inside pocket and rotate them.
MistakeTaking a cold camera straight into a warm building.
InsteadSeal it in a bag and let it warm slowly to avoid condensation.
MistakeWalking onto lake ice without checking thickness.
InsteadFollow local guidance, test the ice and carry ice picks and a rope.
Summary and key terms
- Leave a trip plan, carry essentials and a satellite communication device, and know when to turn back.
- Naismith's rule: about 1 hour per 5 km plus 1 hour per 600 m of climb; add margins.
- Wind chill combines temperature and wind; around −28 and below, skin can freeze in minutes.
- Batteries lose capacity in cold; keep spares warm. Avoid condensation by warming gear slowly in a bag.
- Make noise, carry bear spray and never approach animals with young or food.
- Respect waves, tides and ice; check thickness and carry rescue tools.
- Avalanche terrain needs training and gear; lightning and smoke need early starts and air quality checks.
Practice problems
Work each problem on paper first, then reveal the answer to check.
Hiking time by Naismith's rule for 10 km and 300 m of climb?
Show answer
2 + 0.5 = 2.5 hours.
With a 25 percent margin?
Show answer
About 3.1 hours.
Wind chill at −10 °C and 20 km/h? (20^0.16 ≈ 1.615)
Show answer
13.12 − 6.22 − 18.36 − 6.40 ≈ −17.9.
Battery lasts 2 hours warm and half that in the cold. Batteries for 6 hours?
Show answer
6 batteries, plus a spare.
How do you avoid condensation on a cold camera?
Show answer
Seal it in a bag before going inside and let it warm slowly.
Why is a long lens misleading near wildlife?
Show answer
It makes animals look farther away than they are.
Where is lake ice usually weakest?
Show answer
Near inflows, outflows, springs and pressure ridges.
Flash-to-thunder time of 20 s: what should you do?
Show answer
Seek safer terrain immediately; the storm is close.
Name three items for avalanche terrain.
Show answer
Transceiver, probe and shovel.
Which Canadian index rates air quality health risk?
Show answer
The Air Quality Health Index (AQHI).
Lesson quiz · 5 questions
Score 60% or more to complete this lesson.
Create a free account to save your progress, take quizzes and earn a certificate.