
PHOT-301 · Lesson 12 of 12 · 25 min
Archival permanence, presentation and capstone
A fine print is meant to last. Collectors, galleries, museums and clients expect prints to remain unchanged for many decades, and photographers selling limited editions must be able to describe their materials honestly and reproduce prints consistently. This final lesson covers how prints deteriorate, permanence testing and ratings, choosing archival materials, display conditions, mounting and matting, framing and glazing, storage and handling, limited editions and certificates of authenticity, and the course capstone: a colour-managed portfolio of fine prints with documentation.
How prints deteriorate
Prints change through several mechanisms. Light fading, caused mainly by ultraviolet and short-wavelength visible light, breaks down colourants, with some colours fading faster than others so that colour balance shifts. Ozone and other airborne pollutants attack dyes in particular, especially in prints displayed without glazing. Humidity and heat accelerate chemical reactions, can cause dye migration and blurring, and encourage mould. Paper itself can yellow if it contains lignin, acids or degrading optical brighteners. Physical damage from handling, abrasion, fingerprints and poor mounting is a common and avoidable cause of loss. Pigment inks on archival papers resist most of these effects far better than dye inks or older processes, but no print is immune to poor conditions.
Permanence testing and ratings
Independent laboratories test print permanence through accelerated ageing: exposing prints to high-intensity light, ozone, heat or humidity, measuring changes in density and colour, and extrapolating how long it would take to reach a defined level of change under typical display conditions. Wilhelm Imaging Research has long published display permanence ratings, often expressed as years under glass at 450 lux for 12 hours per day, and Aardenburg Imaging and Archives publishes conservation-oriented tests with stricter criteria. ISO 18941 and related standards define test methods. Ratings for pigment inks on cotton rag papers frequently exceed 100 to 200 years under glass in such tests, while dye-based prints and papers with OBAs score lower. Ratings depend heavily on assumptions about light levels and acceptable change, so they are best used to compare materials rather than as guarantees.
Worked problem
What does a light dose mean?
A test finds that a print reaches its fading limit after a dose of 100 million lux hours. How many years would that represent at 450 lux for 12 hours a day, and at 150 lux for 10 hours a day?
Show solution
- At 450 lux, 12 h/day: annual dose \(= 450 \times 12 \times 365 \approx 1.97\) million lux hours.
- Years \(\approx 100 / 1.97 \approx 51\).
- At 150 lux, 10 h/day: annual dose \(= 150 \times 10 \times 365 \approx 0.55\) million lux hours.
- Years \(\approx 100 / 0.55 \approx 183\).
Answer: About 51 years at 450 lux for 12 hours daily, but about 183 years at 150 lux for 10 hours daily; display conditions matter as much as materials.
Choosing archival materials
For prints intended to last, choose pigment inks from reputable manufacturers, papers made from cotton rag or high-quality alpha cellulose that are acid-free and lignin-free, preferably without optical brighteners or with OBAs disclosed, and materials tested by independent laboratories. Avoid mixing unknown third-party inks with archival claims. Mounting boards, mats, tapes and adhesives should also be archival: conservation-grade boards made of cotton rag (museum board) or buffered purified wood pulp, and tapes and corners that pass the Photographic Activity Test (ISO 18916), which checks that materials do not react with photographs. Describe materials accurately in sales and certificates.
Display conditions
Even archival prints fade under strong light. Recommendations for display include avoiding direct sunlight, which contains intense UV and visible light; keeping light levels moderate, typically 50 to 200 lux for valuable prints, with museums often using 50 lux for sensitive works; using UV-filtering glazing; choosing LED lighting with negligible UV and moderate colour temperature; maintaining stable temperature around 18 to 22 °C and relative humidity around 40 to 50 %, away from heaters, kitchens and bathrooms; and rotating prints in and out of display. Advising clients and collectors about display conditions is a valuable service that protects your work and reputation.
| Factor | Recommendation |
|---|---|
| Light level | 50–200 lux for valuable prints; avoid direct sun |
| UV | UV-filtering glazing; LED lighting |
| Temperature | About 18–22 °C, stable |
| Relative humidity | About 40–50 %, stable |
| Pollutants | Glazing; avoid fresh paint, smoke and kitchens |
| Rotation | Rest valuable prints in dark storage periodically |
Mounting and matting
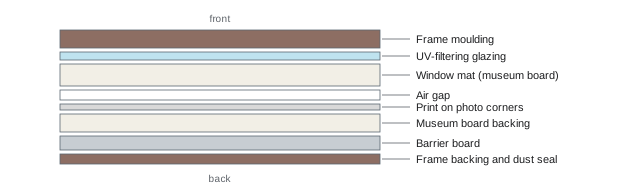
Mounting attaches a print to a support; matting surrounds it with a window mat that separates it from the glazing. Conservation practice favours reversible methods: archival photo corners or hinges of Japanese paper with wheat starch paste or archival tape, which hold the print without permanent adhesive and allow it to expand and contract. Dry mounting with heat-activated adhesive tissue produces a perfectly flat print and is common for exhibition prints, but is not fully reversible. Window mats, typically 4-ply or 8-ply museum board, protect the print surface from touching the glass, where condensation and sticking can cause damage. Larger formats, commercial displays and contemporary exhibitions also use face-mounting to acrylic and mounting to aluminium composite panels, which are visually striking but permanent and require specialist labs.
Framing and glazing
Frames protect prints from handling, dust and pollutants. Glazing options include standard glass, which is inexpensive but reflective and blocks little UV; UV-filtering glass or acrylic, which blocks about 97 to 99 % of UV; and anti-reflective, museum-grade glass or acrylic, which combines UV filtering with very low reflection, at higher cost. Acrylic glazing is lighter and shatter-resistant, preferred for large works and shipping, but scratches more easily and can attract dust through static. A sealed frame package with an archival backing board and a vapour barrier slows humidity changes and pollutants. Frames should be hung away from exterior walls, which may be cold and damp, and from direct heat sources.
Storage and handling
Prints not on display should be stored flat in archival boxes, such as clamshell or solander boxes made of acid-free board, with interleaving tissue between prints, in a cool, dry, dark place with stable conditions. Avoid basements and attics, which experience extremes of humidity and temperature. Handle prints with clean hands or gloves, supporting them fully, and never stack unprotected prints face to face. Sleeves made from polyester (such as Mylar), polypropylene or polyethylene that pass the Photographic Activity Test are suitable; PVC sleeves are not, because they release harmful chemicals. Maintain a record of storage locations for an edition.
Limited editions and certificates of authenticity
Many photographers sell prints in limited editions, which create scarcity and value for collectors. An edition defines the number of prints of an image in a particular size, such as an edition of 10 at 24 × 16 inches, plus a small number of artist's proofs, often two, which are part of the edition and should be disclosed. Good practice includes defining editions clearly before selling, numbering each print (for example 3/10), never exceeding the stated edition size by printing the same image in other sizes or materials without disclosure, keeping records of every print sold, and issuing a certificate of authenticity that describes the image, edition, size, paper, inks, printer, date, signature and any permanence information. Consumer protection and art market rules in some jurisdictions address misrepresenting editions; honesty about editions underpins the trust collectors place in photographers. Documentation from Lesson 11 makes consistent editions possible over many years, even as printers and papers change.
Pricing and selling prints
Pricing fine prints combines costs and value. Costs include materials, proofs, labour, framing, shipping and overhead; value depends on the photographer's reputation, the edition size, the print size and the market. A cost-plus approach ensures prices cover expenses, while market comparison against similar photographers sets realistic expectations. Editions often increase in price as they sell out. Clear documentation and good presentation, from packaging to certificates, signal professionalism. PHOT-410 covers the business of photography in more depth.
Capstone: a colour-managed fine print portfolio
The capstone asks you to demonstrate the full colour management and fine printing workflow by producing a small portfolio of prints with documentation. It should include:
- A calibrated and profiled monitor, with verification results (average and maximum Delta E 2000) and a description of your viewing setup, including luminance and the print viewing light.
- At least six fine prints from your own images, on at least two different papers, for example one glossy or baryta and one matte fine art paper, chosen to suit the images.
- For each print: soft-proof screenshots comparing rendering intents, notes of paper-specific adjustments, test strips, and the final print settings recorded in a print log.
- One black-and-white print, made with either a colour-managed profile or a manufacturer black-and-white mode, with a note on neutrality under two light sources.
- Optionally, a custom profile for one paper or camera, with verification results.
- A presentation plan: mounting, matting, framing or storage, with archival material choices, display recommendations and, if relevant, an edition and certificate of authenticity.
- A reflection of about 600 words on what you learned about the differences between screen and print and how you resolved them.
Present the prints in person or as photographs of the prints under controlled light, with the documentation, as you would to a gallery or collector.
Shipping and transporting prints
Prints are often damaged in transit. Unframed prints should be packed flat between rigid boards with interleaving tissue in sealed plastic sleeves, or rolled loosely image side out around a wide tube for large prints, never folded. Framed works need corner protectors, padding and sturdy boxes, with acrylic glazing preferred for shipping, since glass can break and damage the print. Insurance, tracking and clear handling labels protect valuable shipments. Allow prints to acclimatize before unpacking after shipping in cold or humid conditions, to avoid condensation.
Condition reports and care instructions
Professional photographers and galleries document the condition of prints when they are sold, loaned or exhibited, noting any marks or flaws, and provide care instructions to buyers. A simple care sheet might recommend display away from direct sun and heat, moderate light levels, stable humidity, handling only by the frame, and professional reframing when necessary. Including care instructions with a certificate of authenticity helps buyers protect their investment and demonstrates professionalism.
Digital archives of printed work
Alongside physical prints, keep a digital archive of everything needed to reprint: the master file, print versions, profiles, print logs, edition records and photographs of the finished prints. Back up this archive with the same care as the master images (PHOT-202). Years later, when a buyer requests a replacement or a gallery asks for a larger size, this archive allows you to reproduce or adapt prints faithfully, even if printers, inks and papers have changed.
Reprinting and replacing editions
Over time, materials change: printers are replaced, ink formulations improve and papers are discontinued. When an edition must be completed or a damaged print replaced, use the print log to reproduce the original settings as closely as possible, compare a new test print with an archived reference print from the edition under standard light, and adjust until they match. If the original materials are no longer available, disclose any change of paper or process to the buyer and note it in the edition records, preserving trust and the integrity of the edition.
Professional responsibility
Photographers who sell prints take on a responsibility to buyers: to use materials suited to the intended life of the work, to describe them honestly, to provide care guidance and to stand behind editions. These practices protect collectors and build a reputation that lasts as long as the prints themselves.
Common mistakes
MistakeDisplaying prints in direct sunlight.
InsteadKeep light moderate and use UV-filtering glazing.
MistakeUsing non-archival tapes and boards.
InsteadUse materials that pass the Photographic Activity Test.
MistakeTreating permanence ratings as guarantees.
InsteadUse them to compare materials under stated conditions.
MistakeStoring prints in PVC sleeves.
InsteadUse polyester, polypropylene or polyethylene sleeves.
MistakeExceeding edition sizes without disclosure.
InsteadDefine, number and document editions honestly.
Summary and key terms
- Light, ozone, heat, humidity, poor materials and handling degrade prints.
- Accelerated testing estimates permanence; display conditions change real lifetimes.
- Choose pigment inks, archival papers and tested mounting materials.
- Display at moderate light with UV filtering and stable climate.
- Mount reversibly, mat to separate prints from glazing, and frame with suitable glazing.
- Store prints flat in archival boxes with safe sleeves.
- Define and document editions honestly; the capstone integrates the course.
- Light fading
- Colorant breakdown caused by light exposure.
- Accelerated ageing
- Testing materials under intensified conditions.
- Lux hours
- Cumulative light exposure.
- Photographic Activity Test
- ISO 18916 test for materials safe with photographs.
- Museum board
- Archival board made of cotton rag.
- Hinge mounting
- Attaching prints with reversible paper hinges.
- Window mat
- Board with an opening that frames the print.
- UV-filtering glazing
- Glass or acrylic blocking ultraviolet light.
- Limited edition
- Fixed number of prints of an image and size.
- Certificate of authenticity
- Document describing a print and its edition.
Practice problems
Work each problem on paper first, then reveal the answer to check.
Name three causes of print deterioration.
Show answer
Light, ozone, heat, humidity, poor materials, handling.
How are permanence ratings estimated?
Show answer
By accelerated ageing tests.
Years for 60 million lux hours at 200 lux, 10 h/day?
Show answer
About 82 years.
What does the Photographic Activity Test check?
Show answer
That materials are safe with photographs.
Recommended light for valuable prints?
Show answer
About 50–200 lux.
Why use a window mat?
Show answer
To keep the print from touching the glazing.
Name an advantage of acrylic glazing.
Show answer
Light and shatter-resistant.
Which sleeves should be avoided?
Show answer
PVC.
What are artist's proofs?
Show answer
A small number of prints outside the numbered edition, disclosed.
What does a certificate of authenticity include?
Show answer
Image, edition, size, materials, date and signature.
Lesson quiz · 5 questions
Score 60% or more to complete this lesson.
Create a free account to save your progress, take quizzes and earn a certificate.