
PHOT-301 · Lesson 11 of 12 · 25 min
Making a fine print
A fine print is more than an accurate reproduction of a file. It is a finished object in which tone, colour, detail, paper and scale work together to express the photograph as fully as possible. Making one draws on everything in this course: a calibrated monitor, good profiles, soft proofing, the right paper and careful printing technique, plus the judgement that comes from looking hard at prints and refining them. This lesson follows the fine print workflow from master file to signed print: preparing the master, sizing and resampling, sharpening for print, setting up the print dialogue and driver correctly, test strips and iteration, black-and-white printing, printing large and on rolls, borders and layout, evaluating the print, and documenting your settings.
Preparing the master
Start from a master file edited in 16 bits in a wide working space, with all retouching and global and local adjustments complete (PHOT-202). Before printing, examine the image at 100 % for dust, artefacts, haloes, banding and noise, which become much more visible in large prints than on screen. Then create a print version for the chosen paper and size: a proof copy carrying paper-specific adjustments from soft proofing (Lesson 8), such as shadow lifts for matte papers or local saturation controls for out-of-gamut areas. Keep the print version linked to the master, named clearly with the paper and size, for example "harbour_master_print_PhotoRag_24x16".
Sizing and resampling
Set the print size at the printer driver's native resolution, 360 ppi or 720 ppi for Epson printers, 300 or 600 ppi for Canon and HP, or a simple fraction. If the file has more pixels than needed, downsample; if fewer, upsample, using good-quality resampling such as bicubic, Lanczos or AI-based upscaling for large enlargements. Resampling in your editing application, rather than leaving it to the driver, gives you control and allows sharpening after resampling. Lightroom's print module performs this automatically when print resolution is set and output sharpening is enabled.
Worked problem
Preparing a file for a large print
A 45-megapixel file measures 8,256 × 5,504 pixels. The photographer wants a 30 × 20 inch print on a printer with a native resolution of 360 ppi. What should the file size be, and how much upsampling is needed?
Show solution
- Required pixels: \(30 \times 360 = 10{,}800\) by \(20 \times 360 = 7{,}200\).
- Scale factor: \(10{,}800 / 8{,}256 \approx 1.31\), about 31 % upsampling.
- At the original size, the file would print at \(8{,}256 / 30 \approx 275\) ppi, which is already fine for normal viewing distances.
- Option A: send at 275 ppi and let the driver resample; option B: upsample to 10,800 × 7,200 with a quality method and sharpen at that size for the best detail.
Answer: Upsample about 31 % to 10,800 × 7,200 pixels at 360 ppi, then apply output sharpening; 275 ppi would also print well.
Sharpening for print
Prints need more sharpening than screens because ink spreads slightly into paper and because prints are viewed at a distance that reduces apparent sharpness. Output sharpening is applied last, to the print version at its final size and resolution, and tuned for the paper: matte and textured papers need more, glossy and lustre papers less. Use tools designed for output sharpening, such as Lightroom's print sharpening with paper type and amount settings, or Photoshop techniques such as unsharp mask or smart sharpen at radii proportional to print resolution (often about 0.8 to 1.5 pixels at 360 ppi). Because output sharpening looks crunchy on screen at 100 %, judge it by test prints at final size. Sharpening masks protect smooth areas such as skies and skin from amplified noise. Never apply output sharpening to the master.
| Paper | Output sharpening | Notes |
|---|---|---|
| Glossy and lustre | Low to standard | Surface preserves fine detail |
| Baryta | Standard | Similar to lustre |
| Smooth matte | Standard to high | Ink spreads more; detail softens |
| Textured watercolour | High | Texture competes with fine detail |
| Canvas | High, with care | Weave and coating soften detail |
The print dialogue and driver
Printing errors most often come from print settings rather than images. A correct setup in a colour-managed application is:
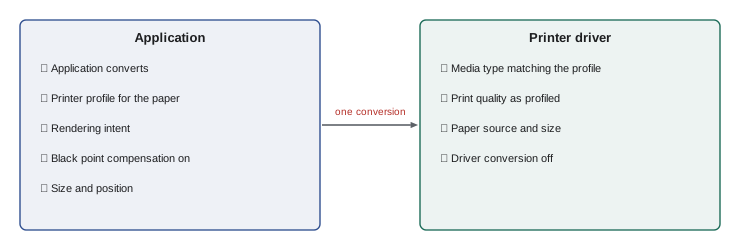
- In the application's print dialogue: choose "application manages colours" (Photoshop) or the printer profile (Lightroom), select the correct printer and paper profile, choose the rendering intent decided during soft proofing, enable black point compensation for relative colorimetric, and set the print size and position.
- In the printer driver: select the media type matching the profile, the print quality used for the profile, the paper source and size, and turn colour management off (often labelled "off (no colour adjustment)" or "no colour correction").
- Save these as presets in both the application and driver for each paper, so that settings are reproducible.
Manufacturer print utilities, such as Epson Print Layout and Canon Professional Print and Layout, combine these steps in one interface and are a reliable choice. Never let both the application and the driver manage colour, and never let neither do so unless you are deliberately printing a profiling target.
Test strips and iteration
Even with good profiles and soft proofing, important prints benefit from one or two rounds of test strips: narrow prints of the most critical areas, such as faces, highlight detail, shadow detail and saturated colours, at final size on the final paper. Compare them under the viewing light, beside the screen and, if possible, under the intended display light. Typical findings include shadows that are slightly too dark, highlights that look chalky, colour a little warm or cool, or sharpening that is too strong or too weak. Make small adjustments to the print version, and print another strip. When the strips look right, print the full image. Let prints dry for at least an hour, ideally overnight, before final judgement, since dry-down can darken and change colours slightly.
Black-and-white printing
Black-and-white inkjet printing has improved greatly with grey inks. There are three main approaches:
- Colour-managed printing of a neutral RGB image with the paper profile: straightforward, but small profile errors can show as colour tints in neutral greys, and neutrality may shift under different lights because of colour ink metamerism.
- Manufacturer black-and-white modes, such as Epson's Advanced Black and White Photo or Canon's monochrome photo mode: these use mainly the black and grey inks, producing very neutral prints with excellent tonal smoothness and allowing controlled toning (warm, cool or custom) with tone and contrast adjustments in the driver. Colour management is bypassed, so soft proofing requires a custom greyscale profile or careful test prints.
- RIPs and specialized black-and-white systems, including custom quad-tone ink sets and software such as QuadToneRIP, which offer precise control over tone curves and toning for monochrome specialists.
Black-and-white prints reveal tonal problems mercilessly: crushed shadows, harsh highlights and banding in gradients. Neutrality should be checked under several light sources. Many black-and-white printers prefer baryta and warm-toned matte papers.
Printing large and on rolls
Large prints require attention to file size, resolution, printer capability and handling. Files for 40 × 60 inch prints at 180 to 240 ppi run to hundreds of megabytes in 16 bits, so working with flattened print versions saves time. Roll printers can print long panoramas; check maximum print length and driver limits. Large prints magnify small flaws in focus, noise and retouching, so check the file at 100 % before printing. Roll paper may curl; decurl prints by rolling them in the opposite direction around a tube with interleaving paper, or let them rest flat under clean weights. Handling large prints requires two people, clean surfaces and gloves.
Borders, layout and signing
Most fine prints have white borders, which isolate the image, give room for handling, matting and signing, and protect the image area. Common practice is equal borders on the sides and top with a slightly larger bottom border, or a border proportional to the print size, such as 1.5 to 3 inches on a 16 × 20 inch sheet. Borderless prints suit commercial work and face-mounting but leave the image vulnerable at the edges. Signing is done in pencil, which is archival and removable, or with archival pigment pens, on the border below the image or on the back, with title, date and edition number where applicable. Avoid ballpoint pens and markers that may bleed or fade.
Evaluating the print
Evaluate the finished print critically, under the viewing light and in daylight, at normal and close distances. Questions to ask include: Do highlights show detail and separation? Do shadows hold detail without looking muddy? Are skin tones natural? Are neutrals neutral, or deliberately toned? Is the colour faithful to the soft proof and the intended mood? Is the sharpness appropriate for the viewing distance, without halos? Are there physical flaws such as banding, scuffs, head strikes, dust specks or uneven gloss? Compare the print with earlier prints of the same image. A fine print often takes several iterations, and printers sometimes return to images years later with better skills and materials.
Documenting your print settings
Record everything needed to reproduce a print: the master file name and version, the print version and its adjustments, size and resolution, sharpening settings, printer, ink set and firmware, paper and batch, profile name and version, rendering intent and BPC, driver media type and quality settings, and the date. Many printers keep a print log in a spreadsheet or in the image metadata, and write key details on the back of test prints. This documentation allows editions to be printed consistently over years (Lesson 12) and makes troubleshooting much faster.
Printing through a lab
Many photographers make their fine prints with professional labs rather than at home, especially for large sizes. Working well with a lab involves choosing a lab that offers the papers and processes you want, obtaining its profiles and file requirements, soft proofing with its profiles, sending a small test print order with a reference image before an important job, and communicating clearly about whether the lab should apply corrections. Many labs offer master printers who will work with you to refine prints, which can be valuable for exhibitions. Keep notes on the lab's settings and results so that reprints match.
Printing for exhibitions
Exhibition prints are usually made as a set, so consistency across prints matters as much as the quality of each. Print all images for a series on the same paper, in the same session where possible, with the same profile and settings, and compare them side by side under the exhibition lighting or a close simulation. Adjust prints so that they look consistent in brightness and colour as a group, which may mean lightening a darker image or toning down a more saturated one. Plan extra prints in case of damage during framing and hanging.
Common print faults and their causes
Several physical faults recur in fine printing. Fine horizontal lines usually mean clogged nozzles or misaligned heads; smears or scuffs near edges suggest head strikes on thick or curled paper; a coarse, grainy look may mean the wrong quality setting or printing on the wrong side; weak blacks on matte paper indicate photo black ink; colour casts across all prints point to driver colour management left on or the wrong profile; and pale bands at the bottom of sheets can come from paper feeding problems. A troubleshooting table beside the printer, built from your own experience, speeds diagnosis and saves paper.
Common mistakes
MistakeSharpening the master for print.
InsteadSharpen the print version at final size for the paper.
MistakeLetting both application and driver manage colour.
InsteadUse application-managed colour with driver colour management off.
MistakeJudging prints while still wet.
InsteadWait for dry-down before final evaluation.
MistakePrinting large without checking the file at 100 %.
InsteadInspect for flaws before printing big.
MistakeSigning prints with ballpoint or marker.
InsteadUse pencil or archival pigment pens.
Summary and key terms
- Start from a clean 16-bit master and make paper-specific print versions.
- Resample to the driver's native resolution in your application.
- Apply output sharpening last, tuned to paper and size.
- Set the application to manage colour and turn driver colour management off.
- Refine with test strips after dry-down.
- Black-and-white printing can use profiles, manufacturer modes or RIPs.
- Plan borders and signing, evaluate critically and document settings.
- Print version
- Copy of the master adjusted for a paper and size.
- Native resolution
- Driver input resolution for best quality.
- Resampling
- Changing the pixel dimensions of an image.
- Output sharpening
- Sharpening for the final print size and paper.
- Application-managed colour
- Colour conversion performed by the editing application.
- Driver preset
- Saved set of printer driver settings.
- Advanced black-and-white mode
- Driver mode printing mainly with black and grey inks.
- Quad-tone printing
- Monochrome printing with several grey inks and custom curves.
- Decurling
- Flattening prints from roll paper.
- Print log
- Record of settings used for each print.
Practice problems
Work each problem on paper first, then reveal the answer to check.
Why make a print version?
Show answer
To keep paper-specific adjustments off the master.
Pixels for a 20 × 16 inch print at 300 ppi?
Show answer
6,000 × 4,800.
Which papers need more output sharpening?
Show answer
Matte and textured papers.
Name two application print settings.
Show answer
Application manages colour, printer profile, intent, BPC.
What must be off in the driver?
Show answer
Driver colour management.
What do test strips show?
Show answer
Critical areas at final size on the final paper.
Why wait before judging a print?
Show answer
Dry-down changes colour and density.
Name a benefit of manufacturer black-and-white modes.
Show answer
Very neutral prints and controlled toning.
How do you flatten roll prints?
Show answer
Roll them the opposite way around a tube or rest under weights.
What should a print log contain?
Show answer
Files, size, sharpening, printer, paper, profile, intent, driver settings, date.
Lesson quiz · 5 questions
Score 60% or more to complete this lesson.
Create a free account to save your progress, take quizzes and earn a certificate.