
PHOT-240 · Lesson 9 of 12 · 27 min
Making silver gelatin prints
A silver gelatin print is made by projecting a negative onto paper coated with a light-sensitive silver emulsion, then developing, stopping, fixing and washing the paper much as film is processed. Printing is where the photographer interprets the negative: deciding how light or dark the print should be, how much contrast it needs, and which areas to emphasize. A fine print has rich blacks, clean whites, detailed shadows and highlights, and tonal relationships that serve the image. This lesson covers printing papers, setting up the enlarger, test strips in linear and f-stop increments, choosing exposure and contrast, variable-contrast filters and paper grades, processing prints, judging dry-down, scaling exposure for different print sizes, and the work print.
Printing papers
Black-and-white papers differ in base, contrast system, surface and tone:
- Resin-coated (RC) papers have a paper base sealed between layers of polyethylene. They process quickly, need short wash times of a few minutes, dry flat and fast, and are ideal for learning, contact sheets, work prints and many finished prints.
- Fibre-based (FB) papers have an uncoated paper base with a baryta (barium sulphate) layer under the emulsion. They need longer fixing and washing, curl when drying and need flattening, but are valued for their depth, surface quality, archival permanence and response to toning, and are the traditional choice for exhibition prints.
- Variable-contrast (VC) papers, such as Ilford Multigrade, contain emulsions sensitive to different colours, and contrast is controlled by filters in the enlarger. Most papers today are variable contrast.
- Graded papers have a fixed contrast grade, typically 0 to 5, and are now made by few manufacturers.
Surfaces include glossy, pearl or lustre, semi-matt and matt; image tones range from neutral to warm or cool, depending on the emulsion and developer.
| Property | Resin-coated (RC) | Fibre-based (FB) |
|---|---|---|
| Processing time | Short (develop 1 min, fix 1 min typical) | Longer (develop 2–3 min, fix 1–3 min with rapid fixer) |
| Washing | About 2–5 min | About 30–60 min, less with washing aid |
| Drying | Flat, quick | Curls; needs pressing or flattening |
| Archival life | Good | Excellent with correct processing |
| Toning | Possible, less effect | Strong, classic results |
| Typical use | Learning, proofs, many finished prints | Exhibition and archival prints |
Setting up the enlarger
Place the clean negative in the carrier, emulsion side down. Set the easel blades for the desired print size and borders, and raise or lower the enlarger head until the image fills the frame. With the lens wide open for brightness, focus on the grain using a grain focuser at the centre of the image, then stop the lens down to the working aperture, typically f/8 or f/11. Check that the image is straight and that no light spills around the negative carrier onto the paper, which reduces contrast. Insert the contrast filter you plan to start with, often a grade 2 or 2½ filter for a normal negative.
Test strips
A test strip determines the correct exposure. Place a strip of paper across an important part of the image, covering a range of tones such as a face, a highlight and a shadow, and expose it in steps by progressively covering sections with card. Two systems are used:
- Linear steps: equal time increments, such as 5, 10, 15, 20 and 25 seconds. These are easy to make, but the steps are uneven in stops: the change from 5 to 10 seconds is a full stop, while 20 to 25 seconds is only a third of a stop.
- F-stop steps: each section receives a fixed fraction of a stop more than the previous, such as one-third or one-half stop increments. F-stop timers or calculated times make the steps visually even, and they make dodging, burning and print size changes easier to calculate.
where \(t_0\) is the base time, \(s\) the step size in stops (for example 1/3), and \(n\) the step number. With a base of 8 seconds and third-stop steps, the sequence is about 8, 10.1, 12.7, 16, 20.2 and 25.4 seconds.
Worked problem
Making an f-stop test strip
A printer wants a test strip with half-stop steps starting at 6 seconds, with six sections. What are the cumulative exposure times for each section, and what incremental times should be given if sections are uncovered one at a time?
Show solution
- Cumulative times: 6 × 2^(0, 0.5, 1, 1.5, 2, 2.5) = 6, 8.5, 12, 17, 24, 33.9 seconds.
- To build the strip by uncovering progressively, expose the whole strip for 6 s, then give increments of 2.5, 3.5, 5, 7 and 9.9 s, uncovering one more section before each.
- Alternatively, start with all sections exposed and cover sections progressively in reverse order.
Answer: Cumulative times of about 6, 8.5, 12, 17, 24 and 34 s, built from increments of 2.5, 3.5, 5, 7 and 9.9 s.
Choosing exposure and contrast
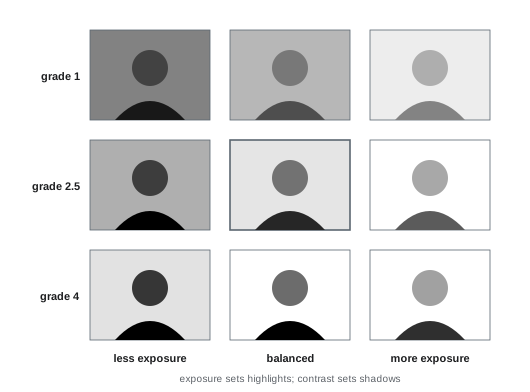
Printing involves two separate decisions: exposure controls the overall darkness, set first for the highlights; contrast controls the separation between highlights and shadows, set by the filter or paper grade. A common method: choose the exposure that renders the important highlights correctly, with delicate detail in whites such as skin or clouds. Then examine the shadows: if they are too light and murky grey, increase contrast; if they are too dark and blocked, with lost detail, decrease contrast. Changing contrast filters with many VC papers also slightly changes effective exposure, though Ilford Multigrade filters 00 to 3½ are designed for roughly constant exposure, with grades 4 to 5 needing about double. Iterate: adjust contrast, make a new test, set exposure for the highlights again, and check the shadows. Aim for a print with a true black where the scene has deep shadows and a clean white where the scene has specular highlights, unless a softer look is intended.
Variable-contrast filters and grades
Variable-contrast papers contain a mixture of emulsions: one sensitive to green light with low contrast and one sensitive to blue light with high contrast. Yellow filters pass mostly green light, producing low-contrast results; magenta filters pass mostly blue light, producing high contrast. Filter sets, such as Ilford Multigrade filters from 00 (lowest) to 5 (highest) in half-grade steps, sit above the negative or under the lens; colour enlarger heads produce the same effect with yellow and magenta dials, using conversion tables supplied by paper manufacturers. Grade 2 to 2½ is considered normal for a well-exposed, normally developed negative. A flat negative from an overcast day may need grade 3 or 4; a contrasty negative from harsh sunlight may need grade 1 or 1½.
| Filter grade | Contrast | Typical negative |
|---|---|---|
| 00–1 | Very low to low | Very contrasty, overdeveloped |
| 1½–2½ | Normal | Normal exposure and development |
| 3–3½ | Higher | Flat or slightly underdeveloped |
| 4–5 | Very high | Very flat, underdeveloped |
Processing prints
Prints are processed in trays, one size larger than the paper, with enough solution to cover the print. A typical RC sequence: developer for 1 minute with continuous gentle rocking, stop bath for about 10 to 30 seconds, fixer for about 1 minute in rapid fixer at paper dilution, then wash for 2 to 5 minutes and dry. Fibre-based papers need longer development, typically 2 to 3 minutes, and longer, carefully timed fixing and washing (Lesson 10). Slide the print into the developer emulsion side up, ensuring it is fully immersed quickly to avoid uneven development; use separate tongs for each tray. Develop for the full recommended time even if the image appears quickly, since full development produces the richest blacks; pulling a print early because it seems too dark gives muddy, weak tones, and the correct fix is less exposure.
Judging prints and dry-down
Judge prints under consistent, bright white light, ideally similar to how they will be displayed, rather than under the safelight. Fibre-based prints in particular dry down: they look slightly darker and less brilliant when dry than when wet, by roughly 5 to 10 % of exposure, depending on the paper. Experienced printers compensate by reducing exposure slightly from the wet print that looks right, or by drying a test print quickly with a hair dryer or microwave to check. RC papers dry down less. Viewing light also matters: prints judged under a very bright viewing lamp will look too dark in normal room light.
Scaling exposure for print size
When changing print size, the light from the enlarger spreads over a larger or smaller area, and exposure must change accordingly. The required exposure time scales approximately with the square of the ratio of lens-to-paper distances, or with magnification:
where \(M\) is the linear magnification from negative to print. Exposure meters and timers with magnification compensation make this easy, and f-stop printing simplifies the calculation, since a change in stops can be applied directly to all dodging and burning times.
Worked problem
Changing print size
A 35 mm negative printed at 8 × 10 inches (magnification about 7) needs 12 seconds at f/8. What time is needed for a 16 × 20 inch print (magnification about 14) at the same aperture?
Show solution
- Ratio: (14 + 1) / (7 + 1) = 15 / 8 = 1.875.
- Squared: 1.875² ≈ 3.52.
- New time: 12 × 3.52 ≈ 42 seconds, or open the lens about 2 stops to f/4 and use about 10.5 seconds.
- Make a new test strip to confirm, since reciprocity effects in paper and lens differences can alter results.
Answer: About 42 seconds at f/8 (or about 10.5 seconds at f/4), confirmed with a test strip.
The work print
A work print is a first good print that is studied, marked up and refined. Examine it carefully under good light: which areas draw the eye, which are too bright or too dark, whether the edges distract, and whether the tonal range is right. Mark it with a pencil or on a note: dodge the face by a third of a stop, burn the sky by one stop, burn the corners by half a stop. These notes, together with the base exposure and contrast, form a printing map that lets you reproduce the print later. Lesson 10 covers dodging, burning and the techniques of fine printing.
Print developers and image tone
Print developers affect the colour and contrast of prints. Neutral developers, such as Ilford Multigrade developer and Kodak Dektol, give neutral to slightly cool blacks on neutral papers; warm-tone developers give brown-black tones on warm-tone papers; and some developers can be diluted more for softer contrast or less for richer blacks. Keep the developer at about 20 °C, replace it when it becomes exhausted, indicated by slower development, weaker blacks or a brown colour, and keep track of how many prints have been processed. Developer that has been oxidized in an open tray for many hours loses activity, so cover trays or discard developer after long sessions.
Print borders and presentation
The white border around a print, created by the easel blades, frames the image and protects it from handling. Some photographers print the full negative including a black border, showing the edges of the frame as evidence that the image was not cropped, a style associated with documentary photographers. Filing out the negative carrier slightly to show the film edge creates this effect. Others prefer clean white borders of equal width, or a slightly wider bottom border for visual balance.
Common printing problems
Muddy, grey prints usually result from underdevelopment, exhausted developer or safelight fog; prints with grey borders indicate fog from safelights or light leaks; uneven development appears as blotches when prints are not fully immersed quickly; and yellow or brown stains suggest exhausted fixer, insufficient fixing or contaminated developer. Blurred prints may come from vibration, a poorly aligned enlarger or missed focus, which a grain focuser and a sturdy bench prevent.
Printing for a series
When printing a set of images for a portfolio or exhibition, aim for consistency: similar paper, image tone, contrast character, print size and border style across the series. Lay prints out together and adjust any that look out of place, since viewers notice when one print is markedly lighter, darker or more contrasty than its neighbours.
Common mistakes
MistakePulling prints early from the developer.
InsteadDevelop fully and reduce exposure instead.
MistakeAdjusting exposure to fix contrast problems.
InsteadSet exposure for highlights and contrast for shadows.
MistakeJudging prints under the safelight.
InsteadJudge under consistent white light.
MistakeIgnoring dry-down with fibre paper.
InsteadReduce exposure slightly or dry a test.
MistakeGuessing exposure for a new print size.
InsteadScale exposure and make a new test strip.
Summary and key terms
- RC papers are fast and convenient; FB papers are archival and prized for exhibitions.
- Variable-contrast papers use filters from 00 to 5.
- Test strips find exposure; f-stop steps are visually even.
- Set exposure for the highlights and contrast for the shadows.
- Develop prints fully and judge them under white light.
- Fibre prints dry down slightly darker.
- Scale exposure with magnification and refine from a marked work print.
- Resin-coated paper
- Paper sealed in polyethylene for fast processing.
- Fibre-based paper
- Traditional paper with a baryta layer.
- Variable-contrast paper
- Paper whose contrast is set by filters.
- Paper grade
- Contrast rating of paper or filter.
- Test strip
- Strip of paper exposed in steps to find exposure.
- F-stop printing
- Exposure steps in fractions of stops.
- Dry-down
- Darkening of prints as they dry.
- Work print
- First print used for evaluation and planning.
- Printing map
- Notes of exposures and manipulations.
- Magnification
- Ratio of print size to negative size.
Practice problems
Work each problem on paper first, then reveal the answer to check.
Name two advantages of RC paper.
Show answer
Fast processing and washing, flat drying.
Why choose fibre-based paper?
Show answer
Depth, surface, permanence and toning.
Which emulsion in VC paper is high contrast?
Show answer
The blue-sensitive emulsion.
Normal filter grade?
Show answer
About 2 to 2½.
Times for third-stop steps from 10 s?
Show answer
About 10, 12.6, 15.9, 20, 25.2 s.
What sets exposure in printing?
Show answer
The highlights.
What do murky grey shadows suggest?
Show answer
Contrast too low.
Typical RC developer time?
Show answer
About 1 minute.
Time for 11 × 14 (M ≈ 10) if 8 × 10 (M ≈ 7) is 10 s?
Show answer
About 18.9 s.
What is a printing map?
Show answer
Notes of base exposure, contrast, dodging and burning.
Lesson quiz · 5 questions
Score 60% or more to complete this lesson.
Create a free account to save your progress, take quizzes and earn a certificate.