
PHOT-240 · Lesson 10 of 12 · 25 min
Fine printing: dodging, burning, split-grade and toning
A straight print, made with a single exposure and contrast setting, is only the beginning. Fine printing shapes the image: lightening a face that draws the eye, darkening a sky that is too bright, burning the edges to hold attention inside the frame, adjusting contrast differently in shadows and highlights, and toning the print for colour and permanence. Ansel Adams compared the negative to a musical score and the print to its performance; this lesson covers the techniques of that performance: dodging and burning, edge burning, split-grade printing, flashing, archival processing of fibre-based prints, toning with selenium and sepia, drying and flattening, spotting, mounting and presentation.
Dodging
Dodging means holding back light from part of the print during the main exposure, making that area lighter. Dodging tools include small cards or foil shapes on thin wires, the printer's own hands, and cut-out masks. Keep the tool moving gently during dodging so that its edges are soft and invisible, and hold it at a height between the lens and paper that gives the right edge softness: closer to the lens makes softer edges, closer to the paper sharper ones. Dodge times are given as a fraction of the base exposure, or, in f-stop printing, as a fraction of a stop. A typical dodge might be a third of a stop on a face in shadow, about 20 % of the exposure time. Dodging too much produces grey, flat areas with weak blacks, since those areas also receive less exposure for their shadows.
Burning
Burning means giving extra exposure to part of the print after the main exposure, making that area darker. A card with a hole, or the hands shaped to let light through a small opening, directs extra light to the area while shielding the rest. Typical burns include darkening skies, bright backgrounds, distracting highlights and the edges of the frame. Burns are often large, from half a stop to two stops or more for skies and windows. Burning with a higher-contrast filter adds separation in highlights, such as cloud detail, while burning with a lower-contrast filter darkens areas without blocking them. Keep the burning tool moving, and work in sequences: write down each step so that the print can be repeated.
Worked problem
A printing map in f-stops
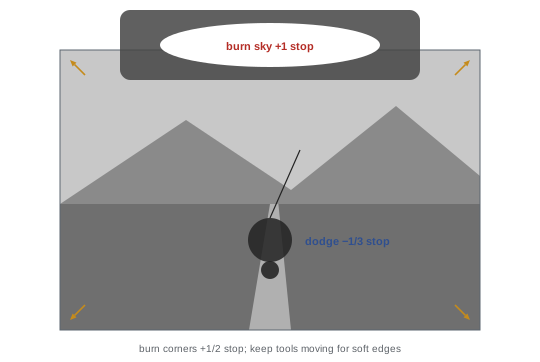
A landscape prints well at a base exposure of 16 seconds at grade 2½. The printer wants to dodge a foreground figure by a third of a stop, burn the sky by one stop, and burn each corner by half a stop. What times are needed?
Show solution
- Dodge the figure by 1/3 stop: 16 × (1 − 2^(−1/3)) ≈ 16 × 0.206 ≈ 3.3 s held back during the main exposure.
- Burn the sky by 1 stop: 16 × (2¹ − 1) = 16 s extra exposure.
- Burn each corner by 1/2 stop: 16 × (2^0.5 − 1) ≈ 16 × 0.414 ≈ 6.6 s extra.
- Record the map: base 16 s at 2½; dodge figure 3.3 s; burn sky +16 s; corners +6.6 s each.
Answer: Dodge the figure for about 3.3 s, burn the sky for 16 s and each corner for about 6.6 s.
Edge burning
Burning the edges and corners of a print slightly, often by a quarter to half a stop, is a common technique that keeps the viewer's eye within the frame. Bright edges pull attention out of the image, while gently darkened edges frame it, similar to a vignette. Edge burning should be subtle enough that viewers do not notice it; obvious dark corners look dated and heavy-handed. Many master printers routinely burn edges on nearly every print.
Split-grade printing
Split-grade printing uses two exposures on variable-contrast paper: one through the lowest-contrast filter (00 or 0), which mainly prints the highlights and light mid-tones, and one through the highest-contrast filter (5), which mainly prints the shadows and darker tones. By adjusting the two exposures independently, the printer controls highlights and shadows separately, achieving any intermediate contrast and allowing localized contrast changes by dodging or burning during either exposure. A common method: make a test strip with the soft filter to set the highlights, then a test strip with the hard filter on top of the chosen soft exposure to set the shadows. Split-grade printing gives fine control and smooth tonality and has become a widely used technique for fibre-based printing.
| Exposure | Filter | Main effect | Local manipulation |
|---|---|---|---|
| First (soft) | 00 or 0 | Highlights and light mid-tones | Dodge or burn to adjust highlight detail |
| Second (hard) | 5 | Shadows and dark tones | Dodge or burn to deepen or lighten shadows |
Flashing
Flashing means giving the paper a brief, uniform exposure to light without the negative, before or after the image exposure, to bring the paper to the threshold of tone. This helps difficult highlights, such as white skies or bright windows, show subtle detail that would otherwise print as paper white, without darkening the rest of the print noticeably. The flash exposure is found by testing: the longest flash time that produces no visible tone on its own, then used with the main exposure. Flashing can also be applied locally with a small light source.
Processing fibre-based prints for permanence
Fibre-based papers absorb chemicals into the paper base, so they need careful processing to remove fixer and silver compounds that would cause staining and fading over time. A typical archival sequence uses a two-bath fixing method: fix the print for half the recommended time in a first fixer bath, then for the remaining time in a second, fresher bath, which ensures complete fixing; when the first bath reaches capacity, it is discarded, the second becomes the first, and a fresh second bath is mixed. Alternatively, a single short fix in rapid fixer, as Ilford recommends for its fibre papers, minimizes fixer absorption into the base. After fixing, rinse, treat with a washing aid (hypo clearing agent) for the recommended time, and wash in running water or a print washer, typically 30 to 60 minutes without a washing aid, or much less with one, following the manufacturer's instructions. Residual fixer can be tested with residual hypo test solutions; residual silver with a sodium sulphide spot test.
Toning
Toning converts the silver image partly or wholly into other compounds, changing its colour and often improving its permanence:
- Selenium toner, diluted typically from about 1+9 to 1+20 for papers, converts silver to more stable silver selenide, protecting the image from oxidation and pollutants. At moderate dilutions and times, it deepens blacks and increases the density range, a subtle improvement many printers apply to all fibre prints; on warm-tone papers, it shifts image colour toward purple-brown. Selenium is toxic and must be handled with gloves and good ventilation.
- Sepia toner, a two-bath process in which the print is bleached and then redeveloped in a sulphide or thiourea toner, produces warm brown tones and excellent permanence; the traditional sulphide toner smells strongly of rotten eggs and requires ventilation.
- Gold toner produces cool blue-black tones on neutral papers and enhances permanence.
- Split toning combines toners, such as selenium followed by sepia, to produce different colours in highlights and shadows.
- Iron (blue) and other dye toners produce strong colours for creative effects.
Toning should be done on fully fixed and washed prints, followed by further washing.
Drying, flattening and spotting
RC prints dry flat on racks or in heated dryers in minutes. Fibre-based prints curl as they dry; they can be dried face down on clean fibreglass screens, then flattened in a dry mount press or under weights between acid-free boards. Some printers prefer hanging fibre prints in pairs, back to back. Spotting removes white specks caused by dust on the negative: using fine brushes and spotting dyes mixed to match the image tone, apply tiny dots to fill the specks, building density gradually. Black specks, from pinholes in the negative, are harder to fix and may require etching or careful retouching. Good darkroom cleanliness minimizes spotting.
Mounting and presentation
Finished prints are protected and presented by mounting and matting. Dry mounting bonds the print to an acid-free board with heat-activated tissue; it is permanent and flattening but not easily reversible. Archival practice, preferred by museums, uses hinge mounting or photo corners, which hold the print in a window mat of acid-free, lignin-free museum board without adhesive on the print itself, so it can be removed. Sign prints in pencil on the mat or the back of the print. Frame behind glass or acrylic with ultraviolet protection, keep away from direct sunlight, and store unframed prints in archival boxes with interleaving tissue. Properly processed, toned fibre-based prints can last well over a century.
Lith printing and other effects
Lith printing uses special developers, highly diluted, with heavily overexposed paper, producing prints with rich, grainy shadows and soft, warm highlights in distinctive colours ranging from salmon pink to chocolate brown. The print is pulled from the developer at a critical moment by eye, so each print is unique. Other effects include solarization (the Sabattier effect), in which a print or film is briefly exposed to light during development, partially reversing tones and creating dark outlines along edges; and bleaching, in which areas of a print are lightened locally with dilute potassium ferricyanide applied with a brush, a technique that brightens highlights such as eyes and must be handled with care.
Making repeatable prints
Fine printing is only useful if the print can be made again, for an edition, a replacement or an exhibition. Keep a printing record for every finished print: the negative identification, enlarger and lens, aperture, magnification or print size, paper type and batch, filter grades and times for each exposure, every dodge and burn with its area and time, developer and dilution, development time, toning and processing details. Many printers make a small sketch of the image marked with dodges and burns. Paper batches vary slightly, so when starting a new box, make a quick test to confirm the base exposure before reprinting.
Editions and signatures
When printing for sale or exhibition, photographers often produce limited editions, a stated number of prints of an image at a given size, numbered and signed. Darkroom prints in an edition vary slightly, which is part of their character. Record each print made and keep edition records honest: print the stated number, note any artist's proofs, and do not later reprint the same edition at the same size. Sign prints in soft pencil on the back or on the mat, and include the title, date and edition number.
The time a fine print takes
Making a fine print can take hours: a test strip, a work print, several refinements of dodging and burning, a split-grade adjustment, then processing, washing, toning and drying, followed by evaluation in good light. Printers often return the next day to view the dried print with fresh eyes before making a final version. This time is part of the craft, and it is why many photographers make fewer, more carefully considered prints than they would digital outputs.
Viewing prints critically
Evaluate finished prints in good light at a comfortable viewing distance, then up close. Ask whether the blacks are rich and the whites clean, whether important highlights and shadows show detail, whether the eye moves through the image as intended, and whether any dodging or burning is visible. Compare the print with your previsualization and your printing notes.
Common mistakes
MistakeHolding dodging tools still.
InsteadKeep tools moving for soft, invisible edges.
MistakeObvious dark corners.
InsteadEdge burn subtly by a quarter to half a stop.
MistakeUnder-washing fibre prints.
InsteadUse two-bath fixing, washing aid and proper wash times.
MistakeToning without gloves or ventilation.
InsteadHandle toners safely with protection.
MistakeDry mounting valuable prints by default.
InsteadConsider reversible archival hinge mounting.
Summary and key terms
- Dodging holds back light to lighten areas; burning adds light to darken them.
- Express dodge and burn amounts as fractions of stops.
- Edge burning keeps attention inside the frame.
- Split-grade printing controls highlights and shadows with soft and hard exposures.
- Flashing brings difficult highlights to the threshold of tone.
- Fibre prints need careful fixing and washing for permanence.
- Toning changes colour and improves permanence; finish with spotting and archival presentation.
- Dodging
- Holding back light from part of a print.
- Burning
- Giving extra exposure to part of a print.
- Edge burning
- Darkening edges to frame the image.
- Split-grade printing
- Separate soft and hard filter exposures.
- Flashing
- Uniform pre- or post-exposure without the negative.
- Two-bath fixing
- Fixing in two successive baths for completeness.
- Washing aid
- Solution that speeds fixer removal.
- Selenium toner
- Toner that protects and deepens silver images.
- Sepia toner
- Bleach and redevelop toner giving brown tones.
- Spotting
- Retouching white specks with dye.
Practice problems
Work each problem on paper first, then reveal the answer to check.
What does holding a dodging tool closer to the lens do?
Show answer
Softens its edge.
Dodge time for 1/3 stop on a 20 s base?
Show answer
About 4.1 s.
Burn time for 1 stop on a 10 s base?
Show answer
10 s.
Burn time for 1/2 stop on a 12 s base?
Show answer
About 5 s.
Why edge burn?
Show answer
To keep the eye inside the frame.
What does the soft exposure control in split-grade printing?
Show answer
Highlights and light mid-tones.
What is flashing used for?
Show answer
Bringing difficult highlights to the threshold of tone.
Why use two-bath fixing?
Show answer
To ensure complete fixing.
What does selenium toner do?
Show answer
Protects the image and deepens blacks.
Why prefer hinge mounting for archives?
Show answer
It is reversible and adhesive-free on the print.
Lesson quiz · 5 questions
Score 60% or more to complete this lesson.
Create a free account to save your progress, take quizzes and earn a certificate.