
ENGG-160 · Lesson 7 of 12 · 28 min
Materials, manufacturing and prototyping
A design is not finished when it works on paper; it must be made, at a reasonable cost, in the quantities needed, by the people and machines available. Many promising products have failed because they were too expensive or too difficult to manufacture, and many cost overruns trace back to design decisions that ignored how parts would be made and assembled. This lesson introduces the choices that connect a design to the physical world: selecting materials, understanding the main families of manufacturing processes and what each implies for a part's shape, cost and tolerances, applying the principles of design for manufacture and assembly, estimating how cost depends on quantity, and using prototypes of the right kind at the right time to learn quickly and cheaply.
Choosing materials
Material choice and design are inseparable: a part designed for cast iron looks nothing like one designed for injection-moulded plastic or carbon fibre. Engineers choose materials by matching their properties to the requirements of Lesson 2:
- Mechanical: strength (yield and ultimate), stiffness (modulus of elasticity), toughness, hardness, fatigue and creep resistance.
- Physical: density, thermal expansion, thermal and electrical conductivity, melting point.
- Environmental: corrosion resistance, ultraviolet and chemical resistance, behaviour at high and low temperatures (CHEM-103).
- Practical: cost, availability, ease of manufacture and joining, recyclability and embodied carbon.
For lightweight design, what matters is often not strength or stiffness alone but performance per unit mass. For a beam of given length that must not deflect more than a set amount, and whose depth can vary, the material that gives the lightest beam is the one with the highest value of \(E^{1/2}/\rho\), where E is the modulus and ρ the density. The materials scientist Michael Ashby developed charts that plot such properties against each other for all material families, so designers can screen thousands of materials quickly.
| Material | E (GPa) | ρ (Mg/m³) | E/ρ | E^½/ρ | Approx. cost ($/kg) |
|---|---|---|---|---|---|
| Structural steel | 200 | 7.85 | 25 | 1.8 | 1–2 |
| Aluminium alloy | 70 | 2.70 | 26 | 3.1 | 3–5 |
| Titanium alloy | 115 | 4.50 | 26 | 2.4 | 20–40 |
| Carbon-fibre composite | 70 | 1.60 | 44 | 5.2 | 30–100 |
| Spruce (along grain) | 10 | 0.45 | 22 | 7.0 | 1–3 |
| Nylon | 3 | 1.14 | 2.6 | 1.5 | 3–6 |
The table explains several familiar choices. Steel, aluminium and titanium have almost the same stiffness per unit mass, so for a tie rod (where E/ρ matters) none has an advantage; but for a light, stiff beam or panel, aluminium beats steel and wood beats both, which is why aircraft were once built of spruce and why aluminium and composites dominate aircraft today. Cost and manufacturability then narrow the choice.
Families of manufacturing processes
Hundreds of processes exist, but most belong to a few families, each with its own shapes, tolerances, costs and best production quantities:
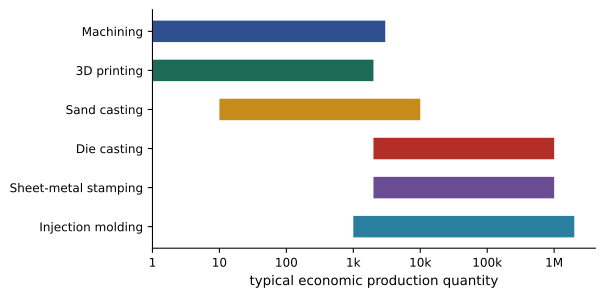
- Casting: pouring molten metal into a mould (sand casting for large, rough parts; die casting for high volumes of aluminium and zinc parts; investment casting for precise, complex parts such as turbine blades). Good for complex shapes; needs draft angles and uniform walls.
- Moulding of plastics: injection moulding forces molten plastic into a steel mould, producing millions of identical parts at low cost each but requiring expensive tooling; thermoforming, blow moulding and rotational moulding suit other shapes and quantities.
- Forming: shaping solid metal by force, including rolling, forging, extrusion, stamping and bending sheet metal. Forged parts are tough; extrusions make long constant sections such as aluminium window frames; sheet metal forms enclosures and car bodies.
- Machining: removing material with cutting tools (turning, milling, drilling, grinding), usually on computer numerically controlled (CNC) machines. Highly precise and flexible, but slower and more wasteful for large quantities.
- Joining: welding, brazing, soldering, adhesive bonding and mechanical fastening (bolts, rivets, snap fits).
- Additive manufacturing (3D printing): building parts layer by layer from plastic, resin or metal powder. It needs no tooling and can make shapes impossible by other means, such as internal channels and lattices, but is slower and costlier per part at volume, and its properties can vary with build direction.
Each process imposes design rules. Moulded and cast parts need draft (a slight taper so they release from the mould), uniform wall thickness to avoid shrinkage defects, and generous radii. Machined parts should avoid deep narrow pockets and internal sharp corners, which a rotating tool cannot cut. Sheet-metal parts need bend radii at least equal to the sheet thickness and holes kept away from bends. Designers who know these rules avoid expensive redesigns.
How cost depends on quantity
Manufacturing costs are usually divided into fixed costs, which do not depend on how many parts are made (tooling, moulds, fixtures, programming and setup), and variable costs, which do (material, machine time and labour per part). The cost per part is the fixed cost divided by the quantity plus the variable cost. Processes with high tooling costs and low variable costs, such as injection moulding and stamping, become economical only at high volumes; processes with low fixed costs, such as machining and 3D printing, suit prototypes and small batches.
# Cost per part for three ways to make a small plastic housing
processes = {                       # fixed cost ($: setup or tooling), variable cost ($ per part)
    "CNC machining":     (300.0, 45.00),
    "3D printing (SLS)": (0.0, 28.00),
    "Injection molding": (18000.0, 1.20),
}
print("Quantity   " + "   ".join(f"{p:>18s}" for p in processes))
for n in [10, 100, 500, 1000, 10000]:
    row = [(fixed + var * n) / n for fixed, var in processes.values()]
    print(f"{n:8d}   " + "   ".join(f"{c:18.2f}" for c in row))

def breakeven(a, b):
    (fa, va), (fb, vb) = processes[a], processes[b]
    return (fb - fa) / (va - vb)
names = list(processes)                   # machining, printing, molding
print(f"3D printing and molding cost the same at {breakeven(names[1], names[2]):.0f} parts")
print(f"Machining and molding cost the same at {breakeven(names[0], names[2]):.0f} parts")Quantity CNC machining 3D printing (SLS) Injection molding
10 75.00 28.00 1801.20
100 48.00 28.00 181.20
500 45.60 28.00 37.20
1000 45.30 28.00 19.20
10000 45.03 28.00 3.00
3D printing and molding cost the same at 672 parts
Machining and molding cost the same at 404 partsFor ten prototypes, 3D printing is far cheaper; injection moulding costs $1,800 a part because the $18,000 mould is spread over only ten parts. At about 670 parts, moulding overtakes printing, and at 10,000 parts it costs about one-ninth as much. A product team might therefore 3D-print the first few hundred units to launch quickly and test the market, then invest in a mould once the design is stable and demand is proven. Note that moulding also allows thinner walls and better surface finish, and that a mould locks in the design: changes after tooling are expensive.
Worked problem
Choosing a process for a bracket
A team needs 2,000 steel mounting brackets a year for five years. Options are laser cutting and bending sheet steel ($600 setup and programming, $4.10 per part) or stamping ($22,000 for a progressive die, $0.85 per part). Which is cheaper over the product's life?
Show solution
- Total quantity: 2,000 × 5 = 10,000 brackets.
- Laser and bend: 600 + 4.10 × 10,000 = $41,600.
- Stamping: 22,000 + 0.85 × 10,000 = $30,500.
- Break-even: (22,000 − 600)/(4.10 − 0.85) = 6,585 parts.
Answer: Stamping saves about $11,000 over five years if the design stays stable and the volume materializes, but needs the die paid for up front, and a design change would require a new die. If sales are uncertain, or design changes are likely in the first year, laser cutting for the first production run and committing to a die later is the lower-risk choice. Engineering economics (ENGG-100) and judgement about uncertainty both matter.
Design for manufacture and assembly
Design for manufacture and assembly (DFMA) is a set of principles for designing products that are easy and cheap to make and put together. Studies by Geoffrey Boothroyd and Peter Dewhurst in the 1980s showed that assembly often accounts for a large share of a product's cost, and that redesigning for assembly commonly cuts part counts by half and costs by a third or more. Key principles:
- Minimize the number of parts. For each part ask: does it move relative to its neighbours, must it be a different material, or must it be separate to allow assembly or service? If not, it is a candidate for combining with another part.
- Use standard parts and common fasteners; reduce the number of different screw sizes.
- Design parts to be self-locating and self-aligning, with chamfers, guides and features that make wrong assembly impossible (poka-yoke, Japanese for mistake-proofing).
- Assemble from one direction, preferably top-down, so the product need not be turned over.
- Replace screws with snap fits or integrated features where service allows.
- Specify tight tolerances only where function requires them: cost rises steeply as tolerances tighten (Lesson 3).
Worked problem
Reducing part count
A small electronics enclosure has a base, a lid, four corner posts, four screws for the posts, four screws for the lid, a separate bracket for the circuit board and two screws for the bracket: 17 parts. Apply the minimum-part questions.
Show solution
- Base and lid must be separate to allow assembly and service: keep both.
- Corner posts and the board bracket do not move and need not be different materials: mould them into the base.
- The eight post and bracket screws disappear with the posts and bracket.
- Replace the four lid screws with two snap fits and two screws (screws retained where tamper resistance is needed).
Answer: The enclosure drops from 17 parts to 4 (base, lid, two screws), cutting assembly time, inventory and the number of things that can be lost or assembled wrongly. The moulded base costs a little more to tool, but the savings over thousands of units are large. DFMA reviews like this are standard practice before tooling is committed.
Related "design for X" guidelines include design for service (can a technician reach and replace the parts that wear?), design for testing, design for transport and installation, and design for disassembly and recycling at end of life, which Lesson 10 discusses further.
Prototyping
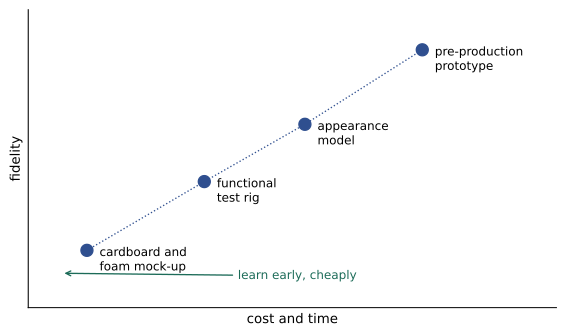
A prototype is any early version of a design built to learn something. Prototypes reduce risk by answering questions before large sums are committed. They vary in fidelity:
- Low-fidelity prototypes, made of cardboard, foam, tape or a quick 3D print, test size, shape, layout and how people interact with a product. They take hours and cost almost nothing.
- Functional prototypes test whether a mechanism, circuit or process works, often looking nothing like the final product: a breadboard circuit, a test rig, a pump in a barrel.
- Appearance models look like the final product but may not work; they test aesthetics and user reaction.
- Engineering and pre-production prototypes are made with near-final materials and processes to test performance, durability, manufacturing and certification.
The key discipline is to decide, before building, what question the prototype must answer and how the answer will be judged. "Build it and see" wastes time; "build a foam model to find whether users can reach the controls while wearing winter gloves, judged by five users each completing the task in under ten seconds" produces a decision. Build the cheapest prototype that can answer the question, and expect to build several. Teams that prototype early and often find problems when they are cheap to fix.
Digital prototypes, CAD models with simulation (Lesson 6), and virtual reality reviews complement physical ones, but physical prototypes still reveal problems that models miss: parts that cannot be assembled by hand, surfaces that feel wrong, tolerances that stack up badly, and behaviour under real loads and environments.
Working with manufacturers
Designers rarely make production parts themselves. Involve manufacturing engineers, suppliers and fabricators early: they know the capabilities and costs of their processes and can suggest changes that save money without compromising function. Request quotations on the actual drawings and models, ask what features drive cost, and discuss tolerances. For building projects, contractors' constructability reviews play the same role. A short conversation before the design is frozen often saves weeks after it.
Common mistakes
MistakeChoosing a material on strength alone.
InsteadConsider stiffness, density, environment, cost, manufacturability and embodied carbon.
MistakeDesigning a part without considering how it will be made.
InsteadChoose the process early and follow its design rules.
MistakeComparing processes on cost per part at one quantity.
InsteadInclude fixed costs and find the break-even quantity for the expected volume.
MistakeSpecifying tight tolerances everywhere.
InsteadTighten tolerances only where function requires them.
MistakeBuilding prototypes without a clear question.
InsteadDefine what each prototype must answer and how success will be judged.
Summary and key terms
- Choose materials by matching mechanical, physical, environmental and practical properties to the requirements.
- Indices such as E/ρ and E^½/ρ identify the best materials for light, stiff designs.
- Casting, moulding, forming, machining, joining and additive manufacturing each impose design rules.
- Cost per part = fixed cost/quantity + variable cost; find break-even quantities between processes.
- DFMA minimizes parts, uses standard parts and self-locating features, and relaxes tolerances where possible.
- Prototypes range from cardboard to pre-production; each should answer a defined question.
- Involve manufacturers early to save cost and avoid redesign.
- Specific stiffness
- Modulus of elasticity divided by density, E/ρ.
- Material index
- A combination of properties that measures performance for a design goal.
- Injection moulding
- Forcing molten plastic into a steel mould to make identical parts.
- Draft angle
- A slight taper that lets a part release from a mould.
- CNC machining
- Computer-controlled removal of material with cutting tools.
- Additive manufacturing
- Building parts layer by layer; 3D printing.
- Fixed cost
- A cost independent of the quantity made, such as tooling.
- Break-even quantity
- The quantity at which two processes cost the same in total.
- DFMA
- Design for manufacture and assembly.
- Prototype fidelity
- How closely a prototype resembles the final product.
Practice problems
Work each problem on paper first, then reveal the answer to check.
Which material in the table gives the lightest stiff beam (highest E^½/ρ)?
Show answer
Spruce (7.0), then carbon-fibre composite (5.2).
Why do steel and aluminium tie rods of equal stiffness weigh about the same?
Show answer
Their E/ρ values are almost equal.
Name one design rule each for moulded parts and machined parts.
Show answer
Moulded: include draft and uniform walls. Machined: avoid sharp internal corners and deep narrow pockets.
From the code output, what does a moulded housing cost at 1,000 parts?
Show answer
$19.20 each.
A process has $5,000 fixed and $2 variable cost. Find the cost per part at 2,500 parts.
Show answer
5,000/2,500 + 2 = $4.00.
Find the break-even between process A ($1,000 + $10/part) and B ($9,000 + $2/part).
Show answer
8,000/8 = 1,000 parts.
State the three questions used to decide whether a part can be eliminated.
Show answer
Does it move relative to others? Must it be a different material? Must it be separate for assembly or service?
What is poka-yoke?
Show answer
Mistake-proofing: designing parts so they cannot be assembled incorrectly.
Write a clear question for a low-fidelity prototype of a handheld meter.
Show answer
For example: can users hold it and press the main button with one gloved hand, judged by five users succeeding without dropping it?
Why might a team 3D-print early production units even though moulding is cheaper at volume?
Show answer
To launch quickly, test the market and finalize the design before committing to expensive tooling.
Lesson quiz · 5 questions
Score 60% or more to complete this lesson.
Create a free account to save your progress, take quizzes and earn a certificate.