
CRE-250 · Lesson 5 of 12 · 27 min
Scenes, overlays and production software
Streaming software is the control room of a live show. It combines cameras, game capture, screen shares, images, browser sources, alerts and audio into scenes, switches between them, adds graphics and effects, and sends the result to the encoder. Good production makes a stream easy to follow and gives it a recognizable identity; cluttered or broken production distracts and frustrates viewers. This lesson covers streaming software options, sources and scenes, layouts for different formats, overlays and branding, alerts and widgets, transitions and stingers, multi-camera and guest production, vertical and dual-format output, automation and stream controllers, recording and replay, and testing before going live.
Streaming software
The main options at the time of writing include:
- OBS Studio: free, open-source software for Windows, macOS and Linux, highly flexible, with plugins and a large community. Many other tools build on it.
- Streamlabs Desktop: built on OBS, with integrated alerts, themes and widgets, aimed at ease of use, with some features requiring a subscription.
- Browser-based studios: services such as StreamYard and Restream Studio run in a web browser, making it easy to bring in remote guests, add branding and multistream, with less control over complex scenes.
- vMix and Wirecast: professional production software with advanced switching, replays, multi-camera input and graphics, often used for events.
- Hardware switchers and all-in-one devices: dedicated video mixers such as the Blackmagic ATEM series, which switch cameras and stream directly or feed a computer.
- Mobile apps and platform apps: direct streaming from phones, with simple overlays.
Choose software that matches your format: OBS for most solo and gaming streams, browser studios for interview shows, professional tools for events.
Sources and scenes
A source is any input: a camera, game capture, window or display capture, image, video file, text, browser source (a web page rendered inside the stream, used for alerts and widgets), audio input or another scene. A scene is a combination of sources arranged in layers. Typical streams have a small set of scenes:
- Starting soon: a holding screen with countdown, music and branding.
- Main or gameplay: game capture with a camera window and overlays.
- Just chatting or camera: the camera large, with chat or images.
- Be right back: a holding screen used during breaks, often with highlights or a slideshow.
- Ending: thanks, socials and next stream.
- Special scenes: guest layouts, screen share, tutorials, sponsor segments.
Grouping sources, using nested scenes for shared elements such as a frame or camera, and naming everything clearly make complex setups manageable.
Layouts for different formats
Layouts should serve the content:
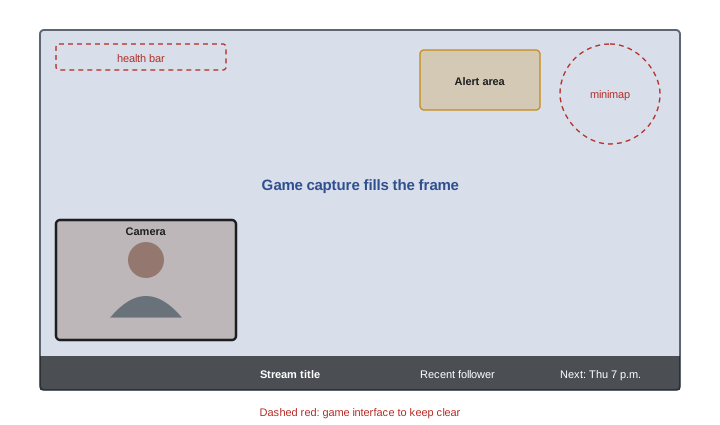
- Gaming: keep the game large and unobstructed; place the camera and overlays where they do not cover important game interface elements such as maps, health bars and subtitles, which vary by game. Some streamers create game-specific layouts.
- Just chatting: the camera is the main source; add visual interest with a well-designed set, chat displayed on screen for VOD viewers, and images or media being discussed.
- Creative: show the work clearly, often with an overhead camera as the main view and a face camera smaller.
- Tutorials: screen share or demonstration as the main view, with the presenter small, and text callouts for key steps.
- Interviews: side-by-side or grid layouts with name labels, switching to a single speaker when appropriate.
Consider how the stream looks on a phone, where many viewers watch: small text and detailed overlays become unreadable.
Overlays and branding
Overlays are the graphic elements around and over the main content: frames, name labels, logos, recent events, goals and information bars. Good overlays reflect the streamer's brand (CRE-110, CRE-230) with consistent colours, fonts and style, remain readable at small sizes, and stay out of the way of the content. Less is often more: many top streamers use minimal overlays or none, letting the content and face carry the stream. Avoid placing important information near edges that may be cropped on some players, and ensure overlays do not obscure captions. Overlays can be designed in graphics software, bought as packages, or built as browser sources with HTML and CSS for dynamic data.
Alerts and widgets
Alerts are on-screen notifications, often with sounds and animations, that celebrate follows, subscriptions, donations, bits, raids and other events. They encourage support by acknowledging it publicly and make streams feel lively. Widgets show running information: goals and progress bars, recent supporters, chat on screen, polls and predictions, timers and countdowns. Services such as Streamlabs, StreamElements and platform-native tools provide alerts and widgets as browser sources. Keep alert sounds at a sensible volume relative to the streamer's voice, limit alert duration so they do not interrupt the content constantly, and consider text-to-speech carefully: viewers may abuse it with offensive messages, so filters and moderation are essential (Lesson 9).
Transitions and stingers
Transitions change from one scene to another. Simple cuts and quick fades are clean; stingers are short animated videos, often with the streamer's logo, that play over the switch, hiding the cut at a set point. Transitions should be short, usually under a second or two, because viewers lose patience with long animations. Consistent transitions between segments help structure the show, for example a stinger whenever the stream moves from gameplay to a chat segment.
Multi-camera and guest production
Multi-camera streams switch between camera angles, such as a face camera, an overhead camera on hands or a wide shot of a studio, adding variety and showing detail. Streaming software switches between scenes containing different cameras, or hardware switchers mix camera feeds before the computer. Guests can join remotely through browser studios, video call software captured into OBS, or dedicated tools that bring remote callers into the production as separate sources with low latency. Remote guests need clear instructions: wired connections where possible, headphones to avoid echo, good light and a test call before the show. A producer or second person can manage switching, guests and chat while the host focuses on talking.
Worked problem
Designing scenes for a weekly interview show
A creator plans a weekly live interview show on YouTube with one remote guest and audience questions. What scenes and sources should be set up?
Show solution
- Starting soon: branded countdown with music and the episode title.
- Host intro: host camera full screen with name label and episode topic.
- Conversation: side-by-side host and guest with name labels, plus a lower-third for the topic.
- Guest solo: guest full screen for longer answers.
- Audience question: side-by-side layout with the selected chat message displayed on screen.
- Ending: thanks, guest's links, next episode, and a be-right-back scene for technical problems.
Answer: Starting soon, host intro, conversation, guest solo, audience question, ending and a technical-difficulty scene, with consistent labels and branding.
Vertical and dual-format output
Mobile platforms favour vertical video, while desktop platforms use horizontal. Some streamers produce both simultaneously, with software or plugins that create a second, vertical canvas from the same sources, rearranging the camera and gameplay for a 9:16 frame. This allows streaming horizontally to one platform and vertically to another, and makes clipping for short-form platforms easier. Designing both layouts requires care: in vertical, the camera often sits on top and a cropped portion of the game below.
Automation, controllers and macros
Automation reduces the number of things a streamer must remember. Stream controllers and hotkeys switch scenes, mute microphones and trigger effects; macros chain several actions, such as switching to the be-right-back scene, muting the microphone and posting a chat message; scene-switching plugins can change scenes automatically when a game window appears or disappears; and chat bots post schedules, links and reminders on timers. Automating sponsor disclosures, safety reminders and breaks helps ensure they happen. Test automations carefully, since a misfiring macro can expose a private window or unmute a microphone at the wrong time.
Recording, replays and VODs
Recording the stream locally, at higher quality than the stream itself, gives better material for highlights and edits (Lesson 11). Many streamers record with separate audio tracks for microphone, game and music, which allows removing copyrighted music or adjusting levels later. Replay buffers save the last few seconds or minutes on demand, letting a streamer capture a great moment with a hotkey and replay it on stream or save it for a clip. Platforms store VODs for a limited time, depending on the platform and account status, so download important streams if you want to keep them.
Testing before going live
Testing prevents embarrassing mistakes. Before important streams, run a private or unlisted test stream, check every scene, confirm audio levels for all sources, verify alerts fire correctly, check that no private windows, notifications, email or personal information appear in display captures, and review the stream on a phone. Display capture of an entire monitor is risky because anything opened appears on stream; window or game capture is safer. Many streamers keep a checklist that includes closing personal apps, enabling do-not-disturb, and checking what is visible in the camera's background.
Organizing scenes and sources
As a stream grows, the number of scenes and sources can become hard to manage. Good habits include naming every source clearly, such as "Cam - face" or "Game capture - PC", rather than leaving default names; grouping related sources; using nested scenes, in which a shared element such as a webcam frame or alert box is built once and added to many scenes so a single change updates them all; and keeping a separate scene collection for experiments. Back up scene collections and profiles regularly, and export them before major software updates.
| Scene | Sources | Notes |
|---|---|---|
| Starting soon | Countdown, music, schedule, chat box | Music at low level; microphone muted |
| Main gameplay | Game capture, webcam, alerts, chat box | Nested webcam and alert scenes |
| Just chatting | Main camera full screen, lower third, alerts | Second camera available |
| Be right back | Loop video, music, chat box | Microphone muted automatically |
| Ending | Credits, raid message, music | Show next stream time |
Performance cost of scenes
Every source uses some processing power. Browser sources, which render web pages for alerts and widgets, can use a surprising amount of memory and processing, especially animated ones; video sources and filters such as chroma key and sharpening add load; and many high-resolution images add memory use. If the software reports lagged frames, check which sources are active, remove hidden sources that still run in the background, limit browser source frame rates, and turn off sources that are not in use rather than hiding them behind others.
Worked problem
Calculating a frame budget
At 60 fps, how much time does the streaming software have to render each frame, and what happens if rendering one frame takes 22 milliseconds?
Show solution
- Frame budget: 1,000 ms / 60 = about 16.7 ms per frame.
- A 22 ms render exceeds the budget by about 5.3 ms.
- The software must drop or lag frames, so viewers see stutter.
- Simplify scenes, reduce browser sources, or stream at 30 fps (33.3 ms budget).
Answer: About 16.7 ms per frame at 60 fps; a 22 ms render causes lagged frames until the scene is simplified or the frame rate lowered.
Designing overlays that age well
Overlays should frame the content, not compete with it. Keep the content area clear, place elements where interface elements in games are not, use the channel colours and fonts consistently, make text large enough to read on a phone, and avoid permanently animated elements that distract and use processing power. Leave space for captions if you use them. Review your overlay on a phone and a television, since many viewers watch on small screens and many on large ones, and revisit the design every year or so as the channel identity develops.
Backups and fallback scenes
Prepare for failure. A "technical difficulties" scene with a message and music lets the stream continue while you fix a problem; a backup audio device can be switched in if the main microphone fails; and a second copy of essential assets on another drive allows a quick recovery. Some streamers keep a printed checklist beside the desk listing what to do if the game crashes, the camera disconnects or the internet drops.
Common mistakes
MistakeCovering game interface elements with overlays.
InsteadDesign layouts around each game's interface.
MistakeUsing full display capture for everything.
InsteadUse window or game capture to avoid exposing private content.
MistakeUnfiltered text-to-speech alerts.
InsteadUse filters and moderation.
MistakeLong, flashy transitions.
InsteadKeep transitions short and consistent.
MistakeGoing live without testing.
InsteadRun a private test and checklist first.
Summary and key terms
- Streaming software composes sources into scenes and sends them to the encoder.
- A core set of scenes covers starting, main, chat, break and ending.
- Layouts should serve the content and keep important elements clear.
- Overlays carry the brand but should stay minimal and readable on phones.
- Alerts and widgets acknowledge support and need moderation.
- Multi-camera and guest production add variety with planning.
- Automation, local recordings and testing make streams reliable.
- OBS Studio
- Free open-source streaming software.
- Source
- Input such as a camera, game or image.
- Scene
- Arrangement of sources in layers.
- Browser source
- Web page rendered as a stream source.
- Overlay
- Graphics around or over the main content.
- Alert
- On-screen notification of support or events.
- Stinger
- Animated transition between scenes.
- Replay buffer
- Saving recent seconds or minutes on demand.
- Hotkey
- Keyboard shortcut for a stream action.
- Display capture
- Capturing a whole monitor.
Practice problems
Work each problem on paper first, then reveal the answer to check.
Name three streaming software options.
Show answer
OBS Studio, Streamlabs, StreamYard, vMix, Wirecast.
What is a browser source?
Show answer
A web page rendered inside the stream.
List five common scenes.
Show answer
Starting soon, main, chatting, be right back, ending.
What must gaming layouts avoid covering?
Show answer
Maps, health bars, subtitles and other interface elements.
Why design for phones?
Show answer
Many viewers watch on small screens.
Why moderate text-to-speech?
Show answer
Viewers may abuse it with offensive messages.
How long should transitions be?
Show answer
Under a second or two.
What do remote guests need?
Show answer
Wired connection, headphones, light, a test call.
Why record separate audio tracks?
Show answer
To remove music or adjust levels later.
Why is display capture risky?
Show answer
Anything opened appears on stream.
Lesson quiz · 5 questions
Score 60% or more to complete this lesson.
Create a free account to save your progress, take quizzes and earn a certificate.