
CRE-130 · Lesson 5 of 12 · 25 min
Light outdoors and on location
Outdoor light is abundant, free and constantly changing. The same street, park or beach can look harsh at noon, glowing at sunset, moody under storm clouds and magical at dusk. For phone creators, outdoor content offers bright light that suits small sensors, but it also brings challenges: extreme contrast in sunlight, squinting subjects, changing clouds that alter exposure mid-shot, wind, heat and screens that are hard to see. This lesson covers how sunlight changes through the day, working in harsh midday sun, using shade and overcast light, golden hour and blue hour, backlight and silhouettes, managing contrast with HDR, reflectors and positioning, filming at night, weather and seasons, planning with apps, and practical care of phones and people outdoors.
How sunlight changes through the day
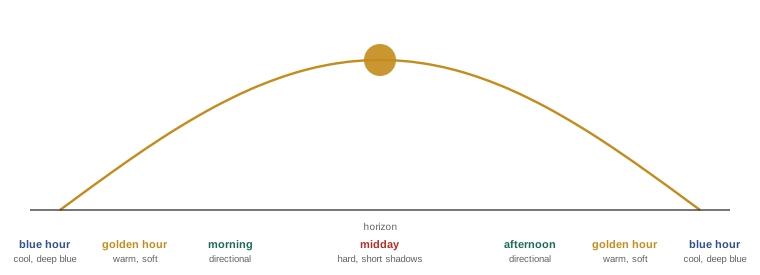
The sun's height in the sky determines the direction, hardness, colour and intensity of outdoor light:
- Midday: the sun is high, light is hard, bright and fairly neutral or cool, and shadows fall straight down, under eyes, noses and hats. Colours look saturated, but contrast is extreme.
- Morning and afternoon: the sun is lower, side light reveals texture and shape, shadows lengthen and the light warms.
- Golden hour: roughly the hour after sunrise and before sunset, when the sun is low, the light is warm, soft and directional, and shadows are long. Faces look flattering and landscapes glow.
- Blue hour: the period of twilight after sunset and before sunrise, when the sun is below the horizon and the sky takes on deep blue tones. City lights balance with the sky for atmospheric images.
- Night: light comes from artificial sources and the moon, which challenges phone sensors.
The timing of golden and blue hour varies with latitude and season. In much of Canada and the northern United States, summer golden hours are long and late in the evening, while winter days are short and the sun stays low all day, giving soft, golden light even at midday. Near the equator, the sun rises and sets quickly, and golden hour is brief.
Working in harsh midday sun
Creators cannot always choose the time of day, so it helps to know how to handle midday sun. Strategies include:
- Find open shade: the shade of a building, tree or awning, where the subject is lit by soft light from the open sky. Position the subject near the edge of the shade facing the open area for the brightest, most flattering light, and watch for dappled light through leaves, which creates distracting patches.
- Turn the subject so the sun is behind them, lighting the hair and shoulders, and expose for the face, using a reflector or the HDR processing of the phone to fill the front.
- Use a diffuser, a translucent panel held between the sun and the subject, to soften the light on a face or product. Collapsible five-in-one reflectors include a diffusion panel.
- Embrace the hard light creatively, using strong shadows, bold colours and graphic shapes for fashion, architecture and street photography.
- Let the subject wear a cap or hat only if the shadow on the face can be filled.
Squinting is a common problem in bright sun. Ask the subject to close their eyes and open them on a count of three just before the shot, or turn them away from the sun.
Overcast and shade
An overcast sky acts as an enormous softbox, giving soft, even, flattering light with gentle shadows. It is excellent for portraits, products, food and fashion outdoors, and it allows consistent exposure because the light changes slowly. The drawbacks are that the light can look flat and cool, the sky appears as a featureless white that the phone may overexpose, and colours look less vivid. To counter this, frame to exclude the white sky, use a slightly warmer white balance or edit warmth in later, add contrast in editing, and include colourful elements. Light in open shade on a sunny day is similar but much bluer, because it comes from the blue sky; phones correct this automatically, but skin may look cool if the phone is confused by surrounding greenery or blue surfaces.
Golden hour and blue hour
Golden hour is the favourite time of photographers and creators for good reason: the warm, low light flatters skin, adds a glow to hair, makes landscapes and cities look beautiful, and creates long, interesting shadows. Plan shoots so that you are set up before golden hour starts, because the light changes quickly and the best period may last only twenty or thirty minutes. Positioning the subject facing the sun gives warm, even light, though they may squint; side light gives depth; backlight with the sun low behind the subject creates glowing rim light and flare. Phones handle backlit golden hour scenes well with HDR, but tap to expose for the face and consider a reflector for fill.
Blue hour suits cityscapes, illuminated buildings, street scenes and moody portraits with practical lights. The light fades quickly, and phones may switch to night mode, using longer captures that need a steady hand or a tripod. Shooting just as the sky still holds some light, rather than in full darkness, gives the best balance between sky and artificial lights.
Worked problem
Planning a golden-hour shoot
A creator wants to film a fashion try-on video at a city park on a clear July evening in Toronto, where sunset is at about 8:55 p.m. The edit needs about 15 clips. When should they arrive and in what order should they film?
Show solution
- Golden hour runs roughly from 7:55 p.m. until sunset; arrive by about 7:15 p.m. to scout locations, set up and test.
- Film wider establishing shots and walking shots first, while there is more light.
- Film close-ups and the most important hero shots in the warmest light, from about 8:20 to 8:50 p.m.
- After sunset, film a few blue-hour shots with city lights if the edit can use them.
Answer: Arrive about 40 minutes before golden hour, film wide shots first and save the key close-ups for the last 30 minutes before sunset.
Backlight, silhouettes and flare
Shooting toward the light creates some of the most striking outdoor images. Backlight outlines subjects with a bright rim, makes hair, leaves, flowers, drinks and fabrics glow, and separates subjects from the background. If you expose for the bright background, subjects become silhouettes, dark shapes against the sky that work best with distinctive outlines and clear separation between figures. If you expose for the subject, the background brightens or clips, which can create an airy, high-key look. Phone HDR attempts to balance both, sometimes producing an unnatural, flat look; adjusting exposure or turning off HDR gives you more control.
Lens flare, streaks and spots of light caused by bright light entering the lens, can add atmosphere or ruin an image. Phones are particularly prone to small green or coloured ghost reflections opposite bright light sources, caused by reflections inside the lens and cover glass. Clean the lens thoroughly, shade it with your hand, move slightly so that the sun is just hidden behind an object, or embrace flare deliberately in moderation.
Managing contrast outdoors
Outdoor scenes often contain a wider range of brightness than a single exposure can capture, from bright sky to deep shadow. Phones handle this with automatic HDR processing, which merges several exposures, and in most daylight scenes this works well. Problems arise with moving subjects, where merged frames create ghosting, and with high-contrast scenes that look flat and unnatural after processing. Strategies for managing contrast include:
- Change position so that the subject and background have similar brightness, such as placing the subject in shade against a shaded background.
- Add fill light with a reflector, a small LED panel or the phone's flash at close range.
- Expose for the highlights and lift shadows in editing, especially with raw files.
- Wait for a cloud to soften the sun, or choose a time of day with softer light.
- Frame to exclude the brightest areas, such as a white sky.
Filming at night
Night scenes are where phone sensors struggle most, but modern night modes produce impressive photographs of still scenes by capturing and merging frames over one to several seconds; a tripod or steady surface allows longer captures with better quality. For video, night modes are more limited, and footage becomes noisy and soft in dim light. Strategies include filming where there is artificial light, such as streetlights, shop windows, neon signs and illuminated buildings; positioning subjects so that these sources light their faces; carrying a small LED light for faces; using the main camera rather than the telephoto or ultra-wide; and lowering the frame rate to 24 or 30 fps to allow longer exposures. Embrace the mood of night rather than trying to make it look like day: deep shadows, pools of light and colourful signs are part of its appeal.
Weather and seasons
Weather creates opportunities as well as challenges. Fog and mist simplify backgrounds and add mood; rain makes streets reflective and colours saturated; snow brightens scenes and adds texture, but fools metering into underexposure, so increase exposure slightly to keep it white; storms bring dramatic skies. Autumn colours, spring blossoms and winter light give seasonal content its character. Protect the phone and yourself: most current phones have some water resistance, but water resistance ratings apply to fresh water under test conditions and decline with age, so avoid submerging phones and dry them after rain. Cold drains batteries quickly, so keep the phone warm in an inside pocket between shots and carry a power bank. Heat and direct sun can cause the phone to overheat and stop recording; shade it, remove the case and avoid leaving it in a hot car.
| Condition | Light quality | Tips |
|---|---|---|
| Clear midday | Hard, high contrast | Find open shade, backlight subjects, use a diffuser |
| Overcast | Soft and even, cool | Exclude white sky, warm and add contrast in editing |
| Golden hour | Warm, soft, directional | Arrive early, film key shots in the best light |
| Blue hour | Cool, low light | Use a tripod, balance sky with city lights |
| Snow | Bright, reflective | Increase exposure to keep snow white |
| Night | Low, artificial sources | Use practical lights, main camera, steady support |
Planning with apps
Several types of apps help creators plan outdoor shoots. Sun and moon position apps, such as PhotoPills, Sun Surveyor and The Photographer's Ephemeris, show where the sun will rise and set and its direction at any time and place, using augmented reality views on the phone to visualize the sun's path over a location. Weather apps forecast cloud cover, precipitation and wind; some specialized apps predict colourful sunsets. Map apps with satellite and street-level views help scout locations remotely. Combining these allows creators to plan, for example, a shot of a person on a hill with the sun setting behind them, or a city skyline at blue hour with the moon rising.
People, permissions and safety on location
Outdoor shoots involve the public and the environment. Be aware of people in the background, especially children; respect requests not to be filmed, and avoid blocking paths or entrances. Some locations, such as parks, transit systems, private property and heritage sites, require permits for commercial filming or the use of tripods; check before you shoot. Lesson 12 discusses consent and filming in public in more detail. Stay safe: watch for traffic when filming in streets, avoid walking backward while filming near edges or roads, tell someone where you are going for remote locations, dress for the weather and carry water. No shot is worth an accident.
Common mistakes
MistakeFilming faces in direct midday sun.
InsteadMove to open shade or backlight the subject.
MistakeArriving at sunset to film golden hour.
InsteadArrive early and be ready before the best light.
MistakeLetting snow turn grey.
InsteadIncrease exposure for bright scenes.
MistakeIgnoring phone overheating in the sun.
InsteadShade the phone and remove the case.
MistakeUsing the telephoto at night.
InsteadUse the main camera and available light.
Summary and key terms
- Sun height controls the direction, hardness, colour and intensity of light.
- Handle midday sun with open shade, backlight and diffusion.
- Overcast light is soft and even; exclude white skies.
- Golden hour flatters subjects; blue hour suits cities.
- Backlight creates rim light, silhouettes and flare.
- Manage contrast by positioning, fill light and exposure.
- Plan with sun and weather apps, and protect phones, people and yourself.
- Golden hour
- Period near sunrise and sunset with warm, low light.
- Blue hour
- Twilight period with deep blue sky.
- Open shade
- Shade lit by the open sky.
- Diffuser
- Translucent panel that softens light.
- Backlight
- Light coming from behind the subject.
- Silhouette
- Dark subject outlined against a bright background.
- Lens flare
- Streaks or spots from bright light in the lens.
- Dappled light
- Patchy light filtering through leaves.
- Night mode
- Multi-second, multi-frame capture for low light.
- Sun position app
- App showing the sun's path for planning.
Practice problems
Work each problem on paper first, then reveal the answer to check.
Describe midday light.
Show answer
Hard, bright, with short shadows falling straight down.
When does golden hour occur?
Show answer
Roughly the hour after sunrise and before sunset.
Where should a subject stand in open shade?
Show answer
Near the edge, facing the open sky.
How do you prevent squinting?
Show answer
Eyes closed until a count of three, or turn away from the sun.
Name a drawback of overcast light.
Show answer
Flat, cool light and white skies.
How do you create a silhouette?
Show answer
Expose for the bright background behind the subject.
How can you reduce lens flare?
Show answer
Clean the lens, shade it, or hide the sun behind an object.
Why increase exposure in snow?
Show answer
The meter underexposes bright scenes.
Name two tips for night video.
Show answer
Use artificial light, the main camera, a small LED, steady support.
What do sun position apps show?
Show answer
The sun's direction and path at a location and time.
Lesson quiz · 5 questions
Score 60% or more to complete this lesson.
Create a free account to save your progress, take quizzes and earn a certificate.