
CRE-130 · Lesson 11 of 12 · 25 min
Editing video on a phone
Editing is where video comes together. A sequence of clips becomes a story with a hook, a rhythm and a clear ending; mistakes and pauses disappear; music, sound effects, text and captions add meaning and accessibility. Phone editing apps now offer multitrack timelines, keyframes, colour tools, AI captions and audio cleanup, making it possible to produce polished videos entirely on a phone. This lesson covers choosing an editing app, organizing footage, the basic edit, pacing and cutting for retention, transitions, text and captions, music and sound, audio cleanup, colour correction and matching, reframing for different formats, exporting, and music licensing and copyright.
Choosing a video editing app
Common phone video editors include:
- CapCut, owned by ByteDance, popular for short-form video, with templates, auto captions, effects, keyframes and direct links to TikTok. Some features require a subscription, and creators and businesses should read its terms of service, particularly regarding content licensing and commercial use.
- Built-in editors in the native photo apps and platform apps such as TikTok, Instagram Edits and YouTube Create, which offer quick trimming, captions, music from licensed libraries and effects.
- VN, InShot and similar apps, with multitrack timelines and good control for free or low cost.
- LumaFusion, a professional multitrack editor for iOS and Android, and mobile versions of desktop editors such as Adobe Premiere Rush or DaVinci Resolve for iPad, for more complex projects and colour grading.
Consider the formats you make, the features you need (multitrack, keyframes, captions, colour), the quality of exports, cost, watermarks on free versions, and how easily projects move to a computer. Learn one app thoroughly; editing speed comes from familiarity with shortcuts and workflows.
Organizing footage
Before editing, review and organize clips. Delete obvious failures, mark favourites, and group clips into albums or folders by project or scene. For larger projects, transfer footage to a computer or tablet with more storage. Many editors find it faster to make a quick selection pass, adding only the usable parts of each clip to a rough timeline, rather than reviewing every clip in full while editing. Name and keep project files so that you can return to them; save music, logos, fonts and templates you use regularly in one place.
The basic edit
Most edits follow a similar process:
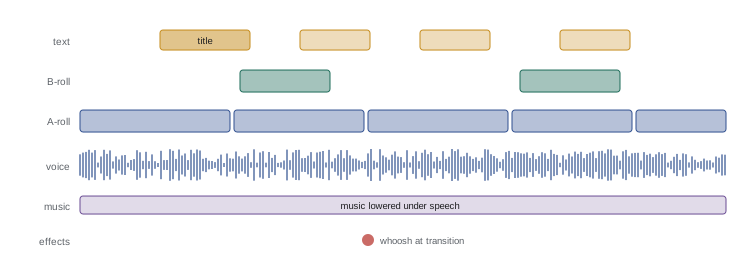
- Assemble: place the main clips (A-roll) in order on the timeline, following the script or story.
- Trim: cut out mistakes, pauses, false starts and repetition, keeping only the strongest moments.
- Cover: add B-roll on an upper track over the A-roll to illustrate points and hide jump cuts.
- Refine: adjust the timing of every cut, tighten pacing and check the flow.
- Add text, captions, graphics, music and sound effects.
- Correct colour and audio.
- Review on the phone at full screen with sound, ideally after a break, then export.
Jump cuts, where a section of a continuous shot is removed and the subject appears to jump, are accepted in fast-paced vlogs and short-form content, where they remove dead air and keep energy high. In more polished content, cover them with B-roll, cut to a different shot size, or use a subtle zoom on alternate segments to make the cut feel intentional.
Pacing and retention
Viewers decide quickly whether to keep watching, so pacing is central, especially in short-form video. Start with the hook in the first one to three seconds, showing or stating the most compelling element immediately rather than building up to it (CRE-120 covers hooks). Remove anything that does not serve the video: pauses, repetition and slow introductions. Vary shot length and size to maintain interest, and match cuts to the rhythm of speech and music. Cutting on action, in the middle of a movement such as a hand lifting a cup, makes cuts feel seamless. End promptly once the payoff is delivered, with a clear call to action if appropriate. Platform analytics showing retention curves reveal exactly where viewers leave, guiding future edits (CRE-202). Faster is not always better: tutorials need time for viewers to follow steps, and emotional moments need room to land.
Transitions
Most professional edits use simple cuts for the vast majority of transitions. Fades to and from black mark the beginning, the end or a passage of time; cross-dissolves suggest time passing or a dreamy mood. Short-form creators also use in-camera transitions, filmed deliberately: a whip pan at the end of one clip and the start of the next, covering the lens with a hand or object, jumping or snapping fingers, or matching a movement or shape between clips (a match cut). These transitions can be engaging when they serve the content, but heavy use of flashy software transitions, spins and effects looks dated and distracts. Use them sparingly and consistently.
Text, titles and captions
On-screen text serves several purposes: hooks and titles that tell viewers what the video is about, labels and steps in tutorials, emphasis on key words, and captions of everything said. Many people watch with the sound off, especially in public, and captions are essential for deaf and hard-of-hearing viewers, so captions are standard practice for creators. Auto-caption tools in editing and platform apps transcribe speech quickly, but always check and correct them, especially names, technical terms and words the software mishears. Keep captions within the safe zone, use large, high-contrast text with an outline or background box, limit each caption to a few words or one or two short lines, and keep them on screen long enough to read. Avoid covering faces and important action. Consistent fonts and colours that match your brand help recognition.
| Text element | Purpose | Tips |
|---|---|---|
| Hook text | Tells viewers why to watch | Large, short, within the first second |
| Captions | Accessibility and sound-off viewing | Check accuracy, high contrast, safe zone |
| Labels and steps | Clarify tutorials | Consistent position and style |
| Emphasis words | Highlight key points | Use sparingly to keep impact |
| End card or call to action | Guide next steps | Clear and brief |
Music and sound design
Music sets mood and pace and can carry a video. Choose music that suits the content and audience, and cut to its beat, aligning cuts with downbeats or changes in the music for a satisfying rhythm; many apps detect beats automatically. Keep music well below speech, usually 15 to 20 dB lower, and use ducking, which automatically lowers music when someone speaks. Sound effects, such as whooshes on transitions, clicks for text, ambient sounds and subtle foley like footsteps and pouring, add polish and realism. Ambient sound recorded on location and room tone fill silences and make B-roll feel alive. Mix levels so that speech peaks around −6 dBFS in the final export and music never competes with words; platforms normalize loudness, so extremely loud mixes gain nothing and may sound distorted.
Cleaning up audio
Phone editing apps increasingly include audio tools: noise reduction to remove steady background hiss, hum and air conditioning; voice enhancement or isolation, often AI-based, which separates speech from background sound; equalization (EQ) to reduce boomy low frequencies or add clarity; and compression to even out loud and quiet passages. Use these tools gently; heavy noise reduction makes voices sound robotic and watery. Removing low frequencies below about 80 to 100 Hz with a high-pass filter often cleans up voice recordings without harming them. Recording clean audio remains far better than repairing it (Lesson 8).
Colour correction and matching
Clips filmed at different times, in different light or with different cameras on the phone often differ in brightness and colour. Colour correction makes each clip look natural and consistent: adjust exposure, contrast, white balance and saturation so that skin tones and neutral colours match across clips. Colour grading then applies a creative look, such as warm and nostalgic, cool and moody, or bright and clean, consistently across the edit. Phone apps offer filters and LUTs as starting points; log footage requires a conversion LUT before grading. Compare clips side by side and pay particular attention to skin. Avoid extreme looks that make skin unnatural or crush detail.
Reframing for different formats
Creators often publish the same content in several formats: a horizontal YouTube video, vertical clips for Shorts, Reels and TikTok, and square or 4:5 versions for feeds. Editing apps can change the project's aspect ratio and reframe clips, and some offer automatic reframing that tracks faces to keep subjects in the frame. When reframing horizontal footage to vertical, keyframe the crop to follow the action, reposition text and captions within the new safe zones, and check that nothing important is lost at the edges. Vertical clips from long videos need their own hook and pacing rather than simply being cut out.
Worked problem
Turning a long video into a vertical clip
A creator has a 12-minute horizontal 4K YouTube tutorial and wants a 40-second vertical clip for Reels and Shorts. How should they approach it?
Show solution
- Choose the single most useful or surprising tip, which can stand alone.
- Create a new 9:16 project at 1080 × 1920 and import the relevant 4K footage.
- Write a new hook for the first two seconds, using text and the strongest visual moment.
- Reframe each clip with keyframes to keep the creator and demonstration centred, using the extra 4K resolution.
- Trim tightly, add captions within the safe zone, add music from the platform's licensed library at a low level, and end with a prompt to watch the full video.
Answer: Select one standalone tip, build a new vertical project with its own hook, reframe with keyframes, caption and trim tightly, then point to the full video.
Exporting
Export settings should match the platform. For most social platforms, export at the project's resolution (1080 × 1920 for vertical, 1920 × 1080 or 3840 × 2160 for horizontal), at the same frame rate as the footage, using H.264 or HEVC at a high bitrate. Platforms recompress everything, so a clean, high-quality export gives the best result; extremely high bitrates add upload time without benefit. Check for watermarks added by free app versions. Watch the exported file in full before publishing to catch errors such as missing audio, misspelled captions or black frames. Keep the project file and a high-quality master export so that you can produce new versions later.
Music licensing and copyright
Music is protected by copyright, typically with separate rights in the composition (owned by songwriters and publishers) and in the recording (owned by artists and record labels). Using a popular song in a video without permission can result in the video being muted, blocked or demonetized, a copyright strike against the account, or legal claims. Platforms such as TikTok, Instagram and YouTube hold licences that allow users to add music from their in-app libraries to personal content, but these licences have limits: business and brand accounts often have access only to a restricted commercial library, and music added in one app may not be licensed if the video is downloaded and posted elsewhere. Sponsored content and advertisements usually require separately licensed music.
In Canada, the Copyright Act includes fair dealing exceptions for purposes such as research, private study, education, parody, satire, criticism, review and news reporting, as well as a non-commercial user-generated content exception (section 29.21). These exceptions are interpreted narrowly and case by case, and using a song simply as background music in a creator video, especially a monetized or sponsored one, is unlikely to qualify. Collective societies such as SOCAN and Re:Sound administer certain music rights in Canada.
Safer options include royalty-free and subscription music libraries such as Epidemic Sound, Artlist and similar services, whose licences cover use across platforms, including monetized and sometimes sponsored content; free libraries such as the YouTube Audio Library, with attention to attribution requirements; music commissioned from composers; and music you create yourself. Keep records of licences for every track you use. The same principles apply to clips, images and footage created by others. CRE-320 covers copyright and creator law in more depth.
Common mistakes
MistakeLeaving pauses and slow introductions.
InsteadStart with the hook and trim dead air.
MistakePublishing auto captions without checking.
InsteadProofread captions, especially names and terms.
MistakeMusic competing with speech.
InsteadKeep music 15–20 dB below speech and use ducking.
MistakeUsing popular songs in sponsored content.
InsteadUse properly licensed commercial music.
MistakeOverusing flashy transitions.
InsteadCut simply and use transitions with purpose.
Summary and key terms
- Phone editors range from quick platform tools to professional multitrack apps.
- Assemble, trim, cover with B-roll, refine, then add text, sound and colour.
- Hooks, tight trimming, varied shots and cutting on action maintain retention.
- Captions are essential for accessibility and sound-off viewing.
- Music supports mood and rhythm but must sit below speech.
- Correct and match colour, clean audio gently and reframe for each format.
- Export at platform settings and use properly licensed music.
- Timeline
- Sequence of clips and tracks in an editor.
- Jump cut
- Cut within a continuous shot that makes the subject jump.
- Cutting on action
- Cutting during a movement for a seamless edit.
- Match cut
- Transition linking similar shapes or movements.
- Ducking
- Automatically lowering music under speech.
- Foley
- Recorded everyday sound effects added in editing.
- High-pass filter
- EQ that removes low frequencies.
- Colour correction
- Making clips look natural and consistent.
- Keyframe
- Point setting a value that changes over time.
- Royalty-free music
- Music licensed for use without per-use royalties.
Practice problems
Work each problem on paper first, then reveal the answer to check.
Name two phone video editors.
Show answer
CapCut, VN, InShot, LumaFusion, built-in apps.
List the basic edit steps.
Show answer
Assemble, trim, cover, refine, add text and sound, correct, review.
How can jump cuts be hidden?
Show answer
B-roll, a different shot size or a subtle zoom.
What is cutting on action?
Show answer
Cutting during a movement.
Why are captions essential?
Show answer
Accessibility and sound-off viewing.
How far below speech should music sit?
Show answer
About 15–20 dB.
What does a high-pass filter remove?
Show answer
Low-frequency rumble below about 80–100 Hz.
What is colour correction?
Show answer
Making clips natural and consistent.
What should change when reframing to vertical?
Show answer
Crop keyframes, text positions, safe zones and the hook.
Name a safe source of music for monetized videos.
Show answer
Subscription royalty-free libraries or commissioned music.
Lesson quiz · 5 questions
Score 60% or more to complete this lesson.
Create a free account to save your progress, take quizzes and earn a certificate.