
CINE-499 · Lesson 7 of 12 · 30 min
Camera, lighting and look tests
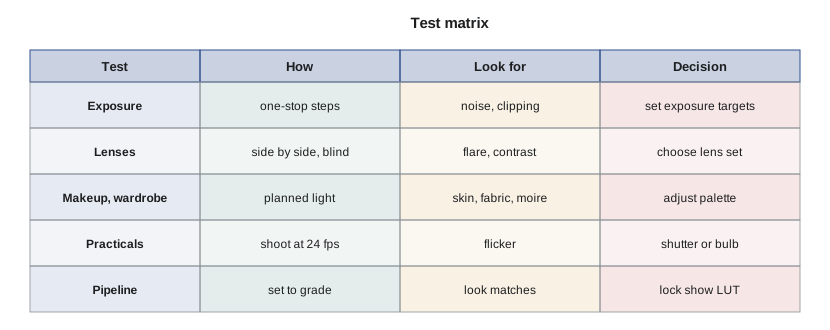
Tests turn the look book into evidence. Before the shoot, you check that the camera, lenses, lights, makeup, wardrobe and the colour pipeline produce the images you promised, and you find problems while they are still cheap to fix. CINE-401 described camera and look tests as part of prep; in the capstone you plan them, run them, analyse them and write a short test report that changes what you do on set. A test that only confirms what you already believed is not wasted, but the most useful tests are the ones that surprise you.
Why test
Every production has assumptions that could be wrong: that the lenses match, that the camera's exposure index gives clean shadows, that the wardrobe colour reads correctly, that the LUT looks the same on set and in the grade, that a practical lamp does not flicker. Tests check these assumptions under controlled conditions.
- Confirm equipment works and matches: bodies, lenses, media, monitors and batteries.
- Find the camera's latitude and noise at your chosen exposure index.
- Check skin tones, makeup and wardrobe under the planned light.
- Build and verify the show look and LUT across the whole pipeline.
- Rehearse difficult technical shots, such as a long focus pull or a gimbal move.
- Give the director, production designer and colourist images to react to.
Planning the tests
Tests take time and need a crew, so plan them like a shoot day. A capstone usually runs one test day, sometimes split across two sessions.
| Time | Test | People needed |
|---|---|---|
| 09:00 | Camera and lens prep, back-focus and collimation checks | DP, first AC, second AC |
| 10:00 | Exposure and latitude test with chart and stand-in | DP, ACs, stand-in |
| 11:00 | Lens comparison at matched stops | DP, ACs, director |
| 12:30 | Meal | Everyone |
| 13:00 | Makeup and wardrobe tests under planned light | DP, gaffer, cast, makeup, wardrobe |
| 14:30 | Location light test or practical flicker test | DP, gaffer |
| 15:30 | Data offload, dailies with show LUT | Second AC or DIT, DP |
| 16:30 | Review with director and colourist | DP, director, colourist |
Camera prep and lens checks
Start with the equipment. The first AC preps the camera package as on any professional shoot: checks every lens on a lens projector or chart, confirms back focus, checks that marks are accurate, tests media cards and batteries and builds every configuration you will need.
- Shoot a focus chart with each lens at several distances to check marks and sharpness across the frame.
- Check that matched lenses really match in contrast and colour; vintage sets often vary.
- Record a few seconds of a grey card and chart for each lens to give the colourist a reference.
- Check frame lines, recording format, timecode and file naming match the camera and pipeline document.
Exposure and latitude
An exposure test shows how the camera holds highlights and shadows at your exposure index and in your recording format. Light a stand-in with a grey card and chart, then shoot a series of exposures in one-stop steps from about five stops under to five stops over normal.
- Keep the light constant and change exposure with the shutter angle or ND, not the aperture, so depth of field stays the same.
- Slate every step clearly.
- In the grade, normalize each step back to correct exposure and judge how far you can go before noise or clipping becomes unacceptable.
- Use the result to set false colour targets and to decide how hard you can push highlights through windows.
Worked problem
Counting stops of latitude
In an exposure test, the colourist finds clean, usable images from 3 stops under to 4 stops over normal. Skin tones degrade beyond those limits. What is the usable latitude, and how should the DP expose a scene with a bright window 5 stops above the key?
Show solution
- Usable latitude = 3 + 4 = 7 stops around normal.
- The window is 5 stops above key; the upper limit is 4 stops over.
- Either reduce the window by about 1 stop with ND gel on the glass, or expose the key slightly under and lift it in the grade if the shadows allow.
Answer: About 7 stops of usable latitude. Put ND on the window (about 1 stop, ND 0.3) so the window stays within the 4-stop highlight limit while the key stays at normal exposure.
Worked problem
Choosing ND for a constant stop
The DP wants to shoot at T2 for shallow depth of field. A light meter reading for the scene suggests T5.6 at the planned exposure index and shutter. How much ND is needed?
Show solution
- From T5.6 to T2 is 3 stops (5.6 → 4 → 2.8 → 2).
- Each 0.3 of ND equals 1 stop, so 3 stops needs ND 0.9.
Answer: ND 0.9 brings the exposure to T2 without changing the shutter or exposure index.
Lens comparison
If you are choosing between lens sets, shoot them side by side on the same scene, at the same stop and framing, with a person and a backlit area to show flare and contrast. Show the results to the director without telling them which is which, so the choice is based on the images. Note the differences in contrast, flare, colour, focus fall-off and distortion, and how each set suits the visual concept.
Makeup, wardrobe and skin tones
Faces carry most films. Test every main cast member under the light you plan for their key scenes, with final makeup and wardrobe.
- Light at the planned contrast ratio and colour temperature.
- Include a chart and grey card in the first frames.
- Check how wardrobe colours read on camera; some fabrics shift colour under LED light or reflect strongly.
- Check fine patterns for moiré on the camera's sensor.
- Look at skin across different complexions and make sure each person is lit and exposed for their own skin, not for a single average.
- Show the results to makeup and wardrobe as well as the director.
Practicals, LEDs and flicker
Practical lamps, LED fixtures, screens and fluorescent tubes can flicker on camera at some frame rates and shutter angles. Test every practical and fixture you plan to use at your frame rate and shutter. CINE-330 explained the maths of flicker for high-speed work; the same logic applies at normal speeds.
- Shoot each practical for a few seconds at the planned frame rate and shutter and watch for pulsing.
- In regions with 60 Hz mains (Canada and the US), lights that pulse at 120 Hz are usually safe at 24 fps with a 180-degree shutter (1/48 s) only if they hold steady; many cheap LEDs do not.
- If a fixture flickers, change the shutter (for example, to 1/60 s or 172.8 degrees at 24 fps) or replace the lamp.
- Check dimmers too; some LED dimmers introduce flicker at low levels.
Worked problem
A flicker-safe shutter
A practical lamp pulses at 120 Hz. At 24 fps, which shutter angle gives an exposure time of exactly 1/60 second, so each frame contains exactly two pulses?
Show solution
- Exposure time = (shutter angle ÷ 360) ÷ frame rate.
- Set (angle ÷ 360) ÷ 24 = 1/60.
- Angle = 360 × 24 ÷ 60 = 144 degrees.
Answer: A 144-degree shutter gives 1/60 second at 24 fps, capturing exactly two 120 Hz pulses per frame, so brightness stays even. (172.8 degrees gives 1/50 s, which suits 50 Hz regions.)
Building and checking the show look
The show look combines a technical transform (for example, from camera log to the display) with a creative look. Build it in the test grade with the colourist if possible, then load it into the camera monitors and the dailies system.
- Grade the test footage to the look book's palette and contrast.
- Export the look as a LUT or as a CDL plus a base LUT, depending on the pipeline.
- Load it on set monitors and check that a test image looks the same on set, in dailies and in the grading suite.
- Name the LUT clearly with version numbers.
- Record which monitors were calibrated and how.
Location and lighting tests
If the key scene depends on natural light or a tricky practical, visit at the same time of day as the shoot and test. Measure light levels, note the sun's direction and how it changes, and check power. A short test at the real location can prevent a wasted shoot day.
Worked problem
Planning a location light check
A kitchen scene is scheduled for 10:00 to 13:00. On the scout at 10:00, the window gives about 2,000 lux on the table; at 13:00 the sun enters the room and the table reads about 12,000 lux. How many stops does the light change, and what does that mean for the plan?
Show solution
- Ratio = 12,000 ÷ 2,000 = 6.
- Stops = log2(6) ≈ 2.6 stops.
- A change of more than 2.5 stops during the scene will cause continuity problems.
Answer: The light rises by about 2.6 stops. The team should diffuse the window (for example, with a large silk outside), schedule the wide shots early and keep extra ND ready, or move the scene earlier.
Writing the test report
The test report is a short document, usually two to four pages, that records what you tested, what you found and what you decided. It is part of the capstone assessment.
- List each test with its purpose and method.
- Include frame grabs from the graded test footage.
- State the decision each test led to.
- Record any open questions and how you will handle them on set.
- Share the report with the director, gaffer, first AC and colourist.
Testing difficult shots and moves
Tests are also rehearsals. If the film depends on a long focus pull, a gimbal walk through a doorway or a dolly move timed to a line of dialogue, rehearse it on the test day with stand-ins. The first AC can set and check marks, the operator can practise the move and the director can see whether it works. If the shot is too hard to achieve reliably, you have time to simplify it. A shot that needs fifteen takes on the shoot day can cost the scene.
- List the two or three hardest shots in the film and rehearse them.
- Time the move and note the number of takes it needs to work.
- Simplify any shot that cannot be achieved reliably.
Record the results of these rehearsals in the test report, with the number of takes each shot needed and any changes you made to the plan.
Common mistakes
MistakeTests are optional if the equipment is new.
InsteadNew equipment can still be faulty or mismatched; test every lens, body and configuration.
MistakeChange aperture between exposure steps.
InsteadKeep the aperture fixed and change shutter or ND, so depth of field stays constant.
MistakeOne exposure setting suits every skin tone.
InsteadLight and expose each person for their own skin, and check across complexions.
MistakeLED practicals never flicker.
InsteadMany do; test each at the planned frame rate and shutter.
MistakeThe LUT on set will look the same in the grade automatically.
InsteadCheck the look across set monitors, dailies and the grading suite and record calibration.
Summary and key terms
- Tests check assumptions about equipment, exposure, skin, wardrobe, practicals and the pipeline.
- Plan a test day like a shoot day, with people, times and a review.
- Exposure tests in one-stop steps show the usable latitude and set false colour targets.
- Each 0.3 of ND equals one stop; use ND or shutter, not aperture, to vary exposure in tests.
- Test makeup, wardrobe and skin tones under the planned light for every main cast member.
- Test practicals and LEDs for flicker; at 24 fps a 144-degree shutter gives 1/60 s.
- Write a test report that links each test to a decision.
- Exposure index
- The sensitivity setting used to rate a camera for exposure.
- Latitude
- The range of exposures over which a camera gives usable images.
- Back focus
- The distance between the lens mount and the sensor, which must be correct for marks to be accurate.
- Collimation
- Checking and adjusting a lens so its focus marks are accurate.
- Neutral density filter
- A filter that reduces light without changing colour; 0.3 equals one stop.
- Moiré
- A false pattern caused by fine detail interfering with the sensor grid.
- Flicker
- Visible pulsing caused by a light source's output varying with mains frequency.
- Show look
- The combined technical and creative transform used for viewing on set and in dailies.
- CDL
- Colour decision list: slope, offset, power and saturation values that describe a primary grade.
- Test report
- A short document recording tests, results and decisions.
Practice problems
Work each problem on paper first, then reveal the answer to check.
List four things tests check.
Show answer
Any four of equipment matching, exposure latitude, skin and makeup, wardrobe, practical flicker, the pipeline and difficult shots.
Usable images from 2 stops under to 5 over: what is the latitude?
Show answer
7 stops.
From T4 to T1.4 is how many stops, and what ND is needed?
Show answer
3 stops, ND 0.9.
Why change shutter or ND rather than aperture in an exposure test?
Show answer
To keep depth of field constant.
What shutter angle gives 1/60 s at 24 fps?
Show answer
144 degrees.
What angle gives 1/50 s at 24 fps?
Show answer
172.8 degrees.
Light rises from 1,500 to 6,000 lux. How many stops?
Show answer
log2(4) = 2 stops.
Why compare lenses blind with the director?
Show answer
So the choice is based on the images, not on brand or expectation.
What should be checked when wardrobe is tested?
Show answer
Colour under the planned light, reflections and moiré from fine patterns.
What belongs in a test report?
Show answer
Each test's purpose and method, frame grabs, decisions and open questions.
Lesson quiz · 5 questions
Score 60% or more to complete this lesson.
Create a free account to save your progress, take quizzes and earn a certificate.