
CINE-220 · Lesson 10 of 12 · 25 min
Exposure ratios and contrast for camera
Lighting is, in the end, a pattern of brightness differences: between the key and shadow sides of a face, between the actor and the background, between the window and the room. These differences, expressed as ratios or stops, define the contrast and mood of an image and determine whether the camera can record it. Controlling them on set is how cinematographers turn an idea such as "moody", "warm and open" or "noir" into a repeatable image. This lesson covers lighting ratios and how to express them, measuring ratios on set, key-to-fill and key-to-background relationships, high-key and low-key lighting, contrast and the camera's latitude, contrast for HDR and SDR, keeping ratios consistent across a scene, and documenting the lighting.
Ratios and stops
A lighting ratio compares two light levels. Cinematographers commonly express ratios in stops, since a difference of one stop doubles or halves the light: a one-stop difference is a 2:1 ratio, two stops 4:1, three stops 8:1, and so on.
In the studio tradition, the key-to-fill ratio was often calculated as (key + fill) : fill, because the key side of the face receives both the key and the fill while the shadow side receives only the fill. On a film set, it is more common and practical simply to meter or measure the lit side and the shadow side and express the difference in stops. A face lit at T4 on the key side and T2.8 on the shadow side has a one-stop difference, a 2:1 ratio.
| Stops difference | Ratio | Typical look |
|---|---|---|
| 0 | 1:1 | Flat, shadowless, commercial or comedy |
| 1 | 2:1 | Bright, open, gentle shape |
| 1.5 | About 3:1 | Natural, everyday drama |
| 2 | 4:1 | Defined, dramatic |
| 3 | 8:1 | Moody, low key |
| 4 or more | 16:1 or more | Noir, thriller, strong chiaroscuro |
Measuring ratios on set
Ratios can be measured with an incident meter with a flat disc, pointing it toward each light in turn while shading the others, or with the dome pointed toward the camera from the lit and shadow sides of the face. Spot meters measure the reflected brightness of each side directly, which includes the effect of skin tone and makeup. On digital sets, false colour and waveforms (CINE-202) show the actual recorded values: if the lit cheek sits at one band and the shadow cheek two bands lower, the ratio is visible directly. Many cinematographers combine meters, to set lights before the camera is ready, and on-camera tools, to confirm the result.
Key-to-background and other relationships
Ratios matter beyond the face. The relationship between the subject and the background determines separation and mood: a background a stop or two darker than the face makes the face stand out, while a background brighter than the face creates a high-key, airy look or silhouettes. Windows and practicals have their own ratios to the room: a window two to three stops brighter than the interior feels like daylight, while a practical lamp a stop or two above the face reads as a glowing source. Depth comes from layering these relationships: foreground, subject and background at different levels, often alternating light and dark so that each plane separates from the next.
Worked problem
Planning a moody office scene
A DP wants a moody night office: the actor's face key side correct at T2.8, shadow side 2.5 stops darker, the back wall 2 stops below the key, a desk lamp practical glowing 1 stop above the key, and city lights through the window at about key level. What readings should the crew aim for at EI 800?
Show solution
- Key side: T2.8.
- Shadow side: 2.5 stops below, about T1.4 to T1.2 equivalent (roughly 6:1).
- Back wall: 2 stops below the key, about T1.4 reflected.
- Lamp shade: 1 stop above the key, about T4 reflected, dimmed to achieve it.
- Window city lights: about T2.8 reflected, using ND gel on the glass if they are brighter.
Answer: Key T2.8, shadow about 2.5 stops down, wall 2 stops down, lamp 1 stop up and window about level with the key.
High-key and low-key
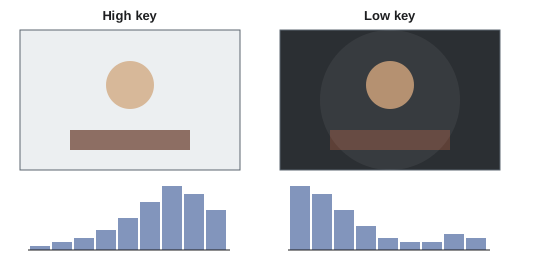
High-key lighting has low ratios, bright overall levels and soft shadows, with most of the frame in the upper part of the tonal range. It suits comedies, commercials, musicals and optimistic or clinical settings. Low-key lighting has high ratios, large areas of shadow and selective highlights, with most of the frame in the lower part of the range. It suits thrillers, horror, drama and night scenes. The terms refer to the overall tonal distribution rather than the key light alone. Between these extremes lie most naturalistic films, which use moderate ratios and let contrast follow the motivated sources of each scene. Choosing a contrast approach for each scene or the whole film, and maintaining it consistently, is a central part of a cinematographer's visual plan.
Contrast and the camera's latitude
Contrast on set must fit the camera's recording range. A modern cinema camera can record 14 to 17 stops (CINE-202), so most lighting ratios on faces fit easily; problems usually come from the extremes of the scene: bright windows, practical bulbs, sky, or very dark corners. Cinematographers decide what must hold detail and what may clip or fall to black, and use lighting to bring the scene into range: ND gels on windows, dimmed practicals, added fill in dark areas. It is also important to remember the difference between scene contrast and final image contrast: a scene lit with modest ratios can be graded to a contrasty look, while a scene lit with extreme ratios cannot be recovered to look soft. Many cinematographers light with slightly less contrast than the final look and add contrast in grading, but not so little that the image lacks shape on set, since directors, actors and producers judge performances on monitors.
Contrast for HDR and SDR
HDR delivery changes how contrast reads. Highlights that would be compressed in SDR, such as windows, lamps and reflections, appear bright and detailed in HDR, so their brightness relative to faces matters more (CINE-202). A practical lamp that reads as a pleasant glow in SDR may appear harsh and distracting in HDR if it is many stops above the key. Deep shadows in HDR on OLED displays may show more noise. Productions delivering HDR often control highlight ratios more carefully on set and monitor HDR at the DIT station. Lighting ratios on faces themselves change less, since skin is placed similarly in both formats.
Consistency across a scene
Ratios must stay consistent across the shots of a scene, so that the coverage cuts together. If the master has a 3:1 ratio on the actor's face and a background two stops below the key, the close-ups should keep similar relationships, even if the lights are moved closer for the close-ups. Changes in ratio between shots, such as a much brighter background in the reverse, read as continuity errors. Consistency extends across days: a scene shot over two days must match, and pickups shot weeks later must match the original. Meter readings, photographs of the setup and console presets help maintain consistency.
Ratios and storytelling
Contrast can change within a film to reflect story and character. A film might begin with soft, low-contrast lighting in a character's happy home life and become progressively harsher and darker as their situation deteriorates. A single scene might increase contrast at a moment of revelation, by dimming fill or adding a hard key as an actor turns into the light. Cinematographers such as Roger Deakins, Rachel Morrison and Hoyte van Hoytema have discussed using controlled shifts in contrast and exposure to support character arcs. Planning these changes in a look book or lighting plan, scene by scene, keeps them deliberate rather than accidental.
Documenting the lighting
Professional crews document lighting so that it can be reproduced. Documentation includes lighting plots showing fixture positions, types, gels and diffusion; meter readings for key, fill, background and practicals; console presets and cue lists; photographs of the setup from several angles; and notes of the T-stop, EI, ND and filtration in camera reports. The best boy electric or gaffer often maintains these records, together with the DIT's look notes. Good documentation is essential for reshoots, second-unit work that must match the main unit, and scenes split across days or locations.
Contrast and the zone system idea
Ansel Adams's zone system, developed for black-and-white photography, divided the tonal range into zones one stop apart, from pure black to pure white, with middle grey in the middle. Cinematographers can apply similar thinking: placing a face at a particular zone, the background a zone or two below, a window several zones above, and deciding which zones should hold detail. Spot meters and false colour make this practical on set. Thinking in zones helps translate a desired look into specific, measurable values that the crew can achieve and repeat.
Practical exercise: building contrast
A useful exercise for developing control over contrast is to light the same scene several times with different ratios: a flat 1:1, a soft 2:1, a natural 3:1, a dramatic 8:1, and a noir 16:1. Record each with a grey card and colour chart, then compare the images on a calibrated monitor. Notice how the mood changes, how the camera handles the shadows at each ratio, and how much each version can be adjusted in grading. Repeating the exercise with different skin tones and backgrounds builds an intuitive understanding of how ratios translate into images.
Contrast in different genres
Genres often have characteristic contrast. Comedies and family films tend toward bright, low-ratio lighting, which keeps faces open and expressions readable. Horror and thrillers use high ratios and darkness to conceal threats and create tension. Romantic dramas often favour soft, warm light with moderate ratios. Historical dramas may use high-contrast candle and window light to evoke paintings of the period. Science fiction often uses stylized contrast and colour. These are conventions rather than rules, and breaking them deliberately, such as lighting a horror film in bright daylight, can be powerful.
Measuring the whole frame
Beyond faces, cinematographers measure the brightest and darkest important areas of the frame to confirm that the scene fits the camera's range. A spot meter reading of a window, a lampshade and a dark corner, or a look at false colour across the frame, shows whether anything will clip or block up. Adjustments can then be made with ND gel, dimmers, flags or fill, before shooting. This habit prevents surprises in the grade.
Consistency across cameras and formats
When multiple cameras shoot the same scene, their exposure and contrast should be matched so that intercut shots look consistent. Matching involves using the same exposure index, similar lenses and filters, and checking each camera's image on calibrated monitors. Ratios set by lighting are shared by all cameras, but a camera with a wider lens may see more of the bright window or dark corner, so the whole frame of each camera should be checked.
Communicating contrast with the director
Directors may not think in stops and ratios, so cinematographers translate: showing reference images, describing how dark the shadows will be, and demonstrating on the monitor during camera tests. Agreeing on contrast early, for each scene and for the whole film, prevents surprises in the edit and grade. Many cinematographers show the director examples of the same scene lit at different ratios during prep, so that decisions are based on images rather than words. This shared understanding also helps the director plan blocking that takes advantage of light and shadow.
Measured, documented ratios turn a cinematographer's intentions into a shared, repeatable plan that the whole crew can follow from the first setup to the last.
Common mistakes
MistakeDescribing contrast vaguely.
InsteadUse stops and ratios to communicate.
MistakeMeasuring only the key.
InsteadMeasure shadow side, background, windows and practicals.
MistakeLighting with extreme ratios expecting to soften in grading.
InsteadLight a little softer than the final look, then add contrast.
MistakeChanging ratios between master and coverage.
InsteadKeep relationships consistent across shots.
MistakeIgnoring practicals and windows in HDR.
InsteadControl highlight ratios for HDR delivery.
Summary and key terms
- Ratios compare light levels; one stop equals 2:1.
- Measure ratios with incident and spot meters, false colour and waveforms.
- Key-to-background, window and practical ratios create separation and depth.
- High-key and low-key describe overall tonal distribution.
- Scene contrast must fit the camera's latitude; extremes need control.
- HDR makes highlight ratios more visible.
- Keep ratios consistent and document lighting for continuity.
- Lighting ratio
- Comparison of two light levels.
- Key-to-fill ratio
- Difference between lit and shadow sides of a face.
- Key-to-background ratio
- Difference between subject and background levels.
- High-key
- Bright, low-contrast lighting.
- Low-key
- Dark, high-contrast lighting.
- Chiaroscuro
- Strong contrast of light and shadow.
- Separation
- Distinguishing subject from background.
- Latitude
- Range of tones a camera can record.
- Lighting plot
- Diagram of fixtures and their settings.
- Continuity
- Consistency between shots and days.
Practice problems
Work each problem on paper first, then reveal the answer to check.
Ratio for a 3-stop difference?
Show answer
8:1.
Stops for a 4:1 ratio?
Show answer
2 stops.
How do you measure a ratio with an incident meter?
Show answer
Read lit and shadow sides, or each light with a flat disc.
Why keep the background darker than the face?
Show answer
For separation.
What does high-key mean?
Show answer
Bright, low-ratio, mostly upper tones.
What does low-key mean?
Show answer
Dark, high-ratio, mostly lower tones.
Why light slightly softer than the final look?
Show answer
Contrast can be added in grading but not removed.
How does HDR affect practicals?
Show answer
They appear brighter and need control.
Why keep ratios consistent?
Show answer
So coverage cuts together.
Name three items in lighting documentation.
Show answer
Plots, readings, presets, photos, camera reports.
Lesson quiz · 5 questions
Score 60% or more to complete this lesson.
Create a free account to save your progress, take quizzes and earn a certificate.