
CHE-280 · Lesson 8 of 12 · 21 min
Localized corrosion: pitting, crevice and intergranular attack
The tube that failed in the thin stillage evaporator last spring sits in a plastic bag on Rafael's shelf, cut lengthwise by the failure analysis laboratory. On the outside it looks almost new. On the inside, under a brown crust of dried stillage solids, are a dozen small dark spots. Under the microscope, each spot is the mouth of a pit, and one of them goes clean through the 1.2 mm wall. The laboratory estimated that less than one gram of metal had been lost from the whole tube. Localized corrosion destroys equipment by concentrating a small amount of metal loss in a small place, and it is the main way passive alloys such as stainless steel fail. This lesson covers pitting, crevice corrosion and intergranular corrosion: how they start, how they grow, what controls them and how to prevent them.
Passivity and its breakdown
Lesson 3 introduced the passive film on stainless steel. The electrochemistry of Lesson 6 shows what passivity looks like. If the potential of a passive alloy is raised slowly in a laboratory test, the anodic current first rises as in an active metal, then drops sharply at the passivation potential as the oxide film forms, and stays very low over a wide range of potentials, the passive range. In a solution without aggressive ions, the current rises again only at a high potential where the film breaks down or oxygen is evolved. In a chloride solution, the current rises suddenly at a lower potential, the pitting potential, as stable pits begin to grow. The more resistant the alloy and the milder the environment, the higher the pitting potential.
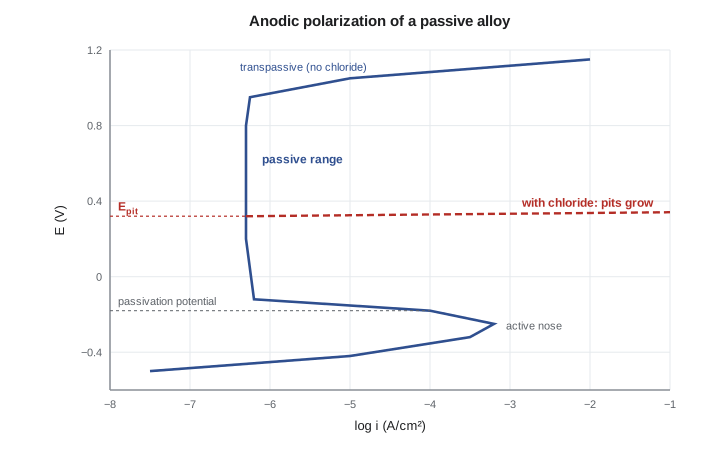
Whether a metal pits in service depends on where its corrosion potential sits relative to its pitting potential. Oxidizers in the environment, such as dissolved oxygen, chlorine, ferric ions and copper ions, raise the corrosion potential. Chloride, higher temperature and lower pH lower the pitting potential. Pitting starts when the two meet. That is why 304L may survive cold, chloride-bearing water but pit when the same water is heated, why chlorinated water pits stainless steels that are safe in unchlorinated water, and why deposits that concentrate chloride on a heated surface are so damaging.
Pitting
Pitting is highly localized attack that forms cavities, which may be shallow and wide or narrow and deep. Pits usually start at weak points in the passive film: sulfide inclusions in the steel, scratches, embedded iron, weld heat tint or deposits. Once a pit starts, it can become self-sustaining. Metal dissolves inside the pit, producing metal ions that hydrolyse and make the solution inside acidic. Chloride ions migrate into the pit to balance the positive charge. The acidic, chloride-rich solution inside the pit prevents the film from reforming, while the large passive surface outside acts as the cathode, reducing oxygen. This autocatalytic process lets a pit grow downward far faster than the surface around it corrodes, often under a cap of corrosion products that hides it from view.
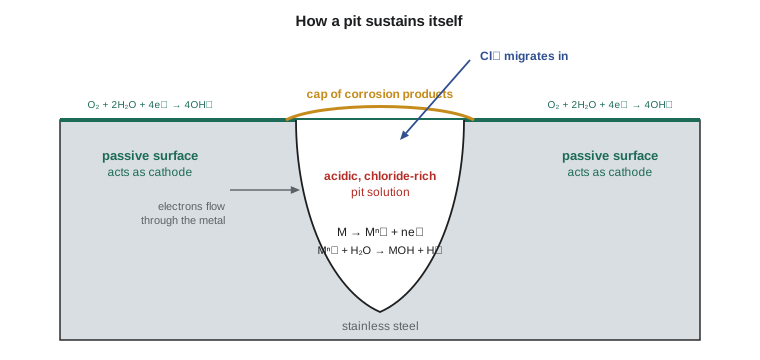
Pitting is hard to manage because it is unpredictable. Two pits in the same tube may grow at very different rates, and the deepest pit on a large area is deeper than any pit found on a small coupon. Engineers therefore treat pit depth statistically. The maximum pit depths found on a set of coupons or inspection areas often follow an extreme-value (Gumbel) distribution, which lets the engineer estimate the deepest pit likely on a much larger area, such as a whole tube bundle. The program below applies this method to maximum pit depths measured on ten coupons from the evaporator and estimates the deepest pit expected on 1, 10 and 100 m\(^2\) of tube surface. The result grows only slowly with area, which is typical of extreme-value behaviour, but even so the deepest expected pit on the full bundle is well over twice the average coupon maximum.
# Extreme-value (Gumbel) estimate of the deepest pit on a large area
import math, statistics
# Deepest pit (mm) measured on each of 10 coupons from the evaporator
maxpits = [0.42, 0.55, 0.38, 0.61, 0.47, 0.52, 0.70, 0.44, 0.58, 0.49]
n = len(maxpits)
m = statistics.mean(maxpits); s = statistics.stdev(maxpits)
alpha = s * math.sqrt(6) / math.pi       # Gumbel scale (method of moments)
lam = m - 0.5772 * alpha                  # Gumbel location
print(f"mean of coupon maxima = {m:.3f} mm, scale = {alpha:.3f} mm")
A_coupon = 0.01      # m2 each
for A in (1, 10, 100):
    T = A / A_coupon                      # return period in coupon areas
    depth = lam + alpha * (-math.log(-math.log(1 - 1 / T)))
    print(f"expected deepest pit on {A:4d} m2 = {depth:.2f} mm")
wall = 3.0
print(f"tube wall {wall} mm: pit-through risk on 100 m2 is", "high" if depth > 0.8 * wall else "acceptable for now")mean of coupon maxima = 0.516 mm, scale = 0.075 mm expected deepest pit on 1 m2 = 0.82 mm expected deepest pit on 10 m2 = 0.99 mm expected deepest pit on 100 m2 = 1.17 mm tube wall 3.0 mm: pit-through risk on 100 m2 is acceptable for now
The pitting factor, the ratio of the deepest pit to the average penetration calculated from weight loss, shows how localized the attack is. A pitting factor of 1 means perfectly uniform corrosion; pitting factors of 10 to 100 are common for stainless steels in chloride. For the failed evaporator tube, the average penetration from weight loss was a few micrometres, while the deepest pit went through 1.2 mm, a pitting factor of several hundred.
Crevice corrosion
Crevice corrosion is localized attack in narrow gaps where the solution is stagnant: under gaskets and washers, at lap joints and threads, under deposits and biofilms, in tube-to-tubesheet joints and beneath O-rings. Its mechanism is closely related to pitting. At first, metal inside and outside the crevice corrodes slowly at the same rate, consuming oxygen. Oxygen inside the crevice is used up and cannot be replaced because the solution is stagnant, so the metal inside becomes the anode while the oxygenated surface outside becomes the cathode. Metal ions accumulate in the crevice, hydrolyse and lower the pH, and chloride migrates in. The crevice solution becomes acidic and concentrated, the passive film breaks down, and attack accelerates. Because crevices provide a ready-made occluded geometry, crevice corrosion starts at lower temperatures and chloride levels than pitting on a free surface.
Alloys are ranked for crevice resistance by the critical crevice temperature, measured in a standard ferric chloride test with artificial crevices, much as the critical pitting temperature ranks pitting resistance. For a given alloy, the critical crevice temperature is typically 15 to 30 °C lower than the critical pitting temperature. The geometry matters a great deal: tighter crevices, larger outside cathodic areas and longer crevices all make attack more likely. That is why gaskets that absorb water, such as some fibre gaskets, can be worse for stainless flanges than non-absorbent ones.
Deposit corrosion, also called under-deposit corrosion, is crevice corrosion under a layer of solids, scale, sludge or biofilm. It caused the evaporator failure. Stillage solids baked onto the hot tube walls formed an occluded layer; chloride concentrated beneath it as water evaporated, oxygen was excluded, and pits started under the deposit. Regular cleaning is therefore not just about heat transfer efficiency; it is a corrosion control measure. The plant's new evaporator cleaning schedule shortens the interval between cleanings when chloride in the stillage is high.
Microbiologically influenced corrosion
Bacteria and other microorganisms contribute to localized corrosion of almost all common metals. They form biofilms on wetted surfaces, creating occluded regions like crevices, and some produce corrosive metabolites. Sulfate-reducing bacteria, which thrive in oxygen-free pockets beneath biofilms and deposits, produce hydrogen sulfide that pits carbon steel. Acid-producing bacteria generate organic acids. Iron- and manganese-oxidizing bacteria form tubercles and can raise the potential of stainless steels toward the pitting potential, which is why stainless steel welds in untreated, stagnant water, such as a hydrotest water left in a new system, sometimes develop rows of pits along the weld within months. The standard defences are to avoid stagnant water and dead legs, to drain and dry systems after hydrotesting, to keep velocities above about 1 m/s, to treat water with biocides, and to monitor biofilm growth.
Intergranular corrosion
Intergranular corrosion attacks the grain boundaries of a metal preferentially, while the grains themselves corrode little. It occurs when the grain boundaries differ chemically from the grains, either because impurities have segregated there or because precipitates have formed that leave the adjacent metal depleted in a protective element. The best-known case is sensitized austenitic stainless steel, described in Lesson 3: chromium carbides at the grain boundaries leave chromium-depleted zones that corrode in acids. In welded equipment, the sensitized region is a band in the heat-affected zone a few millimetres from the weld, where the metal spent time between about 450 and 850 °C. Attack in this band is called weld decay. A different form, knife-line attack, occurs in a very narrow band right next to the weld in stabilized grades such as 321 and 347 when the welding heat dissolves the stabilizing carbides.
Intergranular corrosion also occurs in some aluminium alloys, where precipitates along grain boundaries are anodic to the grains, and in nickel alloys that have been held in a sensitizing temperature range. Standard tests, such as the boiling acid tests published by ASTM for stainless steels, check whether a heat of steel or a weld procedure is susceptible. Prevention uses low-carbon or stabilized grades, controlled welding heat input, and solution annealing where needed.
Worked problem
Pitting factor
A 304L coupon of 20 cm\(^2\) loses 8 mg over 2,160 hours in thin stillage. Its density is 7.94 g/cm\(^3\). The deepest pit on the coupon is 0.38 mm. What is the pitting factor?
Show solution
- Average rate = \(87.6 \times 8/(20 \times 2160 \times 7.94) = 0.00204\) mm/y.
- Average penetration over 2,160 h (0.247 y) = \(0.00204 \times 0.247 = 5.0 \times 10^{-4}\) mm.
- Pitting factor = \(0.38/5.0 \times 10^{-4} = 760\).
Answer: About 760. The weight loss suggests the alloy is fine; the pit depth shows it is not.
Preventing localized corrosion
The defences against localized corrosion follow from its causes. Choose an alloy with adequate resistance at the worst combination of temperature, chloride, pH and oxidizer, using critical pitting and crevice temperatures and plant experience, not PREN alone. Design out crevices: use welded rather than bolted or rolled joints where possible, specify full-penetration welds with smooth roots, use non-absorbent gaskets, and avoid lap joints and pockets. Keep surfaces clean: schedule cleaning before deposits build up, filter out solids, and keep velocities high enough to prevent settling. Control the environment: limit chloride with integrity operating windows, avoid over-chlorinating cooling water, and treat for microbes. Fabricate properly: remove heat tint, avoid embedded iron, and passivate. Finally, inspect where pits are likely, using the statistical methods above to judge how much of a bundle must be examined to find the worst pit.
Common mistakes
MistakeJudging a stainless steel by the weight loss of a coupon alone.
InsteadExamine coupons for pits and calculate pitting factors; localized attack removes little weight.
MistakeAssuming crevice corrosion needs the same conditions as pitting.
InsteadCrevices start attack at lower temperatures and chloride levels than free surfaces.
MistakeLeaving hydrotest water in a new stainless system.
InsteadDrain and dry promptly; stagnant water can cause microbiological pitting along welds within months.
MistakeExtending cleaning intervals to save downtime.
InsteadDeposits create occluded sites for under-deposit corrosion; cleaning is a corrosion control measure.
Summary and key terms
- Passive alloys pit when their corrosion potential reaches the pitting potential; oxidizers raise the former, and chloride, heat and acidity lower the latter.
- Pits are autocatalytic: acidic, chloride-rich solution inside a pit prevents repassivation while the passive surface outside is the cathode.
- Pit depth is statistical; extreme-value methods estimate the deepest pit on large areas, and pitting factors measure localization.
- Crevice and under-deposit corrosion arise from oxygen depletion and acidification in stagnant gaps and start more easily than pitting.
- Microorganisms create biofilms and corrosive metabolites; avoid stagnant water, drain hydrotest water and use biocides.
- Intergranular corrosion attacks grain boundaries, notably in sensitized stainless steel near welds.
- Prevention combines resistant alloys, crevice-free design, cleanliness, environmental control, good fabrication and targeted inspection.
- Pitting potential
- The potential above which stable pits grow on a passive metal in a given environment.
- Pitting factor
- The ratio of the deepest pit to the average penetration calculated from weight loss.
- Crevice corrosion
- Localized attack in narrow, stagnant gaps where oxygen is depleted and the solution becomes acidic.
- Critical crevice temperature
- The lowest temperature at which an alloy suffers crevice corrosion in a standard test.
- Under-deposit corrosion
- Crevice-type attack beneath deposits, scale or biofilm.
- Microbiologically influenced corrosion
- Corrosion caused or accelerated by the activity of microorganisms.
- Weld decay
- Intergranular attack in the sensitized heat-affected zone of an austenitic stainless steel weld.
Practice problems
Work each problem on paper first, then reveal the answer to check.
Name two factors that raise a stainless steel's corrosion potential toward its pitting potential.
Show answer
Oxidizers such as dissolved oxygen, chlorine, ferric ions or copper ions.
Why does a pit become acidic inside?
Show answer
Dissolved metal ions hydrolyse, releasing hydrogen ions, and chloride migrates in to balance the charge.
Why does crevice corrosion often start before pitting on the same alloy?
Show answer
The crevice geometry creates oxygen depletion and an acidic, concentrated solution more easily than a free surface.
A coupon shows an average penetration of 0.002 mm and a deepest pit of 0.25 mm. What is the pitting factor?
Show answer
\(0.25/0.002 = 125\).
What is knife-line attack?
Show answer
Narrow intergranular attack right next to welds in stabilized stainless steels whose stabilizing carbides dissolved during welding.
List three ways to reduce microbiologically influenced corrosion.
Show answer
Avoid stagnant water and dead legs, drain and dry after hydrotesting, keep velocity up and use biocides.
Lesson quiz · 5 questions
Score 60% or more to complete this lesson.
Create a free account to save your progress, take quizzes and earn a certificate.