
WLD-310 · Lesson 9 of 12 · 16 min
GTAW on aluminum
Rob Haldane spent six years building aluminum trailers before he came to Hartwell, and when Glen Teskey asks who should teach Devon aluminum, Marta points at Rob. His first lesson is a demonstration. He runs a bead on a clean piece of 1/8 in 5052 sheet, then on a piece he has left on the shop floor for a month, and then on a piece he has wiped with his bare hand. The clean bead is bright and smooth with a frosty white band on each side. The floor piece spits and leaves a peppered, gray bead. The handprint shows as a line of pores across the bead. Aluminum, Rob says, is the most forgiving metal to weld if it is clean and the least forgiving if it is not. This lesson covers why, and how to weld it with AC GTAW.
How aluminum differs from steel
Aluminum differs from steel in almost every property that matters for welding. It melts at about 1,220 °F, less than half the melting point of steel, but it conducts heat about four to five times better than carbon steel, so the heat runs away from the joint and a lot of current is needed to start a pool, especially on thick material. It does not change color as it heats, so there is no warning glow before it melts; a pool forms suddenly and a thin edge can collapse without notice. It expands about twice as much as steel, so it distorts and shrinks more. And it is covered with a tough oxide layer that melts at about 3,700 °F.
The oxide is the key problem. If it is not removed, it stays on the pool as a skin that stops the filler and base metal from mixing, and pieces of it become trapped in the weld as inclusions. Lesson 2 explained how AC's electrode-positive half breaks the oxide up. The welder's part is to start with clean metal, so the AC only has to deal with the thin oxide that forms after cleaning, not the thick, dirty, hydrated oxide of old material.
Cleaning aluminum
Rob's cleaning sequence is the same every time. First, remove oil, grease, marker and fingerprints with a solvent such as acetone on a clean, lint-free rag, because brushing first would only drive the oil into the surface. Second, remove the oxide with a stainless steel wire brush used only for aluminum, by hand or with light pressure on a power brush, until the surface is bright. Third, weld within a few hours, before the oxide thickens again and absorbs moisture. Aluminum that will not be welded the same day is wrapped or cleaned again.
Grinding aluminum needs care. Ordinary grinding wheels load up with aluminum, smear it and can leave abrasive grit embedded in the surface, which shows up as inclusions and porosity. Hartwell uses discs and burrs made for aluminum, carbide burrs for removing cracks, and flap discs kept only for aluminum. Thick oxide on old parts, such as Wes's water tank, may need a chemical cleaner or abrasive blasting with clean media before welding.
Hydrogen is the cause of most aluminum porosity. Molten aluminum dissolves hydrogen readily, and as the weld freezes, the hydrogen comes out as gas and is trapped as round pores. The hydrogen comes from moisture in the oxide, oil, damp filler, condensation on cold metal brought into a warm shop, and leaks in the gas line. Clean metal, clean dry filler and tight gas fittings are the cure.
Settings for aluminum
GTAW on aluminum uses AC from an inverter or a transformer machine, high-frequency start and stabilization, argon or an argon-helium mixture, and lanthanated or zirconiated tungsten, one size larger than for steel at the same current. Hartwell's inverter starting settings are 70 % electrode negative balance and 120 Hz frequency, and current of roughly 1 A for every 0.001 in of thickness, the same rule as steel but at the top of the range, because aluminum draws so much heat away.
| Thickness | Tungsten | Filler | AC current | Argon |
|---|---|---|---|---|
| 1/16 in | 1/16 in | 1/16 in | 60 to 90 A | 15 to 19 cfh |
| 1/8 in | 3/32 in | 3/32 in | 110 to 150 A | 17 to 21 cfh |
| 3/16 in | 3/32 or 1/8 in | 1/8 in | 150 to 200 A | 19 to 25 cfh |
| 1/4 in | 1/8 in | 1/8 in | 190 to 250 A | 21 to 30 cfh; helium mix helps |
Starting the pool and welding
Because aluminum soaks up heat, the start is the hardest part. The welder strikes the arc at the start of the joint and holds it still with the pedal well down until the surface goes shiny and wet, which can take several seconds on thick material, then adds the first dab of filler and starts moving. As the part heats along the weld, the current needed drops quickly. A welder who holds the same pedal from start to finish will have a good bead at the start and a burn-through at the end. Devon learns to back off steadily as he goes, watching the pool width rather than the pedal.
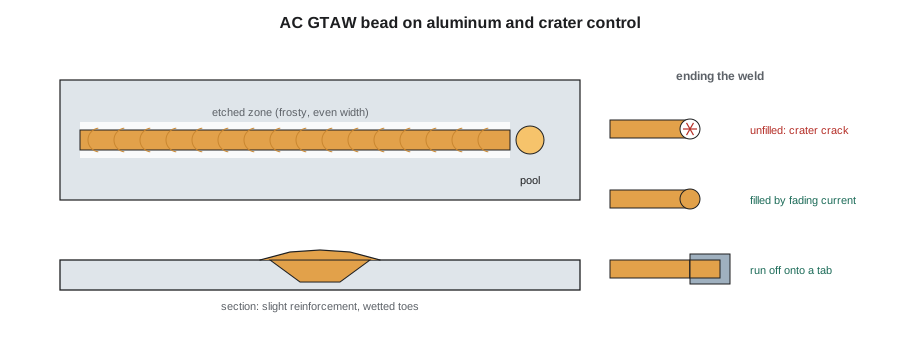
The aluminum pool is fluid and moves fast. Travel is faster than on stainless, the torch angle is about 10 to 15 degrees from vertical, and filler is added in quick, regular dabs, more filler than on steel, because aluminum welds shrink and tend to be concave if under-filled. The bead should show the frosty etched zone on each side, evenly wide, a bright surface with fine ripples, and full wetting at both toes. A black, sooty deposit beside the bead is usually magnesium oxide from 5000-series filler or base metal and is brushed off; a gray, peppered surface means dirty metal or too little cleaning action.
Craters and cracking
Aluminum is prone to crater cracks. When the arc stops, the small pool at the end of the weld freezes from the outside in, and because aluminum shrinks a lot as it freezes, the last metal to solidify, in the center of the crater, can be pulled apart into a star-shaped crack. Crater cracks can grow in service. The welder prevents them by filling the crater: easing off the pedal slowly while adding a last dab or two of filler so that the crater is built up to the bead height before the arc goes out, or by running the weld off onto a tab, or by reversing direction a short distance over the bead before stopping. Machines with a crater current setting help when using a torch switch.
Some aluminum alloys are also prone to hot cracking in the weld itself, especially the 6000-series alloys welded with no filler or with too little, and the 2000 and 7000-series alloys, many of which are not considered weldable by arc processes. The filler choice in lesson 6, 4043 or 5356, is mostly about avoiding hot cracks: adding enough filler changes the weld metal's composition away from the crack-sensitive range.
Strength after welding
Many aluminum alloys get their strength from cold working, such as 5052-H32, or from heat treatment, such as 6061-T6. The heat of welding undoes some of that strengthening in the heat-affected zone. A 6061-T6 part, for example, can lose a large share of its strength near the weld, and the design codes for welded aluminum, such as CSA W59.2 and AWS D1.2, use reduced strengths in the heat-affected zone for that reason. The welder cannot fix this, but can avoid making it worse: excessive preheat, slow travel and too many passes widen the softened zone. Hartwell does not preheat thin aluminum, except to dry it, and on thick sections preheats only as far as the procedure allows, typically no more than about 250 °F.
In the United States, structural aluminum welding is generally covered by AWS D1.2, which sets out procedure and welder qualification, design and inspection for aluminum structures. Hartwell does not have qualified procedures for structural aluminum, so its aluminum work is limited to repairs and parts outside that code, such as Wes's tank, and any structural aluminum, such as a trailer frame, is sent to a shop that holds the procedures.
Heat and current on aluminum
# How much current an aluminum weld needs as the part heats up (illustrative pedal profile along a seam)
start_amps = 150             # needed to wet a cold start
end_amps = 105               # needed once the plate is hot
seam = 12                  # seam length, in
for frac in (0.0, 0.25, 0.5, 0.75, 1.0):
    pos = seam * frac
    amps = start_amps - (start_amps - end_amps) * frac ** 0.7
    print(f"at {pos:5.1f} in: about {amps:3.0f} A ({amps / start_amps * 100:3.0f}% of the start current)")
print(f"if the pedal is held at the start current, the end of the seam gets {start_amps / end_amps:.1f} times the current it needs")at 0.0 in: about 150 A (100% of the start current) at 3.0 in: about 133 A ( 89% of the start current) at 6.0 in: about 122 A ( 82% of the start current) at 9.0 in: about 113 A ( 75% of the start current) at 12.0 in: about 105 A ( 70% of the start current) if the pedal is held at the start current, the end of the seam gets 1.4 times the current it needs
The model is simple, but it is close to what Devon's pedal does on a 1/8 in seam once he has learned the feel: he starts near 150 A and finishes near 105 A. Without backing off, the end of the seam gets more than 40 % too much current, which is how he burns through his first two practice seams.
Practice on aluminum
Rob has Devon run fusion beads, then beads with filler, then outside corners, lap joints and T-joint fillets on 5052 sheet, then butt joints on 1/8 and 3/16 in plate with backing. Fillets on aluminum are harder than on steel because the heat runs away in two directions, and the pool must be held at the root until both members are wet before the rod goes in. By the end of the two weeks, Devon can run a 12 in fillet on 3/16 in plate with an even bead, a filled crater and no pores on the bend test strip Rob cuts from it.
Aluminum fillets and corners
Fillets are the most common joint in Hartwell's aluminum repair work, and the hardest to get right at first. The heat runs into both members, the root is cold, and the fluid pool tends to run onto the flat member and leave the vertical member unfused. Rob's method is to hold the arc at the root with the torch splitting the angle, wait until both surfaces are wet and the pool has formed a small bright crescent between them, and only then add the rod at the leading edge and the upper side. The travel speed is set by watching the crescent: if it narrows, slow down; if it widens and the edges start to undercut, speed up.
Outside corners on aluminum melt quickly and the edges can collapse, so the current is lower and the travel faster than for a fillet of the same thickness, and filler is added generously to build the corner. Aluminum lap joints are welded like steel ones, with the arc aimed at the bottom sheet, but the edge of the top sheet melts back even faster, and the welder must keep the rod near the edge to feed it.
Distortion and fixtures on aluminum
Because aluminum expands about twice as much as steel and its pool shrinks a lot, aluminum parts distort and crack if they are not held well or are welded in a poor sequence. Hartwell's aluminum fixtures are made of steel plate with clamps, and copper or aluminum backing bars are used under thin butt joints. Tacks on aluminum are closer together than on steel, and long seams are welded in short sections, balanced from the middle out. A part that is clamped too rigidly can crack as it cools, so Rob leaves one end of long seams free to move until the tacks are in.
Safety on aluminum
AC GTAW on aluminum is the brightest arc in the shop. The reflected light from bright aluminum adds to the ultraviolet, and the argon arc makes more ozone than a stick arc. Devon uses a shade 11 or 12 lens, keeps the fume extraction close, and wears a long-sleeved jacket even in summer. High-frequency is on continuously on the transformer machine, so the booth's electronics are kept away from its cables.
Common mistakes
MistakeBrushing aluminum before removing oil.
InsteadDegrease with solvent first, then brush with a stainless brush kept for aluminum.
MistakeHolding the same pedal from start to finish.
InsteadStart hot to wet the joint, then back off as the part heats.
MistakeLetting the arc go out on an unfilled crater.
InsteadFade the current while adding filler, or run off onto a tab.
MistakeGrinding aluminum with ordinary wheels.
InsteadUse discs and burrs made for aluminum, kept only for aluminum.
MistakeBringing cold aluminum into a warm shop and welding at once.
InsteadLet it warm up and dry, or wipe off condensation, before welding.
Summary and key terms
- Aluminum melts at a low temperature but conducts heat away quickly and gives no color warning.
- The oxide must be broken up; clean metal lets AC do this with little effort.
- Degrease, brush with a dedicated stainless brush, and weld soon after cleaning.
- Hydrogen from moisture and oil causes porosity.
- Start hot, back off as the part heats, add plenty of filler and fill the crater.
- Welding softens many aluminum alloys near the weld; structural aluminum is covered by its own standards.
- Etched zone
- The frosty cleaned band beside an AC aluminum weld.
- Crater crack
- A crack at the end of a weld caused by shrinkage of an unfilled crater.
- Hot cracking
- Cracking that occurs as the weld metal solidifies.
- 5052-H32
- A strain-hardened aluminum-magnesium alloy used for tanks and sheet work.
Practice problems
Work each problem on paper first, then reveal the answer to check.
What current does the rule of thumb give for 3/16 in aluminum?
Show answer
About 190 A, at the top of the range because aluminum draws heat away.
Name three sources of hydrogen in aluminum welds.
Show answer
Moisture in the oxide, oil or fingerprints, damp filler, condensation, gas leaks.
How does a welder prevent a crater crack?
Show answer
Fade the current while adding filler to fill the crater, or run off onto a tab.
Lesson quiz · 5 questions
Score 60% or more to complete this lesson.
Create a free account to save your progress, take quizzes and earn a certificate.