
WLD-310 · Lesson 12 of 12 · 16 min
Capstone: a stainless process line and an aluminum tank repair
Devon's GTAW course ends with two jobs in the same week, chosen by Glen Teskey because they use nearly everything in the last eleven lessons. The first is production work on the chemical injection line for the third Coldwater skid: twelve shop butt welds in NPS 1 schedule 40S 316L pipe, purged, tint-checked and sampled for ferrite and radiography, welded after Devon passes a performance qualification test. The second is a repair on Wes Brandvold's aluminum stock-water tank, which has cracked beside a mounting bracket after a summer of bouncing across a pasture on its trailer. This capstone follows both jobs from the paperwork to the final check.
Part 1: qualifying for the line
The injection line is process piping built to ASME B31.3, so the welders on it must be qualified to a procedure under ASME Section IX. Elena Marchetti's GTAW procedure for 316L is already qualified. Devon's performance test is a 1G pipe coupon: NPS 2 schedule 40S 316L, rotated on rollers and welded in the flat position, with an argon purge, ER316L filler and the procedure's settings. A 1G test qualifies him for groove welds in the flat position only, which covers the shop butt welds on spools that can be rolled. The fixed-position tie-ins on the skid will be welded by Marta.
Devon prepares the coupon as he will prepare the production welds: bevels machined at 37.5 degrees with a 1/16 in land, cleaned with a stainless brush and acetone, fitted with a 3/32 in root opening, purged through caps until the meter reads below 100 ppm, and tacked in four places with the purge on. He welds a root, a hot pass and a cap, with the interpass checked before each pass and kept below 350 °F. Lucia watches the whole test. The coupon's root, seen through the open end, is a smooth, slightly convex silver bead with pale straw tint along its edges, inside the client's limit.
Lucia cuts the coupon into four bend specimens, two face bends and two root bends, and bends them in the guided bend jig. All four open without a single discontinuity. The test record goes into Devon's file with the procedure number, the positions and diameters qualified, and his welder number, and he is cleared for 1G butt welds on 316L pipe for the Coldwater line.
The line and its weld map
The injection line on the third skid runs from the chemical pump discharge to the injection quill on the gas header, about 60 ft of NPS 1 pipe in four shop spools with socket-weld branches for a pressure gauge, a relief valve and a check valve. Raj Bhullar's spool drawings number every weld, and the weld map shows which welds are shop butt welds that can be rolled, which are socket welds, and which are field tie-ins.
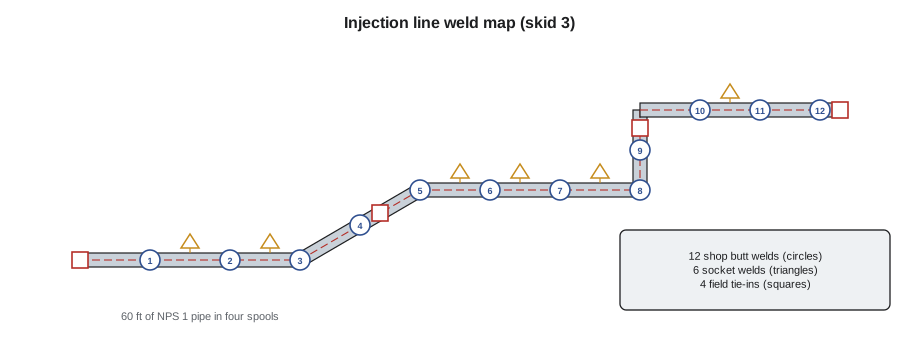
Each spool is purged as a whole: the open ends capped with plastic purge caps, argon fed in at one end at 30 cfh, and vented at the far end through a small hole in the cap. The longest spool holds less than 0.1 cu ft, so the five-volume purge takes about a minute, and Devon waits until the meter reads below 100 ppm, usually after three or four minutes. Every butt weld is taped over its root opening except for the length being welded, and the tape is peeled back as the root advances.
Welding the spools
Devon welds the twelve butt welds over two days, with the spools on rollers so that he welds every root and cap at the top of the pipe in the flat position, turning the spool by hand between short sections. His settings are the procedure's: DCEN, 3/32 in lanthanated tungsten ground to 30 degrees with a flat, a number 10 gas lens cup, 23 cfh of argon at the torch, 1/16 in ER316L for the root and 3/32 in for the hot pass and cap, about 85 A for the root and 95 to 100 A for the cap. He logs the purge reading, the interpass temperature and the current for every pass on the weld record.
# Cost of the twelve shop butt welds on the injection line (labor, argon, filler, tungsten)
import math
welds, od, passes = 12, 1.315, 3                # NPS 1, root + hot + cap
speed = 2.75                                    # average travel, in/min
op_factor = 0.22
labor = 85                                # per hour, dollars
torch_flow, purge_flow = 23, 30            # cfh
gas_price = 0.95                               # dollars per cu ft
filler_mass = 0.77                             # lb for all twelve welds
filler_price = 27                           # dollars per lb
arc_min = math.pi * od * passes * welds / speed
total_h = arc_min / op_factor / 60
purge_min = welds * 12                         # purge and wait time per weld, minutes
gas = (torch_flow * arc_min * 1.3 + purge_flow * purge_min) / 60
cost = {"wages": total_h * labor, "argon": gas * gas_price, "filler": filler_mass * filler_price, "tungsten": 4 * 6.0}
print(f"arc time {arc_min:.0f} min, total time {total_h:.1f} h, argon {gas:.1f} cu ft")
for k, v in cost.items():
    print(f"  {k:9} {v:7.0f} dollars")
print(f"total {sum(cost.values()):,.0f} dollars, or {sum(cost.values()) / welds:.0f} dollars per weld")arc time 54 min, total time 4.1 h, argon 99.0 cu ft wages 348 dollars argon 94 dollars filler 21 dollars tungsten 24 dollars total 487 dollars, or 41 dollars per weld
The estimate shows where the money goes on small-bore stainless: almost all of it is labor, and most of the labor is fitting, purging, waiting for the meter and waiting for the pipe to cool, not welding. The argon and filler are a small share. When Glen compares the estimate with the job card afterwards, the actual time is within an hour of it.
Inspection of the line
Lucia checks every weld visually: the cap profile and width, undercut, the craters, the outside tint, and the root from inside the open spool ends with a borescope. Eleven welds show pale straw or lighter inside. One, CI-307, shows a straw band along the last 3/4 in of the root, level 3 on the client's chart, which is the limit and is accepted. Devon's record for CI-307 shows the reason: the tape at the vent end of the spool had lifted, and the meter reading at the start of the root was 90 ppm, inside the limit but higher than his other welds. He retapes the vent end of each spool before the next welds.
Ferrite is checked on two welds, one in ten rounded up, and both average between FN 6 and 8. Radiography is called on a random five percent of all the butt welds in the line, which picks one of Devon's welds and one of Marta's tie-ins. Both films are clean. After the field tie-ins are made and inspected, the spools go to the cleaning contractor for pickling and passivation, and the line is hydrostatically tested on the skid. It holds.
Part 2: Wes's tank
Wes Brandvold's tank is a 265 gal stock-water tank in 5052-H32 aluminum, 1/8 in thick, strapped and bolted to a small trailer by four welded brackets. A crack about 4 3/4 in long has opened in the tank wall at the corner of the rear right bracket, where the bracket's sharp corner concentrated the stress each time the trailer bounced. The crack leaks a steady drip. Wes wants it fixed before the cattle go back out.
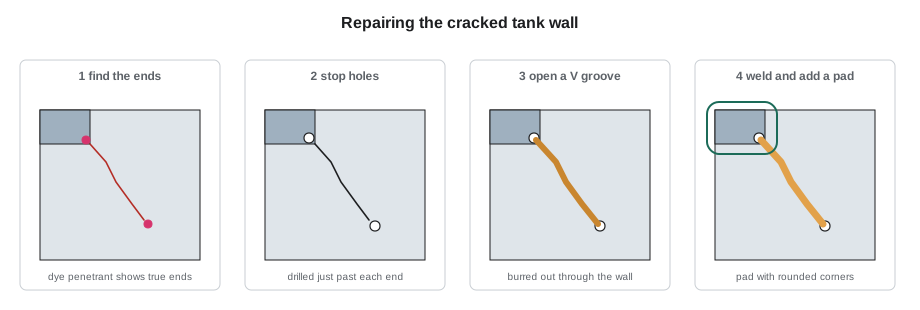
Rob and Devon plan the repair together and Elena reviews it. The tank is not a code item, so there is no qualified procedure, but Hartwell writes a repair plan anyway, as it does for every repair: what is wrong, why, what will be done, and how it will be checked. The plan has five steps.
- Prepare: drain the tank, rinse it and let it dry fully, because water inside will boil into the weld; remove the paint around the crack by sanding; degrease with acetone.
- Find the ends: apply dye penetrant to find the true ends of the crack, which are always beyond the visible ends, and mark them.
- Stop the crack: drill a 1/4 in hole about 1/8 in past each end so that the crack cannot run further while it is welded.
- Excavate: open the crack into a V groove with a carbide burr kept for aluminum, through the full thickness, then brush with a stainless brush kept for aluminum and wipe with solvent.
- Weld and reinforce: weld the groove and fill the stop holes with AC GTAW and ER5356, then add a doubler pad with rounded corners under the bracket so the stress is spread instead of concentrated.
# Tank crack repair: groove volume, filler rods and an estimate of the weld time (5052, AC GTAW)
import math
crack = 5.2            # crack length plus stop holes, in
t = 0.125                 # wall thickness, in
angle = 70              # included groove angle, degrees
rod_d, rod_len, stub = 0.09375, 36, 2.5
area = t * t * math.tan(math.radians(angle / 2)) * 1.25      # V groove plus reinforcement
vol = area * crack
rod_vol = math.pi / 4 * rod_d ** 2 * (rod_len - stub)
speed = 6             # in/min
print(f"groove volume {vol:.3f} cubic in, rods needed {math.ceil(vol / rod_vol)} (take {math.ceil(vol / rod_vol) + 2})")
print(f"arc time about {crack / speed:.1f} min for one pass, plus the stop holes and the doubler")groove volume 0.071 cubic in, rods needed 1 (take 3) arc time about 0.9 min for one pass, plus the stop holes and the doubler
Welding the tank
Devon sets the inverter for AC, 70 % electrode negative, 120 Hz, a 3/32 in lanthanated tungsten with a blunt point and a flat, a number 8 cup, 19 cfh of argon, and a maximum of 150 A on the pedal. The tank wall is thin but the tank is large and draws heat away, so he starts each section with the pedal well down until the edges wet, then backs off. He welds the crack in three sections from the middle outward, to keep the distortion balanced, fills each stop hole with a short circular pass, and fills each crater by fading the pedal while adding a last dab of rod. Between sections he brushes the weld with the aluminum brush to remove the black film of magnesium oxide.
The weld comes out smooth, with an even etched band on each side. Rob checks it with dye penetrant, which shows no indications. Devon then welds a 1/8 in 5052 doubler pad, cut by Raj with a 1 in radius at each corner, to the tank wall under the rear brackets with a continuous fillet, and welds the bracket to the pad instead of directly to the tank wall. Rob insists the pad's fillet is wrapped around the corners and not stopped at them, because a stop at a corner is exactly the stress raiser that started the crack.
Wes fills the tank in the yard and leaves it overnight. The next morning the patch is dry. Rob suggests that Wes have the other three brackets fitted with pads before they crack too, and Glen writes the quote.
What the week shows
Marta reviews the week with Devon. On the stainless line, the quality depended on preparation and discipline: the purge, the tape, the interpass, the regrind after every dip, the log. On the tank, it depended on understanding why the crack happened and not just filling it: the stop holes, the cleaning, the filler, the crater, the doubler. Both jobs used the same process and almost nothing else in common, which is what GTAW is like. Devon's next course is pipe, where the GTAW root he has practiced on plate and rolled pipe meets fixed pipe in every position.
The records
When both jobs are done, Devon's paperwork is as large as the job cards. For the injection line, it includes his performance qualification record, the weld map with his welder number against each of his twelve welds, the weld records with purge readings, interpass temperatures and currents, the tint and visual inspection record, the ferrite readings, the radiography report for the selected weld, and the cleaning contractor's certificate. For the tank, it includes the repair plan, the dye penetrant results before and after, and a short note of the settings and filler. Glen keeps the tank record with Wes's account so that the next repair can start from it.
Common mistakes
MistakeWelding production pipe in positions the test did not cover.
InsteadWeld only what the qualification covers; a 1G test covers flat rolled pipe.
MistakeWelding a crack without finding its true ends.
InsteadUse dye penetrant to find the ends and drill stop holes past them.
MistakeWelding a tank that still has water in it.
InsteadDrain, rinse and dry the tank fully before welding.
MistakeStopping a fillet at a sharp corner of a reinforcing pad.
InsteadRound the corners and wrap the fillet around them.
MistakeIgnoring a high purge reading because it is still inside the limit.
InsteadFind out why it is high; it was the warning on CI-307.
Summary and key terms
- Production GTAW on pressure piping needs a qualified procedure and a qualified welder.
- A 1G pipe test qualifies flat-position welds on rolled pipe.
- Purge, tape, interpass control and logs keep stainless welds within tint and ferrite limits.
- Labor dominates the cost of small-bore stainless welding.
- Crack repair: find the ends, stop the crack, excavate, clean, weld and remove the cause.
- Aluminum repairs need dry, clean metal, the right filler and filled craters.
- Performance qualification
- A test that shows a welder can make sound welds to a qualified procedure.
- Weld map
- A drawing that numbers each weld and shows its type and welder.
- Crack-stop hole
- A hole drilled just past the end of a crack to stop it from growing.
- Doubler pad
- An extra plate welded under an attachment to spread the load.
Practice problems
Work each problem on paper first, then reveal the answer to check.
A line has 22 butt welds and a 5 % random radiography rate. How many are examined first?
Show answer
Two (1.1 rounded up).
Why are the crack-stop holes drilled past the visible ends of the crack?
Show answer
The true ends extend beyond what can be seen; dye penetrant shows them.
Why was the bracket welded to a doubler pad instead of the tank wall?
Show answer
The pad spreads the load and its rounded corners avoid a stress raiser.
Lesson quiz · 5 questions
Score 60% or more to complete this lesson.
Create a free account to save your progress, take quizzes and earn a certificate.