
WLD-130 · Lesson 10 of 12 · 16 min
Distortion and residual stress
The third piece on Marta's bench in the first lesson, the bowed girder flange, had no crack, no porosity and no bad metallurgy. It was ruined by shrinkage. Every fusion weld shrinks as it cools, and because the weld is attached to metal that did not get as hot, the shrinkage either pulls the part out of shape or, if the part is held, locks stresses into it. Distortion costs fabricators more time and money than almost any other welding problem: straightening, re-machining, scrapped parts, and assemblies that will not fit in the field. Residual stresses add to service loads, help cracks start, and drive stress corrosion. This lesson explains why welds shrink, the main types of distortion, how residual stress forms and what it does, and the practical methods Hartwell uses to prevent and correct distortion, from design and fit-up to sequence and straightening.
Why welds shrink
Metal expands when heated and contracts when cooled. The amount depends on the coefficient of thermal expansion, the temperature change and the length:
Here ΔL is the change in length, α is the coefficient of thermal expansion, about 6.7 × 10⁻⁶ per degree Fahrenheit for carbon steel, L is the original length and ΔT is the change in temperature.
Imagine a bar of steel heated in the middle. The hot section tries to expand, but the cold metal on either side resists. Hot steel is weak, so instead of expanding freely the hot section is squeezed: it yields in compression and gets shorter and fatter than it would have been. When it cools, it contracts by the full amount, but it has already been upset, so it ends up shorter than before. If the bar is free, it is now shorter overall. If it is held at both ends, it cannot shorten, and the cooled section is left in tension, pulling on the ends. That simple picture explains both distortion and residual stress.
A weld is an extreme version. The weld metal freezes from liquid at over 2,550 °F and then contracts through more than a thousand degrees. The HAZ around it was heated and upset. All of that metal ends up trying to be shorter than the space it occupies.
Types of distortion
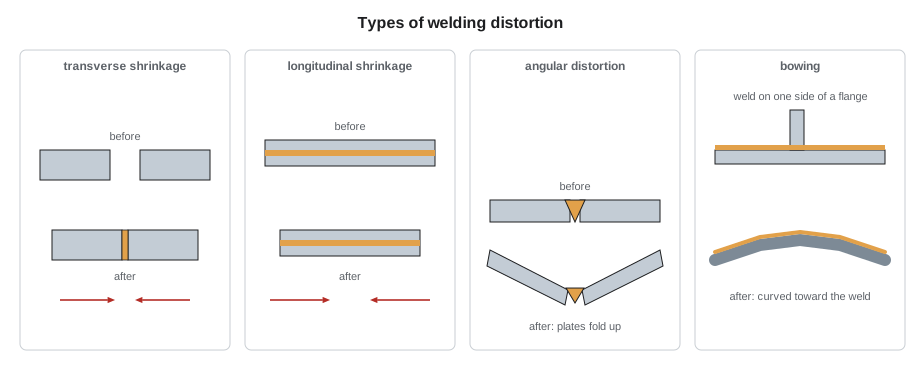
- Transverse shrinkage: shrinkage across the weld, pulling the parts closer together. A heavy butt weld in thick plate can pull the parts together by an eighth of an inch or more.
- Longitudinal shrinkage: shrinkage along the length of the weld, making a long welded part shorter.
- Angular distortion: rotation of the parts about the weld line, because more weld metal is on one side of the plate than the other. A single-V butt closes up into a shallow V; a fillet pulls the standing plate toward it.
- Bowing or camber: a long member bends along its length when the weld is off its center of gravity, such as a fillet on one side of a flange. That is what happened to the flange on Marta's bench.
- Buckling: thin plates, such as deck plate or sheet, buckle into waves when the compressive stresses next to the weld exceed what the plate can carry.
- Twisting: a long member rotates about its axis when welds are unbalanced or sequenced in one direction.
Estimating shrinkage
Engineers have developed simple empirical formulas from tests that give a feel for how much a joint will shrink. Two of the best known are an estimate of transverse shrinkage of a butt weld, from the weld area, plate thickness and root opening, and an estimate of the bow of a member caused by a longitudinal weld off its neutral axis. Both are approximate, but they show which variables matter.
# Rough distortion estimates (empirical formulas; consistent units throughout)
# Transverse shrinkage of a butt weld: S = 0.2 * Aw / t + 0.05 * d
def transverse(aw, t, d):
    return 0.2 * aw / t + 0.05 * d
# Bow of a member from a longitudinal weld: deflection = 0.005 * Aw * L**2 * y / I
def bow(aw, length, y, inertia):
    return 0.005 * aw * length ** 2 / inertia * y
# a single-V butt and a double-V butt in the same plate
t = 1.0                       # plate thickness, in
print(f"single-V butt: shrinkage about {transverse(0.67, t, 0.125):.3f} in")
print(f"double-V butt: shrinkage about {transverse(0.42, t, 0.125):.3f} in (less weld metal)")
# a fillet along one side of a girder flange plate, bending it about its strong axis
for leg in (0.25, 0.3125, 0.375):
    aw = leg ** 2 / 2         # fillet area, in2
print(f"fillet leg {leg} in: bow about {bow(aw, 72, 2.75, 38.4):.3f} in over {"6 ft"}")single-V butt: shrinkage about 0.140 in double-V butt: shrinkage about 0.090 in (less weld metal) fillet leg 0.25 in: bow about 0.058 in over 6 ft fillet leg 0.3125 in: bow about 0.091 in over 6 ft fillet leg 0.375 in: bow about 0.131 in over 6 ft
Two lessons come out of the numbers. Less weld metal means less shrinkage: the double-V joint, with less metal in the groove, shrinks less than the single-V. And bowing grows with the weld area: a fillet one size larger, on the same member, bows it noticeably more. Oversized welds are one of the biggest causes of distortion, which is why Lucia checks fillet sizes as carefully for oversize as for undersize.
Residual stress
When a welded part cannot move freely, the shrinkage is locked in as residual stress. In a typical weld in carbon steel, the weld metal and the HAZ next to it end up in tension along the weld at or near the yield strength of the material, and that tension is balanced by compression in the metal further away. Across the weld, the pattern depends on the restraint. The stresses are internal; there is no outside load. A welded part can sit on a rack with yield-level stress in its welds and look perfectly normal.
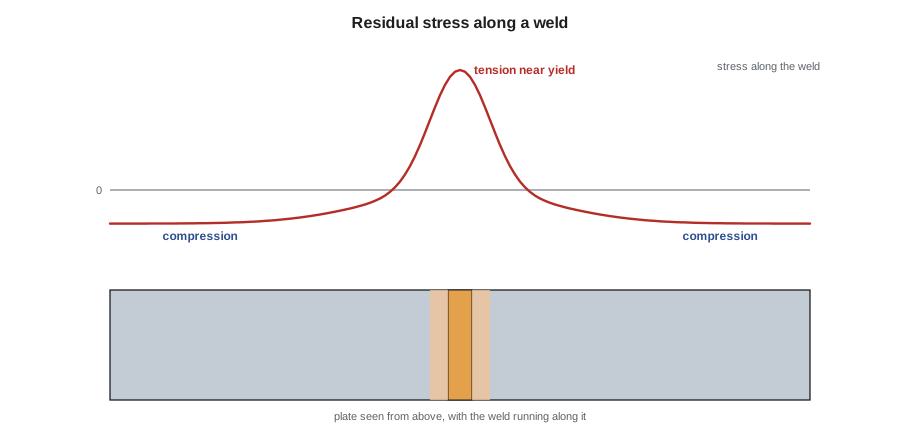
Residual stress matters in several ways:
- It adds to service stress. Under static loads in ductile steel it usually has little effect on strength, because the metal yields locally and the stress redistributes.
- It helps cracks start: hydrogen cracking, fatigue cracking at weld toes and brittle fracture in cold, thick sections all need tension, and residual stress supplies it.
- It drives stress corrosion cracking, in which a susceptible metal in a particular environment, such as stainless steel in hot chlorides or carbon steel in caustic or amine service, cracks under tension with no outside load.
- It causes movement during machining: when a welded part is machined, removing stressed metal upsets the balance, and the part moves. Machined weldments are often stress relieved first.
Residual stress can be reduced by post-weld heat treatment, which lowers the yield strength of the steel at temperature so the stresses relax; by vibratory stress relief in some applications; and by peening, which hammers the surface of the weld into compression. Peening must be done as specified, typically on intermediate passes and not on the root or the final layer unless the procedure says so, because it can hide cracks and work-harden the surface.
Restraint and cracking
Restraint is the degree to which a joint is prevented from moving. A small part on a bench is lightly restrained; a nozzle in a thick vessel shell, a repair in the middle of a rigid frame or a joint between two heavy members already fixed in place is highly restrained. High restraint reduces distortion, because the part cannot move, but raises residual stress, and with it the risk of cracking. Fabricators balance the two. A rigid fixture that holds a part perfectly flat during welding can crack a hardenable steel that would have been fine allowed to move a little. Preheat, a good sequence and low-hydrogen practice are all more important when restraint is high.
Preventing distortion: design
- Use the smallest weld that meets the design. Overwelding is the commonest avoidable cause of distortion.
- Use intermittent fillets where the design allows instead of continuous ones.
- Choose joint preparations that need less weld metal: double-V instead of single-V on thick plate, narrower groove angles where the process allows.
- Place welds near the neutral axis of a member and balance them about it.
- Use fewer, larger parts, such as bent plate instead of welded corners, and rolled shapes instead of built-up sections, where possible.
Preventing distortion: fit-up and fixturing
- Presetting: set parts out of position by the amount the weld will pull them. A T-joint stiffener can be tilted a degree or two away from the first weld; two plates for a single-V butt can be set at a slight angle so they pull flat.
- Pre-bending or pre-cambering: bend a member in the opposite direction before welding so shrinkage straightens it. Long girders are often built with camber deliberately for this and for the load they will carry.
- Back-to-back assembly: clamp two identical parts together so their distortion cancels while they are welded, then separate them.
- Fixtures, clamps and strongbacks: hold parts in position during welding. They reduce distortion at the cost of more residual stress, and the parts may spring back a little when released.
- Allow for shrinkage: cut parts slightly long, or fit butt joints with a small extra gap, so the final dimensions are right after shrinkage.
Preventing distortion: welding procedure and sequence
The order and direction of welding have a large effect on distortion. Hartwell uses these methods every day:
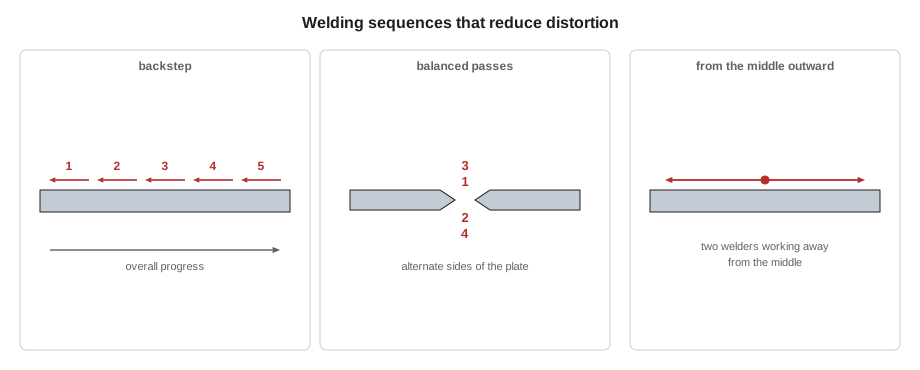
- Balance welding about the neutral axis: alternate passes on opposite sides of a double-V butt or a two-sided fillet, so each side's shrinkage counteracts the other.
- Backstep welding: weld a long seam in short segments, each run in the direction opposite to the overall progress, so each new segment ties into the end of the last and the heat is spread.
- Skip welding: weld short segments at intervals along the joint, then come back and fill the gaps, spreading the heat.
- Work from the center outward on long seams and large assemblies, so shrinkage can move toward free ends rather than being trapped.
- Weld the joints with the most shrinkage first, while the assembly is still free to move, and the stiffer joints last.
- Use the fewest passes and the lowest heat input the procedure allows; faster processes with less total heat distort less.
On the Riverside girders, the web-to-flange fillets are welded by two welders working the same direction on opposite sides of the web at the same time, so the angular distortion of the flange is balanced, and the stiffeners are welded in an alternating pattern from the middle of each girder outward. The girders are built with a specified camber, checked after welding.
Correcting distortion
When distortion happens anyway, it can often be corrected:
- Mechanical straightening: pressing, jacking or rolling the part back into shape, cold. It works on ductile steels but leaves the part with new stresses and some cold work.
- Heat straightening, or flame straightening: heating small, carefully placed areas, often in a V-shape or a spot pattern, to a controlled temperature, so that as they cool and shrink they pull the part back into line. It uses the same principle as the distortion itself. The temperature must be limited, typically to about 1,200 °F for ordinary carbon steel and lower for quenched and tempered or thermomechanically processed steels, which can be ruined by overheating. On bridges and other critical work, heat straightening is done only to an approved procedure with temperature checks.
Neither method is free. Straightening adds labor, can introduce new problems and, on code work, may need approval. Preventing distortion is almost always cheaper than correcting it.
Common mistakes
MistakeMaking fillets oversize to be safe.
InsteadOversize welds add shrinkage and distortion and cost time; weld the size specified.
MistakeWelding all of one side of a double-V butt before turning it over.
InsteadAlternate sides to balance angular distortion.
MistakeClamping a hardenable part rigidly and welding it hot and fast.
InsteadRigid restraint raises residual stress and cracking risk; preheat and sequence matter more.
MistakeHeat straightening quenched and tempered plate with a torch until it glows.
InsteadFollow a procedure with a temperature limit suited to the steel.
MistakeMachining a heavy weldment and expecting it to stay put.
InsteadResidual stresses move the part when metal is removed; stress relieve first if required.
Summary and key terms
- Welds shrink because the hot metal is upset in compression and then contracts on cooling.
- Distortion includes transverse and longitudinal shrinkage, angular distortion, bowing, buckling and twisting.
- Less weld metal and welds balanced about the neutral axis distort less.
- Residual stress in the weld and HAZ is tensile near yield, balanced by compression elsewhere.
- Residual stress helps start hydrogen cracks, fatigue cracks, brittle fracture and stress corrosion.
- High restraint reduces distortion but increases residual stress and cracking risk.
- Prevent distortion by design, presetting, fixtures, balanced and backstep sequences; correct it by mechanical or heat straightening.
- Distortion
- A change in shape or dimensions of a part caused by welding.
- Transverse shrinkage
- Shrinkage across a weld.
- Angular distortion
- Rotation of parts about the weld line from unequal shrinkage through the thickness.
- Residual stress
- Stress locked in a part with no outside load, caused by restrained shrinkage.
- Restraint
- The degree to which a joint is prevented from moving during welding.
- Presetting
- Positioning parts out of line so shrinkage pulls them into line.
- Backstep welding
- Welding short segments opposite to the overall direction of progress.
- Heat straightening
- Using controlled local heating and shrinkage to straighten a distorted part.
Practice problems
Work each problem on paper first, then reveal the answer to check.
A 6 ft steel bar is heated by 540 °F. About how much does it grow?
Show answer
6.7 × 10⁻⁶ × 72 in × 540 = 0.26 in.
Why does a double-V butt shrink less than a single-V butt in the same plate?
Show answer
It has less weld metal, and its two sides balance each other.
Name three welding sequences that reduce distortion.
Show answer
Balanced welding, backstep welding, skip welding, working from the center outward.
Lesson quiz · 5 questions
Score 60% or more to complete this lesson.
Create a free account to save your progress, take quizzes and earn a certificate.