
SMW-230 · Lesson 8 of 12 · 19 min
GTAW on stainless steel
Stainless steel is the material of the trade's most demanding welded work: kitchen hoods and grease duct, dishwasher and laboratory exhaust, hospital and food plant equipment, and polished architectural trim. It is welded with GTAW because the process gives the control and cleanliness the metal needs. This lesson covers why stainless behaves as it does, how to keep it stainless through welding, and the two Keelson jobs that taught Kai the most: the Brine & Ember grease duct in 304 and the Eastgate laboratory exhaust transitions in 316.
What makes stainless steel stainless
Stainless steels are iron alloys with at least about 10.5 percent chromium. The chromium forms an extremely thin, invisible layer of chromium oxide on the surface, the passive layer, which protects the metal underneath and heals itself when scratched, as long as oxygen is present. The common grades in the trade are austenitic stainless steels, which also contain nickel and are not magnetic: 304, the general grade for kitchens and most stainless duct, and 316, with added molybdenum for better resistance to chlorides and many chemicals, used for laboratory exhaust, pools, coastal sites and pharmaceutical work. The L grades, 304L and 316L, have a low carbon content, which matters for welding.
Three things can spoil the passive layer and cause stainless to rust or corrode, and welding can cause all three if it is done carelessly.
- Heat tint. Heating stainless in air forms a colored oxide layer next to the weld, from pale straw through gold, brown, purple and blue to gray. Under the color, the surface has lost chromium, and the tinted zone corrodes much more easily than the base metal. The darker the color, the worse it is.
- Sensitization. Holding standard-carbon austenitic stainless in a temperature range of roughly 850 to 1,550 °F, lets chromium combine with carbon at the grain boundaries, leaving chromium-poor zones that corrode. The low-carbon L grades and low heat input reduce the risk.
- Contamination. Iron particles from carbon steel tools, brushes, clamps or grinding dust embed in the surface and rust, leaving brown streaks. Chlorides from some markers, cleaners and tap water attack the passive layer.
Distortion and heat in stainless
Austenitic stainless steel expands about half as much again as carbon steel for the same temperature rise and conducts heat only about a third as well. The heat from the arc stays concentrated near the weld, and that zone expands more and then shrinks more. Stainless sheet therefore distorts more than carbon steel sheet for the same weld, and burns through more readily when heat builds up. Everything in lessons 4 and 10 about fit-up, clamping, tacking, sequence, chill bars and low heat input applies with extra force.
Preparing stainless for welding
Keelson's stainless corner existed for one reason: to keep carbon steel away from stainless. Its rules were strict.
- Use only stainless steel brushes, discs, files and clamps reserved for stainless, marked with blue tape and stored separately.
- Never grind carbon steel near stainless; grinding dust travels.
- Protect stainless sheet on the bench with clean paper or plastic, and use carts and tables covered so the sheet does not touch carbon steel.
- Degrease with an approved solvent that leaves no residue, and remove the protective film well back from the joint.
- Use only markers approved for stainless, free of chlorides and sulfur.
Fit-up is the same as for any thin sheet, only tighter: zero gap on butt joints where possible, close tacks, and good clamping. Copper chill bars or a purge fixture behind the joint support the pool and pull heat away.
Back purging
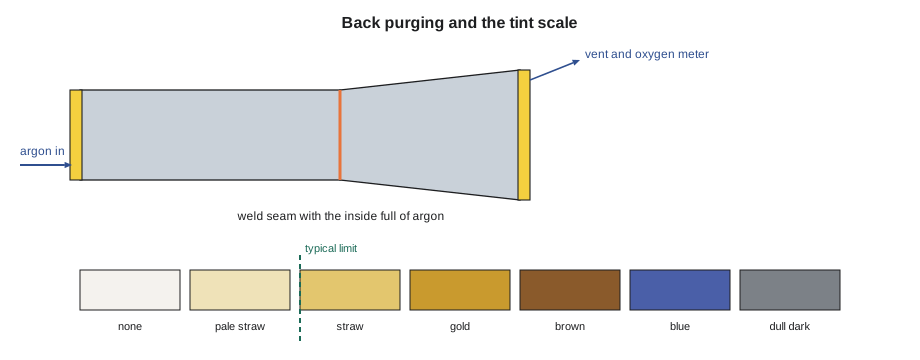
The weld pool and the hot metal on the back of a stainless joint need shielding as much as the front. Without it, the root oxidizes into a rough, dark, crusty surface called sugaring, which corrodes, holds bacteria and in a pipe or duct roughens the inside. The cure is back purging: filling the space behind the joint with argon so there is no oxygen there while the metal is hot. On a flat panel, a grooved copper or aluminum backing bar with argon fed into the groove does it. In duct, pipe and closed fittings, the ends are sealed with tape, purge dams or plugs and the inside is filled with argon, with a vent at the far end to let air out.
The air has to be displaced, not just diluted. As a rule of thumb, the purge gas volume should be several times the volume of the space being purged before welding starts, and the oxygen content at the vent can be checked with an oxygen meter. Specifications for food and pharmaceutical work set a limit in parts per million; for duct, the usual test is the color of the root after welding. During welding, the flow is turned down to a low, steady rate to keep the space full without blowing out the pool.
Kai worked out the purge for the Eastgate lab exhaust transitions with the script below. Each assembly was a 14 in round to 12 by 12 in transition, 24 in long, welded to a short length of 14 in round duct, sealed at both ends.
# Back purge volume and time for a sealed stainless assembly
import math
d, l_round = 14, 16             # round duct diameter and length, in
a, b, l_tr = 12, 12, 24          # transition square end and length, in
v_round = math.pi * d ** 2 / 4 * l_round
v_tr = (math.pi * d ** 2 / 4 + a * b) / 2 * l_tr    # average of end areas x length
volume = (v_round + v_tr) / 1728       # cu ft
exchanges = 5                      # purge volumes before welding (shop rule)
purge_flow, weld_flow = 40, 10  # cfh
pre = volume * exchanges / (purge_flow / 60)
print(f"assembly volume about {volume:.1f} cu ft")
print(f"pre-purge at {purge_flow} cfh: {pre:.1f} min for {exchanges} volumes")
weld_min = 25
gas = volume * exchanges + weld_flow / 60 * weld_min
print(f"welding {weld_min} min at {weld_flow} cfh purge: total purge gas about {gas:.1f} cu ft per assembly")
print(f"for 6 assemblies about {6 * gas:.1f} cu ft of argon, plus torch gas")assembly volume about 3.5 cu ft pre-purge at 40 cfh: 26.2 min for 5 volumes welding 25 min at 10 cfh purge: total purge gas about 21.6 cu ft per assembly for 6 assemblies about 129.8 cu ft of argon, plus torch gas
About 3.5 cubic feet of space needs about 17 cubic feet of argon to purge, and about 22 cubic feet per assembly including the welding time; the script divides the flowmeter reading by 60 because it reads per hour. Six assemblies use about 130 cubic feet, close to half of a large cylinder, for purging alone, which went on the job's material list.
Welding thin stainless
Aggie's settings for the 18 gauge 304 grease duct seams were DCEN, a 1/16 in lanthanated tungsten ground to a sharp point, argon at a moderate flow through a gas lens, ER308L filler of the same diameter, and pulsed current with a low average. The technique points were the same as in lesson 7, with a few additions for stainless.
- Keep the arc short and the travel speed steady. A long arc spreads heat and widens the tint.
- Use the least filler that gives a full weld; stainless pools are sluggish, and too much rod makes a high, cold bead.
- Hold a long post-flow over the end of the weld so the crater does not oxidize.
- On outside corners, the edges can often be fused autogenously, which gives a smooth corner with very little heat.
- Work in short sections and let the metal cool; touch the panel near the weld, and if it is too hot to hold, wait.
Filler matching matters. ER308L is the usual rod for 304 and 304L; ER316L for 316 and 316L. Using a 308 rod on 316 duct leaves a weld with less corrosion resistance than the duct, which in a lab exhaust is where corrosion starts. Dissimilar joints, stainless to carbon steel, use a higher-alloy rod such as ER309L, by procedure.
Grease duct and hoods
Commercial kitchen grease duct must be liquid-tight with continuous welds or other joints listed for the purpose, built of carbon steel or stainless steel of at least the minimum thicknesses the kitchen code sets, sloped to drain toward the hood or to a grease reservoir, and fitted with cleanout openings. The welding has to be continuous and fully fused along every seam and joint, so that grease cannot weep through a pinhole and feed a fire. SMW-410 covers the code requirements for hoods and grease duct in detail; here the point is that the welds must be sound, continuous and inspectable. Lesson 11 covers how they are tested.
At Brine & Ember, the duct was 18 gauge 304, which meets the stainless minimum, with outside corner welds on the longitudinal seams and lap joints with full fillet welds at the transverse joints, the arrangement Lin's drawing showed. Aggie welded the seams with pulsed GTAW and a copper chill bar clamped along the inside of each corner, and Kai fitted, tacked and welded the transverse laps under her eye.
Cleaning and passivation after welding
After welding, the heat tint and any contamination must be removed to restore the passive layer. The methods in order of thoroughness are these.
- Mechanical cleaning: brushing with a clean stainless brush or grinding with a stainless-only disc removes light tint, but polishing alone can leave a chromium-poor layer if the tint is heavy.
- Chemical pickling: an acid paste or gel, usually containing nitric and hydrofluoric acid, dissolves the tinted oxide and the chromium-poor layer beneath it. It is very hazardous, needs full chemical protection and training, and must be rinsed off completely with clean water and the waste handled as hazardous.
- Electrochemical cleaning: a wand with a pad soaked in a mild electrolyte, connected to a low-voltage power unit, cleans the tint quickly and is much safer than pickling paste. Keelson used it for most weld cleaning.
- Passivation: a chemical treatment, often with nitric or citric acid, that removes free iron and helps the passive layer re-form evenly. Specifications for food and pharmaceutical work often require it after cleaning.
For the Brine & Ember duct, which would be concealed, cleaning the tint off the inside of the welds was the priority, because grease and cleaning chemicals would sit there. For the visible hood, Aggie cleaned, then blended the welds with progressively finer discs to match the hood's brushed finish, and Kai learned how much time the finishing takes compared with the welding.
Worked problem
Choosing the filler
The Eastgate lab exhaust is 316L stainless, and the fan connection has a carbon steel flange. Which fillers should Kai use for the stainless-to-stainless seams and for the flange joint?
Show solution
- Stainless to stainless in 316L: ER316L, to match the molybdenum and low carbon.
- Stainless to carbon steel: a higher-alloy filler such as ER309L, as set out in the welding procedure.
- Check the WPS for both joints; the specification may call for a stainless flange instead.
Answer: ER316L for the duct seams, and the dissimilar-metal filler named in the procedure, usually ER309L, for the flange.
Reading the color as a record
Because heat tint forms as the metal cools in air, its color is a record of how hot the metal beside the weld got and how long it stayed hot. Aggie used it to coach Kai. A narrow band of pale straw beside the weld meant the heat input was low and the shielding good. A wide band running into gold and brown meant he had slowed down, run too much current or let the area heat up by welding too long in one place. Blue or gray on the root side meant the back purge had failed. Each color pointed to a cause, and the next weld could be adjusted before the habit set in. Kai kept his tinted scrap coupons in a row on the bench, oldest to newest, and could see his heat control improving week by week.
Common mistakes
MistakeLeaving dark heat tint on stainless duct.
InsteadRemove it by electrochemical cleaning, pickling or grinding, then passivate if specified.
MistakeWelding stainless with no back purge on a closed fitting.
InsteadPurge the inside with argon so the root does not sugar.
MistakeUsing carbon steel clamps or brushes on stainless.
InsteadUse only stainless-only tools from the stainless corner.
MistakeWelding 316 with 308 filler.
InsteadMatch the filler: ER316L for 316, ER308L for 304.
MistakeRunning a long weld on thin stainless without stopping.
InsteadWeld in short sections, let it cool, and use chill bars.
Summary and key terms
- Stainless resists corrosion because of a thin chromium oxide passive layer; 304 is the general grade and 316 resists chlorides better.
- Heat tint, sensitization and iron contamination spoil the passive layer.
- Stainless expands more and conducts heat less than carbon steel, so it distorts and burns through more readily.
- Back purging with argon protects the root; purge several volumes before welding and keep a low flow during it.
- Weld with DCEN, short arc, pulsed low average heat and matching L-grade filler.
- Clean heat tint after welding and passivate where specified; grease duct welds must be continuous and sound.
- Passive layer
- The thin chromium oxide film that protects stainless steel.
- Heat tint
- The colored oxide formed next to a weld in stainless, with chromium-depleted metal beneath.
- Sensitization
- Loss of corrosion resistance at grain boundaries after holding stainless in a critical temperature range.
- Back purging
- Filling the space behind a weld with inert gas to protect the root.
- Sugaring
- Rough, oxidized metal on the unshielded root side of a stainless weld.
- Passivation
- A chemical treatment that removes free iron and helps the passive layer re-form.
Practice problems
Work each problem on paper first, then reveal the answer to check.
A sealed fitting holds 2 cu ft. How long does a pre-purge of five volumes take at 30 cfh?
Show answer
10 ÷ 30 = 0.33 hour, 20 minutes.
Which grade would you choose for duct exposed to chlorides, and why?
Show answer
316, because its molybdenum improves resistance to chlorides.
What does a blue heat tint tell you?
Show answer
The metal was heavily oxidized; the tint must be removed and the weld may need review.
Name a safer alternative to pickling paste for cleaning tint.
Show answer
Electrochemical weld cleaning.
Lesson quiz · 5 questions
Score 60% or more to complete this lesson.
Create a free account to save your progress, take quizzes and earn a certificate.