
SMW-230 · Lesson 1 of 12 · 21 min
Welding and cutting in the sheet metal trade
Third year at Keelson Sheet Metal brought Kai Ferreira to a part of the shop he had mostly watched from a distance: the welding bay behind the plasma table, with its curtains, fume arms and the row of machines along the back wall. In the first two years he had joined metal with seams, locks, rivets, screws, solder and the spot welder. Now Walt Szymanski wanted him able to cut and weld thin-gauge metal properly, because the jobs coming through the shop needed it. The Brine & Ember kitchen hood and grease duct had to be welded liquid-tight. The Eastgate Hospital laboratory exhaust was stainless steel, and its transitions and fittings were welded. The Ashgrove Elementary pool change room exhaust was aluminum, and the roof curbs, equipment stands and duct supports for the whole retrofit were cut and welded from steel angle and channel.
Aggie MacLeod, the journeyworker who had mentored Kai since his first week, held the shop's welding qualifications on thin carbon steel, stainless steel and aluminum. She would be his main teacher in the bay. Her first rule was the one she had learned from her own mentor: thin metal does not forgive. A structural welder on half-inch plate has room for a little too much heat or a slightly slow hand. On sheet a millimeter or so thick, the same mistake burns a hole, warps a panel or leaves a joint that leaks grease into a ceiling. This course is about doing it right on the material the trade actually uses.
Why the sheet metal trade welds
Most duct and architectural work is still joined mechanically, and for good reason: seams and locks are fast, need no heat, keep the zinc coating intact and can be done by any trained worker. Welding takes over where mechanical joints are not good enough. The main cases in a sheet metal shop are these.
- Liquid-tight and grease-tight duct. Commercial kitchen grease duct must be built with continuously welded joints so that grease cannot leak out and feed a fire. Some dishwasher exhaust, chemical fume exhaust and laboratory exhaust is welded for the same reason, so that condensate or corrosive liquids stay inside.
- Stainless steel and aluminum fabrications. Hoods, sinks, counters, tanks and sanitary fittings in food service and hospitals are welded and then ground and polished smooth, because a seam or crevice holds dirt and bacteria.
- Strength and stiffness. Equipment curbs, rails, stands, hangers, frames and reinforcing angles are welded from steel sections, often with sheet metal welded to them.
- Repair and modification. Cutting openings in existing duct and casings, closing holes, and adding collars and supports on site often means a quick weld.
Cutting goes hand in hand with welding. The plasma table in the shop cuts most flat patterns from sheet, a hand plasma torch cuts openings and shapes in the field, and an oxy-fuel torch or an abrasive saw cuts steel sections for frames and supports. Lesson 3 and lesson 4 cover cutting in detail.
The processes used on thin metal
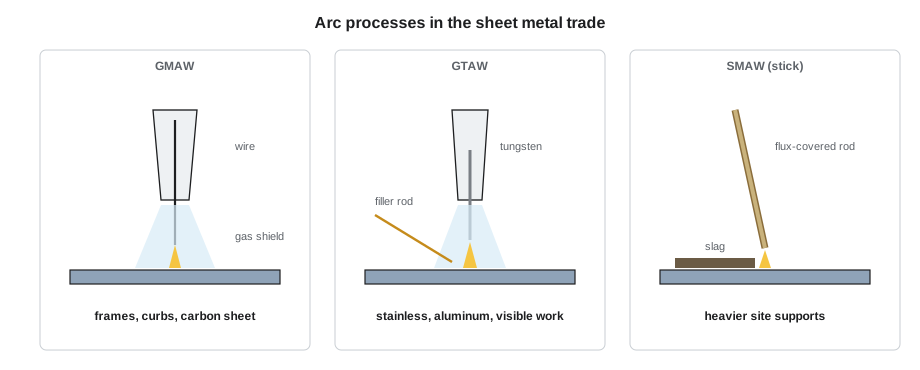
Welding joins metal by melting the edges of the parts, usually with some added filler metal, so that they fuse into one piece as they cool. The heat in the processes this course covers comes from an electric arc between an electrode and the work, shielded from the air by a gas so that oxygen and nitrogen do not contaminate the molten pool. Three arc processes matter most in the trade.
- Gas metal arc welding, GMAW, often called MIG. A continuous solid wire is fed through a gun, carries the current and melts into the joint as filler. It is fast, easy to learn and good for carbon steel sheet, frames and supports. Lessons 5 and 6 cover it.
- Gas tungsten arc welding, GTAW, often called TIG. The arc runs from a tungsten electrode that does not melt, and the welder adds filler rod by hand. It is slower but gives the most control of heat and the cleanest welds, so it is the process for stainless steel, aluminum and visible or sanitary work. Lessons 7 to 9 cover it.
- Shielded metal arc welding, SMAW, or stick welding, uses a flux-covered rod. It is used on site for heavier steel supports, but it is hard to control on thin sheet and leaves slag, so it is rarely the right choice for sheet metal itself. The WLD welding program covers it in depth.
Two older heat processes also appear. Oxy-fuel welding with an oxygen and acetylene flame was once common on sheet and is still used for some repairs, but it puts a lot of heat into a wide area and warps thin metal badly. Resistance spot welding, covered in SMW-130, joins overlapping sheets by clamping them between two electrodes and passing a short burst of current, with no filler and no gas.
Codes, standards and who may weld
Welding that matters is done to a written code or standard, by a qualified welder, following a written procedure. The details differ between the two countries.
In the US, the American Welding Society publishes the codes. AWS D9.1, the Sheet Metal Welding Code, covers welding of sheet metal in HVAC, kitchen equipment, architectural and general work, including how procedures and welders are qualified; its current edition is dated 2026. AWS D1.3 covers structural welding of sheet steel, D1.6 stainless steel and D1.2 aluminum, and D1.1 covers heavier structural steel. Each code requires written welding procedure specifications and welders qualified by test. ANSI Z49.1 is the main safety standard for welding and cutting, and OSHA's rules for welding, cutting and brazing apply in the shop and on site. Keelson qualifies its sheet metal procedures and welders to AWS D9.1, and its structural welders to D1.1 or D1.3 as the job requires.
Either way, the paperwork has the same three parts. A welding procedure specification, or WPS, is the recipe: the process, base metal, filler, shielding gas, joint design, current, voltage, travel speed and any preheat or cleaning. A procedure qualification record shows that the procedure was tested and the test welds passed. A welder qualification record shows that a particular welder passed a test weld made to the procedure, in a particular position and thickness range. An apprentice like Kai welds under supervision and works toward his own qualification tests.
| Item | Canada | United States |
|---|---|---|
| Company system for steel | CSA W47.1 certification | Contractor's own program under the AWS codes |
| Sheet metal welding | CSA W59 and project specifications | AWS D9.1 Sheet Metal Welding Code |
| Sheet steel structures | CSA W59 | AWS D1.3 |
| Aluminum | CSA W47.2 and W59.2 | AWS D1.2 |
| Stainless steel structures | CSA W59 and specifications | AWS D1.6 |
| Safety in welding and cutting | CSA W117.2 and provincial rules | ANSI Z49.1 and OSHA rules |
Thin metal behaves differently
Three things make welding sheet harder than welding plate. The first is heat capacity. A thin sheet has very little metal to absorb and carry away the heat of the arc, so the area around the weld heats up quickly. Too much current, or a pause, melts straight through. The second is distortion. Metal expands as it heats and shrinks as it cools, and a weld shrinks most of all. On a thick plate the surrounding metal resists the shrinkage; on a thin panel it cannot, so the panel buckles, bows or pulls out of square. Lesson 10 covers how to control it. The third is fit-up. Thin edges have to touch closely, because a gap that a plate welder would bridge with a little extra filler burns back on sheet.
The answer to all three is the same: put in only as much heat as the joint needs, in short controlled amounts, on parts that fit well and are held firmly. That idea, heat control, runs through every lesson that follows.
The way welders measure heat is called heat input: roughly, the arc energy put into each inch of weld. It is worked out from the arc voltage, the current and the travel speed. Kai ran Aggie's numbers for two of her usual settings through the short script below: the GMAW setting for the 20 gauge galvanized curb flashing and the GTAW setting for the 18 gauge stainless grease duct.
# Heat input = arc voltage x current x 60 / (1000 x travel speed)
settings = [('GMAW, 20 ga galvanized flashing', 17, 70, 20), ('GTAW, 18 ga stainless grease duct', 11, 55, 6), ('GMAW, 1/4 in angle for a curb', 21, 160, 12)]      # (joint, volts, amps, travel speed in ipm)
for joint, v, a, s in settings:
    q = v * a * 60 / (1000 * s)     # kJ per in
print(f"{joint:<34} {v:>4} V {a:>4} A {s:>5} ipm heat input {q:.2f} kJ/in")GMAW, 20 ga galvanized flashing 17 V 70 A 20 ipm heat input 3.57 kJ/in GTAW, 18 ga stainless grease duct 11 V 55 A 6 ipm heat input 6.05 kJ/in GMAW, 1/4 in angle for a curb 21 V 160 A 12 ipm heat input 16.80 kJ/in
The thin stainless joint takes about 6 kJ/in and the flashing about 3.6 kJ/in, while the curb angle takes about 17 kJ/in, several times more. The sheet joints get far less heat per inch, and even so they are the ones that warp. That is the scale of the problem in this trade.
The welding bay at Keelson
Walt had laid out the bay after the shop moved into its current building, and he walked Kai through it on the first morning. There were four booths along the back wall, each with fire-resistant curtains, a steel welding table with a clamp edge, a fume extraction arm on a swinging boom and a ground clamp lead. Two booths had GMAW machines with spools of solid carbon steel wire and cylinders of argon and carbon dioxide mix. Two had GTAW machines able to run alternating current for aluminum, with argon cylinders, a foot pedal and racks of filler rod sorted by alloy. A separate stainless steel corner had its own clamps, brushes and grinding discs that were never used on carbon steel, because steel particles left on stainless rust and spoil it. The plasma table stood outside the bay, with its own water bed and down-draft extraction, and a portable plasma unit and an oxy-acetylene cart sat by the door for field work.
Kai's job for the first week was to learn the bay before he struck an arc: where the extinguishers and the hot work permits were, how the extraction worked, how to set up and shut down each machine, how to change a cylinder, and which tools belonged to the stainless corner. Aggie's view was that most welding injuries and most ruined jobs come from a rushed setup, not from the weld itself. Lesson 2 covers the safety side in detail.
Planning the work
The welding on a job starts at the shop drawing. Lin Zhao, Keelson's detailer, marks every welded joint on the drawing with a weld symbol: an arrow pointing to the joint, a reference line, and symbols showing the weld type, size, length and any special requirements such as all-around welding or a field weld. The detail sheet for the Brine & Ember grease duct showed continuous welds on every longitudinal seam and transverse joint, a welded flange at the hood collar and welded access door frames. The Eastgate lab exhaust transitions were marked for GTAW with a back purge. Kai learned to read the symbols the same way he had learned the pattern lines in SMW-120 and SMW-210, and to ask Lin about anything he could not make out.
Then the welder checks the material, the procedure and the fit before starting. Is it the right alloy and thickness? Is there a written procedure for this joint and is the welder qualified to it? Are the parts cut, cleaned and fitted closely, and clamped so they will not move? Is the area safe for hot work? Only then does the arc start.
Worked problem
Comparing heat input
Aggie tries two settings on a 18 gauge stainless joint: 11 V, 55 A at 6 ipm, and 11 V, 70 A at 6 ipm. How much more heat per inch does the second setting put in?
Show solution
- First: 11 × 55 × 60 ÷ (1000 × 6) = 6.05 kJ/in.
- Second: 11 × 70 × 60 ÷ (1000 × 6) = 7.70 kJ/in.
- The ratio is 70 ÷ 55, about 1.27.
Answer: About 27 percent more heat for each unit of weld length, with more distortion and a wider heat tint. On thin stainless, the lower setting is the better one if it still fuses the joint fully.
What a good thin-gauge weld looks like
Aggie kept a board on the bay wall with sample welds on scrap: good ones and bad ones. A good thin-gauge weld is narrow and even, with a smooth crown and a small, regular ripple pattern. It is fused into both edges along its whole length, with no undercut where the edge has melted away, no holes and no lumps of filler sitting on top. On the back of a butt weld there is a thin, even line of penetration. On stainless, the color beside the weld is light straw or none at all. Around it the panel is flat. A bad weld is wide and lumpy, wanders off the joint, has holes or burn-through, has cold lap where filler sat on the surface without fusing, or leaves the panel buckled. Kai's goal for the course was to make the first kind consistently and to know why the second kind happens.
Common mistakes
MistakeChoosing welding because it seems stronger, when a seam or lock would do.
InsteadWeld only where the job needs liquid-tight, sanitary, strong or repair joints; mechanical joints are faster and keep the coating.
MistakeStarting a weld without a written procedure or qualification when the job requires one.
InsteadCheck the WPS and the welder's qualification before welding code work.
MistakeUsing plate settings on sheet.
InsteadThin metal needs far less heat; use the lowest heat that fuses the joint fully.
MistakeSharing grinding discs and brushes between carbon steel and stainless.
InsteadKeep separate tools for stainless so steel particles do not cause rust.
MistakeTreating the weld symbol as a suggestion.
InsteadMake the weld type, size and length the symbol shows, and ask the detailer about anything unclear.
Summary and key terms
- The sheet metal trade welds for liquid-tight and grease-tight duct, sanitary stainless and aluminum work, frames and supports, and repairs.
- GMAW suits carbon steel sheet and frames; GTAW suits stainless, aluminum and visible work; stick welding is mostly for heavier site supports.
- Code welding needs a written procedure and a qualified welder; the standards are CSA in Canada and AWS in the US.
- Thin metal has little heat capacity, distorts easily and needs close fit-up.
- Heat input, in energy per unit length of weld, is worked out from voltage, current and travel speed.
- Planning starts with the weld symbols on the shop drawing and a check of material, procedure, fit and safety.
- GMAW
- Gas metal arc welding: a continuous wire electrode, fed through a gun, melts into the joint under a shielding gas.
- GTAW
- Gas tungsten arc welding: the arc runs from a tungsten electrode that does not melt, and filler rod is added by hand.
- Welding procedure specification
- The written recipe for a weld: process, materials, joint, settings and techniques.
- Welder qualification
- A record that a welder passed a test weld to a procedure in a given position and thickness range.
- Heat input
- The arc energy put into each unit length of weld, from voltage, current and travel speed.
- Weld symbol
- The drawing symbol that shows the type, size and extent of a weld at a joint.
Practice problems
Work each problem on paper first, then reveal the answer to check.
A GMAW weld runs at 18 V and 80 A at 16 ipm. What is the heat input?
Show answer
18 × 80 × 60 ÷ (1000 × 16) = 5.4 kJ/in.
Name two jobs at Keelson that need welding instead of seams.
Show answer
The Brine & Ember grease duct (liquid-tight) and the Eastgate stainless lab exhaust; also the steel curbs and the aluminum pool exhaust.
Which AWS code covers sheet metal welding in HVAC and kitchen work?
Show answer
AWS D9.1, the Sheet Metal Welding Code.
Why does a gap that a plate welder would bridge cause trouble on sheet?
Show answer
The thin edges melt back and burn through instead of filling.
Lesson quiz · 5 questions
Score 60% or more to complete this lesson.
Create a free account to save your progress, take quizzes and earn a certificate.