
SMW-230 · Lesson 4 of 12 · 18 min
Choosing a cutting process and preparing joints
Walt Szymanski liked to say that a weld is only as good as the joint you give it. Most of the bad welds he saw on thin metal began before the arc was struck: an edge cut ragged with a torch, a gap that wandered from nothing to two sheet thicknesses, zinc left on the surface, oil from the brake still on the metal, or parts tacked loosely and left free to move. This lesson covers the steps between the drawing and the first tack: choosing how to cut each part, choosing the joint, preparing and cleaning the edges, and fitting and clamping the parts so they stay put while the heat goes in.
Mechanical cutting is still the first choice
Thermal cutting is powerful, but for straight cuts in sheet it is not usually the best tool. A squaring shear cuts a clean, square, cold edge with no heat-affected zone, no dross, no fume and no burned coating, faster than any torch. Notchers, nibblers, snips and the ironworker from SMW-110 do the same for notches, openings and steel sections. A cold-cut saw or a band saw cuts angle and channel to length cleanly. Thermal cutting is chosen when the shape is not straight, the part is too thick or too large for the shear, the material is too hard on blades, or the cut is in a finished assembly or in the field.
For welding, a sheared edge is ideal: straight, square and clean. A plasma-cut edge is usually fine after the dross is knocked off and the edge is lightly ground. An oxy-fuel cut edge on steel sections needs the slag and scale removed. An edge cut with an abrasive wheel can have a burr and a thin layer of overheated metal that should be dressed off.
| Part | Best first choice | Why |
|---|---|---|
| Straight blanks for grease duct | Squaring shear | Square, clean edge for close-fit butt and lap joints |
| Irregular flat patterns | CNC plasma table | Any outline, repeatable, nested to save metal |
| Opening in a finished duct | Hand plasma or nibbler | No room for a shear; nibbler avoids heat on coated sheet |
| Steel angle for a curb | Cold saw or band saw | Square ends for fitting and welding |
| Heavy steel base plate | Plasma table or oxy-fuel | Too thick for the shear |
| Stainless panel with fine detail | Laser, bought in | Narrow kerf, little heat tint |
Kai wrote a short checklist into a script during a slow afternoon. It is not a substitute for judgment, but it shows how the choice depends on the shape, thickness and material.
# A simple cutting-process chooser (shop rules of thumb, illustrative)
SHEAR_MAX = 0.105    # thickest mild steel the squaring shear takes, in
def choose(shape, t, metal, in_place=False):
    if in_place:
        return 'nibbler' if t <= 0.064 and metal != 'stainless' else 'hand plasma'
    if shape == 'straight' and t <= (SHEAR_MAX * 0.6 if metal == 'stainless' else SHEAR_MAX):
        return 'squaring shear'
    if shape == 'section':
        return 'cold saw or band saw'
    if metal == 'carbon' and t > 0.375:
        return 'oxy-fuel or plasma table'
    if shape == 'fine':
        return 'laser (bought in)'
    return 'CNC plasma table'
parts = [('grease duct side blank 18 ga', 'straight', 0.048, 'carbon', False), ('lab exhaust gore 20 ga stainless', 'curved', 0.036, 'stainless', False), ('curb angle 2 x 2 x 1/4', 'section', 0.25, 'carbon', False), ('base plate 1/2 in', 'curved', 0.5, 'carbon', False), ('opening in installed casing 18 ga', 'curved', 0.052, 'carbon', True), ('perforated panel 18 ga stainless', 'fine', 0.048, 'stainless', False)]
for name, shape, t, metal, ip in parts:
print(f"{name:<36} {choose(shape, t, metal, ip)}")grease duct side blank 18 ga squaring shear lab exhaust gore 20 ga stainless CNC plasma table curb angle 2 x 2 x 1/4 cold saw or band saw base plate 1/2 in oxy-fuel or plasma table opening in installed casing 18 ga nibbler perforated panel 18 ga stainless laser (bought in)
Note the stainless rule: stainless steel is stronger and work-hardens, so a shear rated for a given mild steel thickness takes only about 60 percent of it in stainless. Overloading a shear chips the blades.
Joints for thin metal
A welded joint is described by how the parts meet and by the weld that joins them. The five basic joints are the butt, the lap, the corner, the tee and the edge joint. On sheet, each has a thin-gauge version.
- Square butt joint: two sheets edge to edge in the same plane. Thin sheet needs no bevel. The edges must touch or have a gap no wider than the procedure allows, usually well under one sheet thickness. Butt joints give a flat, smooth surface and are used on stainless hoods and counters, where they are ground flush.
- Lap joint: one sheet overlapping another, welded along the edge of the top sheet with a fillet weld. Lap joints tolerate more fit-up variation than butt joints and are common on grease duct transverse joints and on patches. The overlap must be tight: a gap between the sheets traps heat in the top sheet and burns it back.
- Corner joint: two sheets meeting at a corner. The outside corner joint, with the edges flush, is easy to weld and gives a neat corner on boxes and casings. On grease duct, the longitudinal corner seams of rectangular duct are usually outside corner welds.
- Flanged or edge joint: the edges of both sheets are turned up and the weld melts the flanges together. Useful on very thin sheet, because the flanges give more metal to melt, often with no filler.
- Tee joint: one part meeting another at right angles, welded with a fillet. Used for brackets, stiffeners and collars.
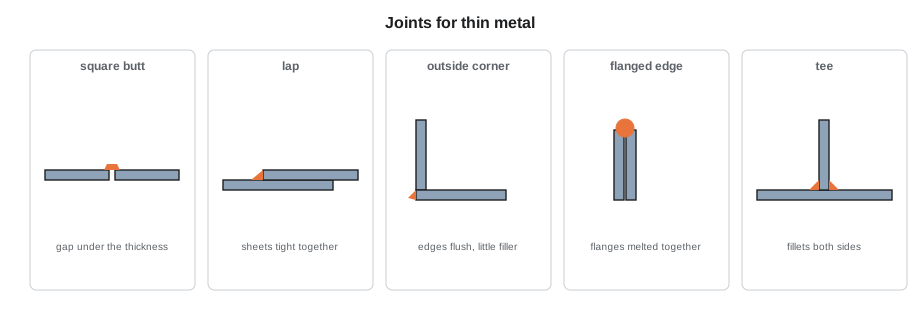
The joint is set by the drawing and the welding procedure, not chosen on the bench. Lin Zhao's shop drawing for the Brine & Ember grease duct showed outside corner welds on the longitudinal seams and lap joints with full fillet welds around the transverse joints, the arrangement the kitchen code and the specification allowed. The Eastgate lab exhaust spec called for butt-welded seams ground smooth inside, because rough inside welds hold condensate.
Fit-up and gaps
Fit-up is how well the parts meet before welding. On thin metal, three numbers matter: the gap between the edges, the mismatch where one edge sits higher than the other, and the overlap on lap joints. A good rule for GTAW butt joints on sheet is a gap no wider than about half the sheet thickness, and preferably zero; GMAW on sheet tolerates a little more, but a wide gap still burns back. Mismatch of more than a small fraction of the thickness leaves one edge exposed to the arc and melts it away. Overlaps on lap joints should be large enough to give a solid fillet, typically several sheet thicknesses, and the sheets must touch.
# Fit-up check for thin sheet butt joints (shop limits, illustrative)
def check(t, gap, mismatch, process):
    gmax = (0.5 if process == 'GTAW' else 0.8) * t
    mmax = 0.25 * t
    ok_gap = gap <= gmax
    ok_mm = mismatch <= mmax
    return ok_gap, ok_mm, gmax, mmax
joints = [('hood panel seam A', 0.048, 0.012, 0.004, 'GTAW'), ('hood panel seam B', 0.048, 0.036, 0.004, 'GTAW'), ('lab exhaust gore seam', 0.036, 0.008, 0.015, 'GTAW'), ('curb flashing butt', 0.036, 0.024, 0.008, 'GMAW')]     # (joint, thickness, gap, mismatch, process), all in in
for name, t, gap, mm, proc in joints:
    g, m, gmax, mmax = check(t, gap, mm, proc)
    verdict = 'fit is good' if g and m else 'refit before welding'
print(f"{name:<30} gap {gap} (max {gmax:.3f}) mismatch {mm} (max {mmax:.3f}) {verdict}")hood panel seam A gap 0.012 (max 0.024) mismatch 0.004 (max 0.012) fit is good hood panel seam B gap 0.036 (max 0.024) mismatch 0.004 (max 0.012) refit before welding lab exhaust gore seam gap 0.008 (max 0.018) mismatch 0.015 (max 0.009) refit before welding curb flashing butt gap 0.024 (max 0.029) mismatch 0.008 (max 0.009) fit is good
Seam B had a gap almost as wide as the sheet was thick and seam C had too much mismatch; both went back to the bench. Refitting takes minutes; repairing a burn-through on finished stainless takes much longer and never looks the same.
Cleaning before welding
Anything on the surface ends up in the weld or in the welder's lungs. Oil, cutting fluid, drawing compounds from the brake, marker ink, tape residue, paint and zinc all cause porosity, poor fusion or cracking, and give off fume. The cleaning depends on the metal.
- Carbon steel: wipe off oil with a solvent the shop approves, and remove mill scale, rust and paint from the weld zone with a flap disc or wire brush.
- Galvanized steel: where the procedure allows, remove the zinc for a short distance each side of the joint, on both faces, with a flap disc or by grinding, and restore protection afterwards with zinc-rich paint or a repair alloy. Where the zinc stays, expect more spatter and porosity and use the fume controls from lesson 2.
- Stainless steel: degrease with a solvent that leaves no residue, and use only stainless steel brushes and discs that have never touched carbon steel. Remove protective film well back from the joint; adhesive left near a weld burns and contaminates it.
- Aluminum: degrease first, then remove the oxide layer with a stainless brush used only for aluminum, just before welding. Aluminum oxide reforms within hours, so clean on the day of welding. Lesson 9 covers aluminum in detail.
A useful rule from Aggie: clean the metal twice as far back from the joint as you think you need, because the heat spreads wider than the weld.
Holding the work
Thin parts move as soon as they are heated. Holding them firmly in position until the welds are complete is the second half of fit-up. The shop's main tools are welding tables with clamp edges, locking pliers and C-clamps, magnetic squares for steel (not for stainless or aluminum, which are not magnetic), and purpose-built jigs and fixtures. Copper or aluminum backing bars clamped behind a joint support the weld pool and pull heat away; lesson 10 covers them as a distortion control. On stainless, backing bars can carry a groove for the purge gas.
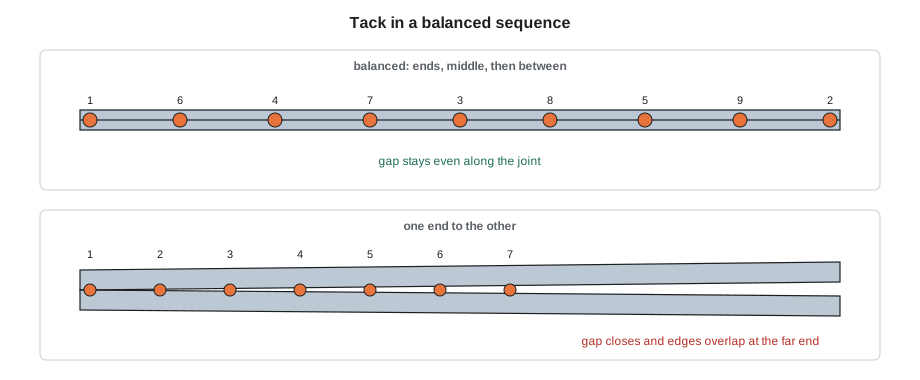
Tack welds are short welds that hold the parts in position before the full weld is made. On thin metal they are small, closely spaced and made in a sequence that keeps the joint aligned: a tack at each end, then one in the middle, then between, so that the gap does not close up or open as the heat goes in. A tack must be fully fused, because the final weld will run over it; a poor tack becomes a defect in the finished weld. Tacks on visible stainless work are kept very small so that they blend into the final weld.
Marking and identification
Before welding, parts are checked against the cut list and marked so they go together the right way: the inside face of a duct side, the top of a hood panel, the match marks across a joint. On stainless, only markers approved for stainless are used, because some markers contain chlorides or sulfur that attack the metal at welding temperature. Weld procedure numbers and the welder's identification are recorded for code work, so any joint can be traced later. Lesson 11 covers the records.
Worked problem
A tack spacing for a long seam
A 48 in long butt seam in 18 gauge stainless needs tacks no more than about 2 in apart. How many tacks, and in what order?
Show solution
- Spaces = 48 ÷ 2 = 24, so 25 tacks including both ends.
- Order: both ends, then the middle, then the quarter points, then between each pair, working outward from the center in alternating directions.
Answer: 25 tacks, placed in a balanced sequence so the joint neither closes up nor opens.
Common mistakes
MistakeCutting a straight blank with a torch when the shear is free.
InsteadUse the shear for straight cuts: it leaves a cold, square, clean edge.
MistakeWelding a butt joint with a gap almost as wide as the sheet.
InsteadRefit so the gap is within the procedure's limit, ideally zero.
MistakeLeaving zinc, oil or film on the joint.
InsteadClean both faces well back from the joint, using the right tools for each metal.
MistakeTacking from one end to the other.
InsteadTack the ends, then the middle, then between, to keep the gap even.
MistakeUsing magnetic squares on stainless or aluminum.
InsteadThey are not magnetic; use clamps and fixtures.
Summary and key terms
- Mechanical cutting gives the best edges for welding where it can be used; thermal cutting is for shapes, thick parts and in-place work.
- Stainless takes only about 60 percent of a shear's mild steel capacity.
- Thin-sheet joints are square butt, lap, outside corner, flanged edge and tee joints.
- Fit-up limits gap, mismatch and overlap; on sheet the gap should be small, ideally zero.
- Clean each metal with its own tools, well back from the joint, and remove zinc where allowed.
- Clamp parts firmly and tack in a balanced sequence with small, fully fused tacks.
- Fit-up
- How closely the parts meet before welding: gap, mismatch and overlap.
- Square butt joint
- Two sheets edge to edge in the same plane, with no bevel.
- Lap joint
- One sheet overlapping another, welded with a fillet along the edge.
- Mismatch
- The amount one edge of a butt joint sits above or below the other.
- Tack weld
- A short weld that holds parts in position before the full weld.
- Backing bar
- A copper or aluminum bar clamped behind a joint to support the pool and remove heat.
Practice problems
Work each problem on paper first, then reveal the answer to check.
A GTAW butt joint in 20 ga (0.036 in) sheet has a 0.028 in gap. Is it acceptable under a half-thickness rule?
Show answer
No: the limit is 0.018 in; refit it.
Why should zinc be removed from both faces of a galvanized joint?
Show answer
Zinc on either face vaporizes, causing porosity, spatter and fume.
When should aluminum be wire-brushed before welding?
Show answer
On the day of welding, after degreasing, because the oxide reforms.
Why are tacks made in a balanced sequence?
Show answer
So the gap stays even and the parts do not shift as heat goes in.
Lesson quiz · 5 questions
Score 60% or more to complete this lesson.
Create a free account to save your progress, take quizzes and earn a certificate.