
SMW-230 · Lesson 12 of 12 · 18 min
Capstone: a grease duct section and a lab exhaust transition
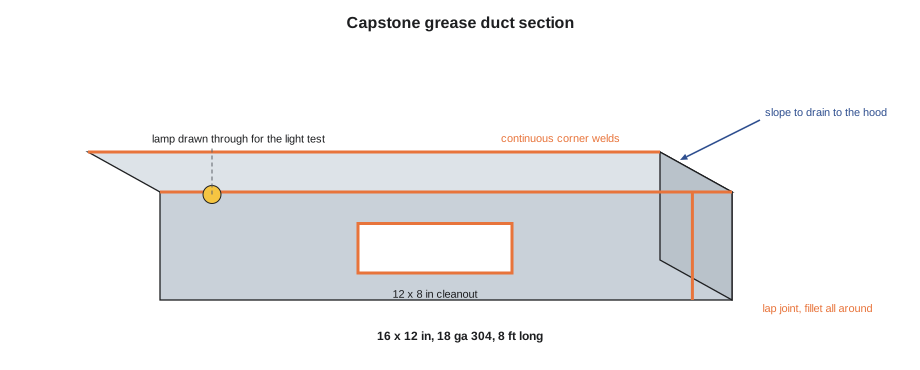
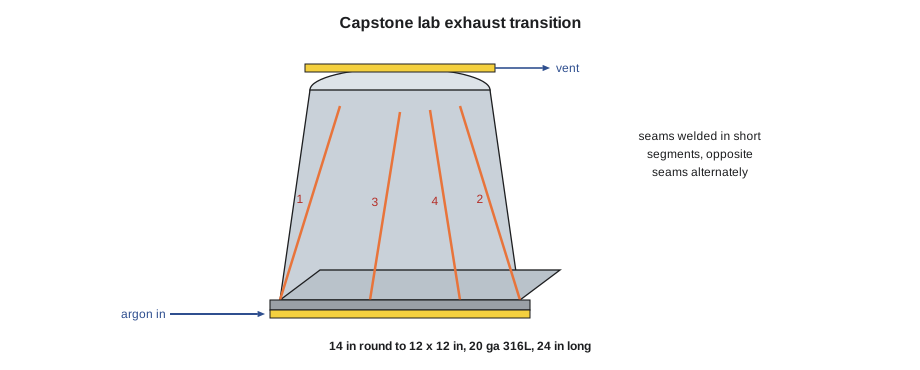
For his final assessment in the welding bay, Walt Szymanski gave Kai two real pieces of Keelson work to cut, fit, weld, clean, inspect and record from start to finish, with Aggie MacLeod watching but not touching. The first was a section of the Brine & Ember grease duct: a straight length of 18 gauge 304 stainless rectangular duct, 16 by 12 in in cross-section and 8 ft long, with a welded cleanout door frame and a lap joint ready to meet the next section. The second was one of the Eastgate laboratory exhaust transitions: a 14 in round to 12 by 12 in square transition, 24 in long, in 20 gauge 316L, butt-welded with the inside ground smooth. This lesson follows the job through the same steps the course has taught, and closes with the paperwork and what Kai took from it.
Step 1: read the drawings and the procedures
Kai started at Lin Zhao's shop drawings. The grease duct sheet showed the duct in two U-shaped halves with outside corner welds on the two longitudinal seams, a lap joint at one end with a full fillet weld all around, a cleanout opening of 12 by 8 in on one side with a welded collar for a listed access door, and the note that every seam and joint was to be continuously welded and liquid-tight, sloped to drain to the hood once installed. The transition sheet showed four triangulated panels from SMW-210 joined by butt seams, a round collar welded to the round end, a flange on the square end, and the note that the inside of every seam was to be smooth, with no heat tint darker than light straw.
He pulled the two welding procedures from the binder: GTAW, DCEN, pulsed, ER308L for the 304 grease duct, and GTAW, DCEN, pulsed, ER316L with a full argon back purge for the 316L transition. He checked that Aggie's qualification and his own supervised trainee status covered the thicknesses and the flat and horizontal positions he would use, and that the material on the rack had the right grade stamped on it and its mill certificates in the job file.
Step 2: cut and prepare
The grease duct blanks were straight, so they went through the squaring shear, and Kai formed the U-shapes on the brake in the stainless corner, with the protective film still on the outside. The cleanout opening was cut on the CNC plasma table from a file Lin prepared, then the heat-tinted edge was ground back with a stainless-only flap disc. The transition panels had come from the plasma table as flat patterns; Kai rolled the round edges, formed the panels, and dressed every edge with a file kept in the stainless corner. He degreased all the joint areas with the shop's solvent, peeled the film back well clear of every weld, and marked the panels with a stainless-safe marker.
Step 3: fit, tack and clamp
The two halves of the grease duct were clamped together on the long welding table, with copper chill bars inside each corner held by a simple spreader. Kai checked the gaps with a feeler gauge: zero to about 0.008 in along both seams, inside the procedure's limit. He tacked each seam at about 2 in spacing, starting at the middle and working outward to both ends, and checked the section for square across both ends and twist along its length before going further.
The transition was harder. Its four panels had to meet at four seams with no gap and no mismatch, and the round end had to stay round. Kai built it in a fixture Walt had made for the job: a plywood ring for the round end and a square frame for the flanged end, holding the panels in position while he tacked. Two seams needed refitting after the first check, one with a gap of nearly a full sheet thickness at the round end and one with a mismatch. Then he sealed the ends with tape purge dams, fed argon in at the low end, and purged five volumes as calculated in lesson 8 before tacking with the purge running.
Step 4: weld
Kai welded the grease duct longitudinal seams with pulsed GTAW in short segments, starting at the middle and working outward, alternating seams, and waiting for each area to cool before welding beside it. He fused the outside corners with a small amount of filler, enough to give a full, slightly convex corner. Then he welded the cleanout collar, fully around, in four segments. The end lap joint he welded last, with the section stood on end so the lap was in the horizontal position, overlapping each segment onto the end of the one before.
On the transition, with the back purge flowing at a low rate, he welded the four seams in short segments, alternating opposite seams, then the round collar in four quadrants, then the flange. He kept the arc short and the filler light, watched the color of the bead's edges as a record of his heat, and clipped the oxidized end off his rod every few dips.
Kai logged his settings and arc times on the job sheet, and afterwards worked out the heat input and the cost of the welding with the script below, using the shop's labor and gas rates. The rates are illustrative.
# Capstone weld log: heat input and cost per unit length (illustrative shop rates)
welds = [('grease duct long seams', 192, 10.5, 50, 6, 70), ('cleanout collar', 40, 10.5, 50, 5, 20), ('end lap fillet', 56, 11.0, 58, 5, 30), ('transition seams', 96, 10.0, 42, 5.5, 30), ('collar and flange', 92, 10.0, 45, 5, 30)]   # (weld, length in, volts, average amps, travel ipm, filler grams)
labor = 95.0          # shop labor rate per hour, dollars
operating = 0.35       # arc-on share of the welder's time on this kind of work
gas = 18            # torch argon cfh
purge_gas = 22       # purge argon used on the transition, cu ft
argon_price = 0.35     # dollars per cu ft
filler_price = 0.06    # dollars per gram of stainless rod
total_cost = 0.0
for name, length, v, a, s, g in welds:
    q = v * a * 60 / (1000 * s)
    arc_min = length / s
    hours = arc_min / 60 / operating
    cost = hours * labor + arc_min * gas / 60 * argon_price + g * filler_price
    total_cost += cost
    print(f"{name:<30} {q:.2f} kJ/in  arc {arc_min:5.1f} min  about {cost:7.2f} dollars  ({cost / length * 12:.2f} per ft)")
total_cost += purge_gas * argon_price
print(f"purge argon {purge_gas} cu ft: {purge_gas * argon_price:.2f} dollars")
print(f"total welding cost for the two items about {total_cost:.0f} dollars, before cutting, fitting and cleaning")grease duct long seams 5.25 kJ/in arc 32.0 min about 152.32 dollars (9.52 per ft) cleanout collar 6.30 kJ/in arc 8.0 min about 38.23 dollars (11.47 per ft) end lap fillet 7.66 kJ/in arc 11.2 min about 53.64 dollars (11.49 per ft) transition seams 4.58 kJ/in arc 17.5 min about 82.59 dollars (10.32 per ft) collar and flange 5.40 kJ/in arc 18.4 min about 86.97 dollars (11.34 per ft) purge argon 22 cu ft: 7.70 dollars total welding cost for the two items about 421 dollars, before cutting, fitting and cleaning
The welding came to a few hundred dollars for the two items, nearly all of it labor, and the cutting, fitting, purging, cleaning and inspection took about as long again. Walt's point in making Kai run the numbers was that the cheapest weld on thin stainless is the one that does not have to be repaired.
Step 5: clean
On the grease duct, Kai cleaned the heat tint off the inside of every weld with the electrochemical cleaner, rinsed it, and cleaned the outside of the welds, which would be concealed, to a uniform finish. On the transition, the inside welds came out straw-colored with one short stretch of darker gold near the round collar where the purge had thinned while he repositioned the hose. He cleaned all the inside seams electrochemically, and Aggie had him grind the inside of the butt seams smooth with progressively finer discs, as the specification asked, then clean and passivate the whole inside surface.
Step 6: inspect and test
Kai inspected both items himself first, with a lamp and a magnifier, and wrote down what he saw before Aggie looked. He found an undercut at one start on the cleanout collar and a small pore at the end of the lap fillet; he ground both out and rewelded them. The grease duct section then went into the dark corner of the shop for a light test, with a strong lamp drawn slowly through it on a cord. No light showed. On the transition, he checked the inside surface against the color chart, the round end with a diameter tape at two angles, and the flange for flatness; all were within the drawing.
The section and the transition went out with their tags. The grease duct section's record showed the shop light test passed; the site light test would be done after installation, with the fire official watching, before the ceiling closed.
Step 7: record
| Record item | Grease duct section | Lab exhaust transition |
|---|---|---|
| Drawing and revision | Lin's sheet, current revision | Lin's sheet, current revision |
| Material and certificate | 304, 18 ga, certificate in file | 316L, 20 ga, certificate in file |
| Procedure | GTAW, DCEN pulsed, ER308L | GTAW, DCEN pulsed, ER316L, back purge |
| Welders | Kai (supervised), Aggie inspecting | Kai (supervised), Aggie inspecting |
| Repairs | Undercut at collar start, pore at lap end | Two seams refitted before welding |
| Inspection | Visual passed after repair | Visual, color, roundness and flatness passed |
| Testing | Shop light test passed; site test to follow | Not required; inside passivated |
What Kai took from it
Walt asked Kai at the end what he would do differently. He had three answers. First, he would check fit-up with a feeler gauge on every seam before tacking, not just eyeball it, because both of the transition seams he had to refit looked fine until he measured them. Second, he would fix the purge hose in place before starting so it could not move and thin the purge. Third, he would plan the start of every weld on a liquid-tight joint, because both repairs on the grease duct were at starts or ends. Walt added one more: the work was good because the preparation was good, and the welding had taken the least time of any step.
The course ends where it began. Thin metal does not forgive, but it rewards care: the right cut, a tight fit, clean metal, a firm clamp, a balanced sequence, low and steady heat, honest inspection and complete records. Those are the habits of a sheet metal welder, and they carry forward to SMW-310, where Kai's welded duct goes up into ceilings and is tested again, and to SMW-410, which covers the full code requirements for kitchen exhaust systems.
Worked problem
Heat input check from the log
The grease duct long seams were welded at 10.5 V and 50 A average at 6 ipm. What was the heat input, and how does it compare with the 6.9 kJ/in 'careful' run from lesson 7?
Show solution
- Heat input = 10.5 × 50 × 60 ÷ (1000 × 6) = 5.25 kJ/in.
- Compared with 6.9 kJ/in, that is about 24 percent lower.
Answer: Lower heat input from pulsing and a steady speed, which showed as a narrow tint and a straight section.
Common mistakes
MistakeStarting to weld before checking fit-up with a gauge.
InsteadMeasure gaps and mismatch on every seam and refit before tacking.
MistakeLetting the purge hose move during welding.
InsteadFix the purge supply in place and monitor the color of the root.
MistakeNot planning starts and stops on liquid-tight joints.
InsteadStart ahead, overlap welds and fill craters; that is where leaks begin.
MistakeSkipping the shop light test because the site test will catch leaks.
InsteadTest in the shop, where repairs are easy.
MistakeLeaving the record incomplete.
InsteadRecord material, procedure, welder, inspection, repairs and tests.
Summary and key terms
- The capstone runs both jobs through the course's steps: drawings and procedures, cutting, fit-up, welding, cleaning, inspection and records.
- Shear and brake for straight parts, plasma for openings, stainless-only tools throughout.
- Tight fit-up checked with a gauge, balanced tacks, chill bars and fixtures keep thin stainless straight.
- Pulsed GTAW in short alternating segments, with a full back purge on the transition, keeps heat input and tint low.
- Clean tint, grind and passivate where specified, inspect honestly, repair to procedure and light-test grease duct.
- The preparation takes longer than the welding, and it is what makes the welds good.
- Job record
- The set of documents showing how a welded item was made, inspected and tested.
- Fixture
- A purpose-built frame that holds parts in position for tacking and welding.
- Purge dam
- A seal placed in a duct or pipe to contain the back purge gas.
- Electrochemical cleaning
- Removing heat tint with an electrolyte pad and low-voltage current.
- Shop light test
- A light test of a welded duct section done in the shop before it ships.
- Feeler gauge
- A set of thin blades used to measure small gaps.
Practice problems
Work each problem on paper first, then reveal the answer to check.
A weld 48 in long is made at 5.5 ipm. How many minutes of arc time is that?
Show answer
48 ÷ 5.5 = 8.7 minutes.
Why were the transition's inside seams ground smooth?
Show answer
The specification called for a smooth inside so condensate and contaminants do not collect.
Name two causes of the repairs on the grease duct section.
Show answer
An undercut at a start and a pore at the end of a weld.
What has to happen on site before the grease duct is concealed?
Show answer
A leakage test, usually a light test, witnessed where the official requires it.
Lesson quiz · 5 questions
Score 60% or more to complete this lesson.
Create a free account to save your progress, take quizzes and earn a certificate.