
SMW-130 · Lesson 7 of 12 · 17 min
Rivets and riveting
Rivets are among the oldest fasteners in metalwork and still among the most useful in sheet metal. A rivet makes a permanent joint that will not loosen with vibration, does not need access to both sides if it is a blind rivet, and can join metals and thicknesses that cannot be welded or soldered. Rivets hold access door frames, hood panels, fitting collars, flange angles, damper blades and a hundred other parts in a sheet metal shop. SMW-110 introduced the hand rivet tool. This lesson covers the types of rivet, how they are chosen and sized, how joints are laid out, how rivets are set, and how a riveted joint is inspected and drilled out.
Solid rivets
A solid rivet is a short rod with a head on one end. It is placed through matching holes in the parts, and the plain end, the tail, is upset with a hammer and a rivet set, or with a squeezer or a pneumatic hammer, to form a second head that clamps the parts together. Solid rivets are strong, cheap and very reliable, and they are the rivet of choice where both sides of the work can be reached, the parts are heavy, or the joint must be soldered afterwards. Tinner's rivets, small flat-headed solid rivets made of steel, copper or other metals, are still the standard rivet for soldered copper and tinware, because the solder bonds to them and seals the joint.
Setting a solid rivet by hand takes three tools: a rivet set, which has a deep hole to draw the sheets together over the rivet and a cupped hollow to shape the head; a heavy bucking bar or dolly held against the factory head; and a hammer. The sheets are drawn together first by placing the deep hole of the set over the tail and striking it. The tail is then upset with direct blows of the hammer, and finally shaped with the cupped end of the set. The rule of thumb Aggie taught was that the tail should stick out about one and a half rivet diameters before setting, enough to form a head without bending over.
Blind rivets
A blind rivet can be set from one side of the work, which is why it is the most used rivet in the trade. The common type, often called a pop rivet after an early trade name, is a hollow rivet body with a mandrel, a nail-like pin, running through it. The rivet is put in the hole, the tool grips the mandrel and pulls it, the head of the mandrel draws up into the rivet body and expands it on the far side to form the second head, and the mandrel snaps off at a weakened point when the joint is tight.
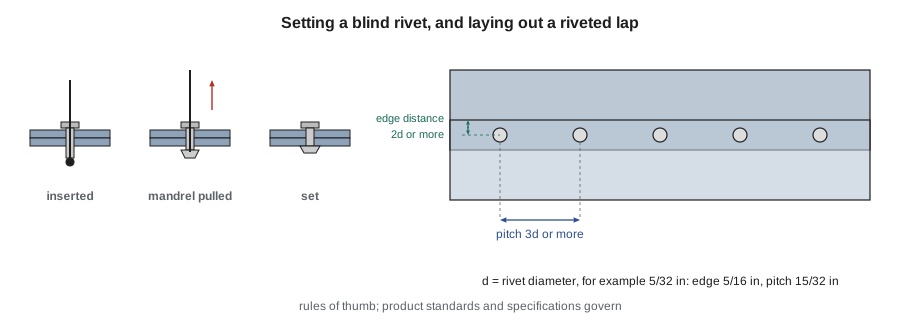
Blind rivets come in many types for different jobs.
- Open-end blind rivets are the general-purpose type. The hollow body leaves a hole through the center once the mandrel breaks, so they are not airtight or watertight on their own.
- Closed-end, or sealed, blind rivets have a body closed at the far end, so the joint is sealed. They are used on duct, gutters, hoods and anywhere a leak path through the rivet matters.
- Multi-grip rivets set over a range of material thicknesses, saving the need to stock many lengths.
- Large-flange rivets have a wide head that spreads the load on soft or thin material.
- Structural blind rivets lock their mandrel inside the body, giving much higher strength and resistance to vibration. They are used where a joint carries real load, such as hangers, supports and equipment frames.
Rivet bodies are made of aluminum, steel, stainless steel, copper and other metals, and the mandrel may be a different metal from the body. The choice follows the rule from SMW-110 for dissimilar metals. An aluminum rivet in galvanized steel is common and acceptable indoors. A steel rivet in aluminum, or any steel in copper, will corrode in the wet. On Brine & Ember's stainless hood, Kai used stainless rivets with stainless mandrels; a steel mandrel left in a stainless rivet would have rusted inside the hood and stained it.
Sizing a rivet
A rivet is chosen by diameter, length and grip range. The diameter is set by the load and the thickness of the parts; a common rule of thumb is a rivet diameter of at least about three times the thickness of the thicker sheet, and no larger than needed. The grip range is the total thickness of the parts the rivet can join, and the rivet length must suit it. A rivet too long for the grip sets loosely or forms a bulky head; one too short does not form a head at all. Manufacturers' charts give the grip range of every size, and on every new job Kai learned to check the chart rather than reach for whatever was in the bin.
Holes are drilled to the size the manufacturer specifies, usually a little larger than the rivet body. A hole too small will not take the rivet; a hole too big lets the rivet tilt and set badly, and lowers its strength. Holes are deburred so the sheets sit flat against each other, and the sheets are clamped together while drilling so the holes line up.
Laying out a riveted joint
Three dimensions govern the layout of a riveted lap joint. Edge distance is the distance from the center of a rivet to the edge of the sheet; too little and the rivet tears out through the edge. Pitch is the distance between rivets along the row; too little and the sheet between the holes is weakened, too much and the sheets gap between rivets. Overlap is the width of the lap, which must fit the rows and edge distances. A common rule of thumb in sheet metal and light fabrication is an edge distance of at least two rivet diameters and a pitch of at least three diameters, with the maximum pitch set by the need to keep the joint tight. Specifications and standards for particular products, such as duct or aircraft structure, set their own values, and those govern.
| Dimension | Typical rule of thumb | If too small | If too large |
|---|---|---|---|
| Edge distance | At least 2 rivet diameters | Rivet tears out through the edge | Wasted metal; edge may lift |
| Pitch | At least 3 diameters; maximum set by tightness | Sheet weakened between holes | Sheets gap and leak between rivets |
| Overlap | Twice the edge distance per row, plus row spacing | Edge distance cannot be met | Wasted metal |
Strength of a riveted joint
A riveted lap joint can fail in three ways. The rivets can shear across the joint line. The sheet can fail in bearing, where the rivet pushes into and elongates its hole. Or the sheet can tear across the line of holes, where the holes have reduced its cross section. A joint is only as strong as the weakest of these, and a good layout balances them. Manufacturers publish the shear strength of each blind rivet size and material, and the bearing and tearing strengths come from the sheet's thickness and strength.
The script below checks a riveted lap joint for the three failure modes. The rivet shear value is an illustrative catalog-style value for a small aluminum blind rivet, and the sheet strength is a typical value for mild galvanized steel; for any real joint, use the manufacturer's data and the material's specified strength.
# Check a riveted lap joint for rivet shear, sheet bearing and net-section tearing
import math
n = 4                   # rivets in the row
d = 0.156                   # rivet diameter, in
t = 0.0336                   # thickness of the thinner sheet, in
width = 4             # width of the joint, in
rivet_shear = 250        # illustrative ultimate shear strength per rivet, lb
sheet_ult = 49000          # sheet ultimate tensile strength, psi
hole = d * 1.03           # hole slightly larger than the rivet
shear = n * rivet_shear
bearing = n * d * t * sheet_ult * 1.5      # bearing commonly taken near 1.5 x tensile strength
tearing = (width - n * hole) * t * sheet_ult
for name, v in (("rivet shear", shear), ("sheet bearing", bearing), ("net tearing", tearing)):
    print(f"{name:13s} {v:8.0f} lb")
print("weakest:", min((shear, "rivet shear"), (bearing, "sheet bearing"), (tearing, "net tearing"))[1])rivet shear 1000 lb sheet bearing 1541 lb net tearing 5527 lb weakest: rivet shear
For four 5/32 in aluminum rivets in 22-gauge steel, the rivets shear long before the steel bears or tears. That is the usual result with aluminum rivets in steel, and it is why structural joints use steel or structural rivets, or more of them.
The 1.5 factor for bearing is a common simplification, not a code value; design standards for cold-formed steel and aluminum give their own bearing rules. The point of the calculation is the comparison: knowing which mode governs tells you whether to add rivets, use stronger ones, or use thicker sheet.
Setting blind rivets well
Blind rivets are easy to set and easy to set badly. A few habits make the difference.
- Hold the tool square to the work. A tilted tool sets the rivet at an angle with a gap under one side of the head.
- Press the work together firmly before pulling, and keep the nose of the tool pressed against the rivet head through the pull, so the sheets are drawn tight.
- Use the nosepiece that matches the mandrel size; the wrong nosepiece slips or jams.
- Do not use a rivet too long for the grip; it leaves a loose or bulky tail.
- Empty the mandrel collector on pneumatic tools; broken mandrels are sharp and fly if the collector is full.
- Wear safety glasses. Mandrels snap with force and can eject from the tool.
Power riveters, battery and pneumatic, set rivets faster and with less fatigue than hand tools and are standard on production work. Lazy tongs and long-reach hand tools set rivets in tight places. In all cases the tool must suit the rivet size; a tool rated for small rivets will not set structural rivets, and forcing it damages both.
Rivets and tightness
Rivets make strong joints but not tight ones. The sheets between rivets can gap, and open-end blind rivets leave a hole through their center. Where a riveted joint must be airtight or watertight, it is sealed. On duct and hoods, sealant is applied between the sheets before riveting, so the rivets clamp it, and closed-end rivets are used. On copper and tinware, the joint is riveted with solid tinner's rivets and then soldered, the solder flowing between the sheets and over the rivet heads. On Brine & Ember's hood, the inner liner joints that could see grease were welded, as the code requires for grease-tight construction, and rivets were used only on the outer, dry skin.
Removing a rivet
Rivets are removed by drilling, never by prying. For a blind rivet, the mandrel stub is punched out first if it remains, then the head is drilled off with a drill the size of the rivet body, centerd carefully so the hole in the sheet is not enlarged. The rest of the rivet is punched through. For a solid rivet, the factory head is center-punched, drilled to a depth equal to the head with a drill slightly smaller than the rivet, and snapped off with a pin punch, then the shank is driven out. Kai's first attempt at drilling out rivets on a damaged access door enlarged two holes, which then needed the next rivet size up. Aggie's advice was to start with a small pilot drill in the center of the head and step up.
Common mistakes
MistakeUsing an open-end blind rivet where the joint must be sealed.
InsteadUse a closed-end rivet and sealant between the sheets.
MistakePutting steel rivets or mandrels in stainless or copper.
InsteadMatch the rivet body and mandrel to the work, or choose compatible metals.
MistakePlacing rivets too close to the edge.
InsteadKeep at least about two diameters of edge distance, or what the specification requires.
MistakePulling a blind rivet without pressing the sheets together.
InsteadHold the work together and keep the tool square and pressed on the head through the pull.
MistakeDrilling out a rivet with an oversize drill.
InsteadPilot in the center of the head and step up to the body size.
Summary and key terms
- Solid rivets are upset with a set and bucking bar; tinner's rivets are used on soldered copper and tinware.
- Blind rivets set from one side by pulling a mandrel; closed-end types seal, structural types carry real load.
- Choose rivet diameter, length and grip range from the manufacturer's chart, and drill to the specified hole size.
- Typical layout rules are at least two diameters of edge distance and three of pitch, unless the specification sets others.
- A riveted joint fails by rivet shear, sheet bearing or net tearing, whichever is weakest.
- Rivets do not make a joint tight; seal between the sheets or solder over the rivets.
- Blind rivet
- A rivet set from one side by pulling a mandrel that expands the body on the far side.
- Mandrel
- The pin through a blind rivet that is pulled to set it and then breaks off.
- Grip range
- The range of total material thickness a rivet can join.
- Edge distance
- The distance from a rivet center to the edge of the sheet.
- Pitch
- The distance between neighboring rivets in a row.
- Tinner's rivet
- A small solid rivet used on tinware and soldered sheet metal.
Practice problems
Work each problem on paper first, then reveal the answer to check.
A joint uses 5/32 in rivets. What are the minimum edge distance and pitch by the usual rule of thumb?
Show answer
Edge distance about 5/16 in, pitch about 15/32 in.
Why are closed-end rivets used on a gutter?
Show answer
Their closed body does not leave a leak path through the rivet.
Which failure mode usually governs with aluminum rivets in steel?
Show answer
Rivet shear.
What should you do first when drilling out a blind rivet?
Show answer
Punch out any mandrel stub, then pilot drill in the center of the head.
Lesson quiz · 5 questions
Score 60% or more to complete this lesson.
Create a free account to save your progress, take quizzes and earn a certificate.