
SMW-130 · Lesson 3 of 12 · 18 min
The Pittsburgh lock and the snap lock
Walk past the roll formers in any duct shop and you will hear the two machines that make most of the corner seams in North American rectangular duct. One forms the Pittsburgh lock, the other the snap lock, sometimes called the button punch snap lock. SMW-110 showed Kai the machines and how to run them safely. This lesson is about the seams themselves: how each is shaped, how it is assembled and closed, where each may be used, what goes wrong with them, and how to check one.
Why corner locks
A rectangular duct section can be made from one sheet bent into a box with one corner seam, from two L-shaped pieces with two corner seams, or from four flat pieces with four. Most shops make sections from two L-shaped pieces, because two pieces are easier to handle, nest better on the sheet and fit the brake. That means every section has two corner seams running its full length, and a typical Ashgrove section 5 ft long has 10 ft of corner seam. Over a job with hundreds of sections, the corner seam is the single most repeated joint in the shop. It has to be fast, consistent and strong, and it has to be made on machines.
The Pittsburgh lock
The Pittsburgh lock is formed in two parts. On one edge of the sheet, the lockformer rolls a pocket: a folded channel with a doubled-back hook inside it. On the mating edge, a single flange is formed at a right angle, usually on the brake. To assemble the seam, the flange is slid into the pocket along the full length of the section, and then the outer lip of the pocket is hammered or closed down over the flange. The result is a strong, stiff corner in which the flange is trapped inside a fold of metal on both faces.
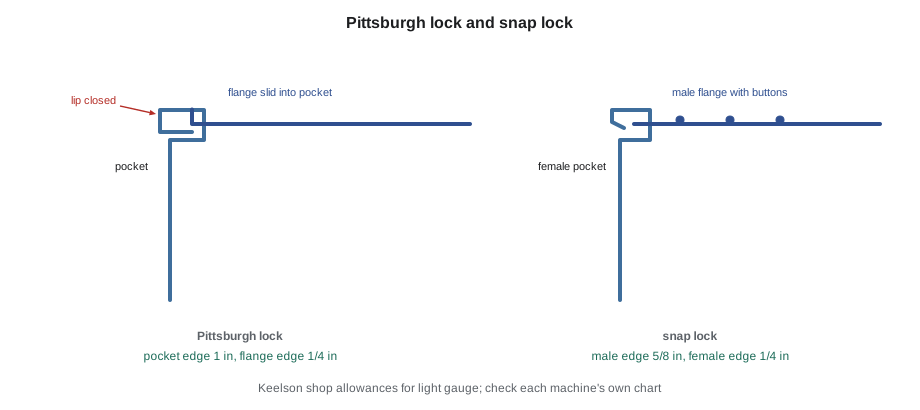
The pocket takes much more metal than the flange. On Keelson's chart, for light gauge, the pocket edge needs an allowance of 1 in and the flange edge 1/4 in. Different lockformers form slightly different pockets, so every shop measures its own and keeps a chart for each machine and each gauge. When Lin details a section, the pattern for each piece includes the pocket allowance on one edge and the flange allowance on the other, and she arranges the pieces so the pocket edge and flange edge always mate.
The Pittsburgh is the most versatile corner seam. It can be used on all pressure classes in the duct construction standards within its gauge limits, it takes moderate twisting and racking without opening, and it can be assembled on the bench or in the field. Its weakness is that it is not airtight. Even closed tightly, a Pittsburgh lock has a long, narrow path inside the folds, and sealant is applied in the pocket before assembly, or along the seam afterwards, wherever the seal class requires it.
Closing a Pittsburgh lock
The closing is where most bad Pittsburgh seams come from. The flange must be pushed fully into the pocket for the whole length, so that its edge seats against the bottom. The lip is then closed down with a mallet or a hammer and a hand dolly, working along the seam with firm, even blows so the lip lies flat and tight. Some shops close Pittsburghs with a pneumatic closing tool or a seam closer, which runs along the seam and folds the lip consistently.
A seam with the flange not fully seated has a lip that closes over nothing at one end. A seam hammered too hard and too unevenly has a wavy lip that has cut into the flange in places. A seam closed with a steel hammer directly on the metal has dents and cracked coating along it. Aggie's test for a closed Pittsburgh was simple. She ran a thumbnail along the lip, looking for any spot where it lifted, and sighted down the corner of the section, which should be a straight line. On a well-made section both corners look the same from end to end.
One subtle point matters a great deal. The flange must be formed to the correct width, and square. A flange that is too wide bottoms out in the pocket before the faces of the duct meet, leaving the duct out of square. A flange that is too narrow does not reach the hook inside the pocket and pulls out under load. A flange bent at less than a right angle makes a section that twists. Kai's first set of Ashgrove sections had two that rocked on the bench because the brake stop for the flange had drifted. Walt's rule after that was to check the first flange on every new setup with a square and a rule.
The snap lock
The snap lock, or button punch snap lock, is a faster seam to assemble. One edge of the sheet is formed with a female pocket that has an inward-facing lip. The mating edge is formed with a male flange, and along the flange a row of small raised buttons is punched, usually by a button punch on the roll former or a separate punching machine. To assemble the seam, the male flange is pushed straight into the pocket, and the buttons snap past the lip and lock behind it. No hammering is needed.
Because it assembles by pushing, the snap lock is ideal for duct that is shipped flat, as L-shaped pieces, and assembled on site. A truckload of flat snap-lock pieces takes a fraction of the space of assembled duct. Residential and light commercial duct is very often snap lock for this reason. On Keelson's chart, the snap lock takes 5/8 in for the male edge and 1/4 in for the female edge, as in SMW-110 and SMW-120.
The snap lock has firm limits. Its holding power comes only from the small buttons catching a thin lip, so it is weaker than a Pittsburgh in pull-out and twisting. The duct construction standards restrict its use by pressure class, duct size and gauge, and most specifications do not allow it on higher pressure systems or on large ducts. It is also more sensitive to the gauge: the buttons and lip that work in light gauge do not form properly in heavier sheets. Lin's rule, which matched the Ashgrove specification, was snap lock only for low pressure branch duct up to a modest size, and Pittsburgh for everything else.
Choosing between them
| Feature | Pittsburgh lock | Snap lock |
|---|---|---|
| Assembly | Slide in, close lip with mallet or tool | Push in until buttons snap |
| Shipping flat | Possible, but closing on site is slower | Very well suited |
| Strength and stiffness | High | Lower; buttons carry the load |
| Pressure class | Used across the classes within gauge limits | Restricted to lower classes and sizes |
| Gauge range | Wide | Light gauge only |
| Airtight without sealant | No | No |
| Allowance (Keelson chart) | 1 in pocket, 1/4 in flange | 5/8 in male, 1/4 in female |
There is no single right answer between the two seams. The standard, the specification and the use decide. Where the duct is large, the pressure higher, the run exposed to damage, or the duct carries anything other than clean air, the Pittsburgh is the safe choice. Where the duct is small, low pressure, shipped flat and assembled by an installer, the snap lock saves a great deal of labor.
Setting up the lockformer
SMW-110 covered the lockformer's guarding and the rule that hands never follow the sheet into the rolls. For seam quality, three settings matter. The edge guide sets how much of the sheet is fed into the rolls, and so how wide the pocket is. The roll gap is set for the gauge being run; a gap too tight scores the coating and a gap too loose forms a sloppy pocket. And the sheet must be fed square to the rolls and supported on the outfeed side, so that a long sheet does not drift and form a pocket that wanders.
Many shops keep a sample board beside each machine: short pieces of correctly formed pocket and flange in each gauge, labeled with the allowance and the date. An operator starting a run forms a test piece and compares it to the board before feeding the job. It takes two minutes and saves an hour of scrapped sheets.
Sealing corner locks
Because neither lock is airtight, sealing is part of making the seam whenever the seal class calls for it, which on most commercial work today is every seam. There are two ways. A bead of duct sealant can be run into the pocket before the flange is inserted, so the sealant is trapped inside the joint, or sealant can be applied along the outside of the closed seam. Sealant inside the pocket is neater and better protected, but it must be the right type, applied in the right amount, and the seam closed before it skins over. Some shops use roll formers that inject sealant into the pocket automatically as it is formed. Lesson 11 covers sealants and seal classes in detail.
Whichever method is used, the sealant must reach the ends of the seam. The corners where a Pittsburgh seam meets a transverse joint are the most common leak points in rectangular duct, because the seam's internal channel opens there. Aggie made Kai finish every section end with a small fillet of sealant across the end of each corner seam, a habit she called closing the tunnels.
Strength of a corner lock
A corner lock must carry the outward push of the air pressure on the duct walls. A simple calculation shows the size of that load. The pressure acts on the area of a wall; half of the force on each wall is carried by each corner seam, along its length. The script below works out the load per unit length of seam for a few duct sizes and pressures. The numbers are small, which is why light gauge locks work, but they grow quickly with the duct width, which is why wide ducts need reinforcement and why the snap lock is limited by size.
# Outward load on each corner seam of a rectangular duct from internal pressure
cases = [(16, 1), (24, 2), (48, 2), (48, 4)]   # in, in w.g.     # (width, pressure)
for width, p in cases:
    load_per_len = p * width / 2        # each seam carries half of one wall's push
print(f"width {width} in, pressure {p} in w.g.: about {load_per_len * 0.0361:.2f} lb per inch along each corner seam")width 16 in, pressure 1 in w.g.: about 0.29 lb per inch along each corner seam width 24 in, pressure 2 in w.g.: about 0.87 lb per inch along each corner seam width 48 in, pressure 2 in w.g.: about 1.73 lb per inch along each corner seam width 48 in, pressure 4 in w.g.: about 3.47 lb per inch along each corner seam
A 48 in wide duct at 4 in w.g. puts about 3.5 pounds on every inch of each corner seam. Spread along the seam that is not much, but it is steady, and every flex of the wall from fan pulses works the seam back and forth. The standards deal with that by limiting the unreinforced width for each gauge and pressure, a subject for SMW-220.
The factor 0.0361 converts inches of water to pounds per square inch, so the result comes out in pounds per inch of seam. A check by units like this is worth doing whenever you write or use a formula: a result in the wrong units is the most common mistake in shop arithmetic.
Inspecting corner locks
A finished corner lock is checked by eye and by hand before the section leaves the bench.
- The lip lies flat and tight along the whole length, with no lifts or gaps.
- The corner is straight when sighted end to end, and the section is square across both diagonals.
- There are no cracks in the coating at the folds, and no tool marks or cuts on the lip.
- The flange is fully seated at both ends of the section.
- Sealant, where required, is continuous and reaches both ends.
Sections that fail any check are fixed or scrapped before they go to the field. A bad seam found in the shop costs minutes. The same seam found when the balancer walks the job costs a lift rental, a crew and a ceiling tile.
Common mistakes
MistakeClosing a Pittsburgh lock with the flange not fully seated.
InsteadPush the flange to the bottom of the pocket along the whole length before closing.
MistakeHammering the lip directly with a steel hammer.
InsteadUse a mallet or a hammer on a dolly, or a closing tool, with even blows.
MistakeUsing snap lock on large or higher pressure duct.
InsteadCheck the standard and specification; use a Pittsburgh where the snap lock is not allowed.
MistakeRunning a new gauge without checking the roll gap and a test piece.
InsteadSet the gap for the gauge and compare a test piece with the sample board.
MistakeLeaving the ends of corner seams open.
InsteadClose the tunnels with a fillet of sealant at each section end.
Summary and key terms
- The Pittsburgh lock is a rolled pocket with a single flange slid in and the lip closed over; strong, stiff and versatile.
- The snap lock is a female pocket and a male flange with punched buttons that snap past a lip; fast and ideal for flat shipping, but weaker.
- Both take much more allowance on the pocket edge than the flange edge; every shop keeps a chart for its own machines.
- Most bad Pittsburgh seams come from a flange not fully seated, the wrong flange width, or rough closing.
- Neither lock is airtight; sealant goes in the pocket or along the seam, and the seam ends must be closed.
- Wall load on a corner seam grows with duct width and pressure, which is why the standards limit sizes and gauges.
- Pittsburgh lock
- A corner seam made by sliding a single flange into a rolled pocket and closing the pocket lip over it.
- Snap lock
- A corner seam in which a buttoned male flange snaps into a female pocket.
- Button punch
- A machine or tool that punches the raised buttons on a snap lock flange.
- Lockformer
- A roll-forming machine that forms Pittsburgh pockets and other locks.
- The folded channel of a lock into which the mating flange is inserted.
- Sample board
- A board of correctly formed lock pieces kept beside a machine for comparison.
Practice problems
Work each problem on paper first, then reveal the answer to check.
Which edge of a Pittsburgh lock takes the larger allowance?
Show answer
The pocket edge, about 1 in on Keelson's chart against 1/4 in for the flange.
Why is snap lock popular for residential duct?
Show answer
It ships flat and assembles by pushing, with no tools.
A section rocks on the bench. What is a likely cause in the seam?
Show answer
A flange formed at the wrong width or angle, so the section is out of square or twisted.
What does closing the tunnels mean?
Show answer
Sealing the open ends of the corner seams at each end of a section.
Lesson quiz · 5 questions
Score 60% or more to complete this lesson.
Create a free account to save your progress, take quizzes and earn a certificate.