
SMW-130 · Lesson 10 of 12 · 19 min
Resistance spot welding and stud welding
Two kinds of welding are part of everyday sheet metal work even in shops that do little arc welding. Resistance spot welding joins overlapping sheets with a squeeze and a pulse of current, no filler and no flame; it fastens flange angles, stiffeners, damper parts, hood panels and casings. Stud welding fixes pins and studs to a sheet in a fraction of a second; in duct shops it is how insulation pins are attached to hold acoustic liner. Both are fast, clean and repeatable when the machine is set up right, and both hide their faults when it is not. This lesson covers how each works, how it is set up and checked, and where arc welding of sheet metal fits.
How resistance spot welding works
A resistance spot welder clamps the overlapped sheets between two copper alloy electrodes and passes a large electric current through them for a short time. The current meets the most electrical resistance where the two sheets touch, so the heat is generated right at the joint between them. A small pool of metal melts there and, when the current stops, freezes into a lens-shaped nugget that fuses the sheets together. The electrodes keep squeezing while the nugget cools, then release. The whole cycle takes a fraction of a second to a second or so.
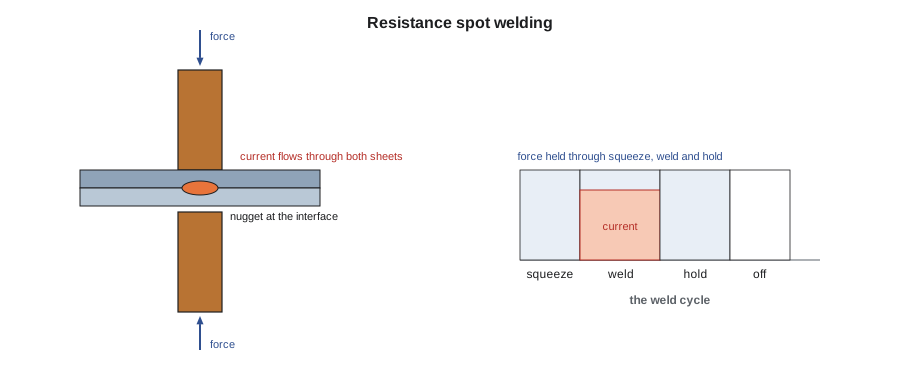
Three variables control the weld, and every spot welding schedule sets all three.
- Current. The heat goes up with the square of the current, so a small change in current makes a large change in heat. Too little gives a small or no nugget; too much gives expulsion, a shower of molten metal squirting from the joint, and burned, cratered welds.
- Time. Weld time is usually counted in cycles of the electrical supply, 60 per second in North America. Longer time grows the nugget, but too long overheats the sheets and electrodes.
- Force. The electrode force holds the sheets in close contact, sets the contact resistance and forges the nugget as it cools. Too little force gives expulsion and porous welds; too much spreads the current and gives a small, weak weld.
The weld cycle has four stages: squeeze time, when the electrodes close and the force builds before any current flows; weld time, when the current flows; hold time, when the force is held while the nugget freezes; and off time, before the next weld. Welding before the full force is reached, by cutting the squeeze time short, is a common cause of expulsion.
Electrodes
The electrodes carry the current and the force and set the size of the weld. They are made of copper alloys that conduct well but stay hard when hot, and they are water-cooled on most machines. The diameter of the electrode face sets the area of contact and therefore the nugget size. A widely used rule of thumb for steel sheet is a face diameter of about five times the square root of the sheet thickness, in millimeters, with the nugget aimed at a similar size. Welding standards and electrode makers give tables by thickness and material.
Electrode faces wear and mushroom with use. As the face grows, the current spreads over a larger area, the current density falls, and the welds get smaller even though the machine settings have not changed. That is why the welds made at the end of a shift can be weaker than those at the start. The cure is regular dressing of the electrode faces with a tip dresser or a file shaped to the correct face profile, and replacing electrodes worn past their limit. On galvanized steel, zinc picks up on the copper and wears the faces faster, so they must be dressed more often.
Spot welding coated and different metals
Galvanized steel is the most common material spot welded in sheet metal shops, and it is harder to weld than bare steel. The zinc coating has low resistance and melts first, so more current is needed to make a nugget of the same size, and the zinc alloys with the copper electrodes and wears them. Welders typically set higher current and longer weld time for galvanized than for bare steel of the same gauge, and keep electrode faces dressed. The zinc is burned off around each weld, leaving a small area that should be touched up with zinc-rich paint on exposed work.
Stainless steel spot welds well. It has higher resistance than mild steel, so it needs less current but more force, and its welds must not be overheated or they discolor and lose corrosion resistance. Aluminum can be spot welded but needs very high current, clean surfaces and machines designed for it, and most sheet metal shops rivet aluminum instead. Copper is very hard to spot weld because it conducts too well. Dissimilar metal pairs are usually avoided.
Thickness matters too. Two sheets of the same gauge weld most easily. Joining a thin sheet to a thick one moves the heat toward the thicker side, and joining more than two sheets needs a longer weld time. Shops weld test coupons whenever the combination changes.
Setting up a spot welding schedule
Every job's spot welds are made to a schedule: the current, time and force for each material and thickness combination, often from the machine maker's chart, then checked by welding and testing coupons. The script below works out the electrode face diameter from the rule of thumb and scales a starting schedule from a reference setting for the gauge. The reference values and scaling are illustrative; real starting values come from the machine and electrode makers, and the final schedule comes from coupon tests.
# Starting spot weld settings scaled from a reference, with the 5 x sqrt(t) electrode rule (illustrative values)
import math
ref_t, ref_kA, ref_cycles = 0.0394, 9.0, 10     # reference: thickness in, current kA, weld time in cycles
for t in [0.0217, 0.0276, 0.0336, 0.0516, 0.0635]:
    face = 5 * math.sqrt(t * 25.4)                # electrode face diameter, mm
    kA = ref_kA * (t / ref_t) ** 0.5           # current grows roughly with sqrt of thickness
    cycles = round(ref_cycles * t / ref_t)     # time grows roughly with thickness
    galv_kA = kA * 1.2                         # galvanized: about 20 percent more current as a start
print(f"t = {t} in: face about {face:.1f} mm, bare {kA:.1f} kA / {cycles} cycles, galvanized start {galv_kA:.1f} kA")t = 0.0217 in: face about 3.7 mm, bare 6.7 kA / 6 cycles, galvanized start 8.0 kA t = 0.0276 in: face about 4.2 mm, bare 7.5 kA / 7 cycles, galvanized start 9.0 kA t = 0.0336 in: face about 4.6 mm, bare 8.3 kA / 9 cycles, galvanized start 10.0 kA t = 0.0516 in: face about 5.7 mm, bare 10.3 kA / 13 cycles, galvanized start 12.4 kA t = 0.0635 in: face about 6.3 mm, bare 11.4 kA / 16 cycles, galvanized start 13.7 kA
For 22-gauge galvanized, the script suggests a face of about 4.6 mm, or 3/16 in, and a starting current near 10 kA. Walt's chart for the shop welder gave similar values, and the coupon test confirmed them after a small increase in weld time.
The exponents in the script are simple scaling assumptions chosen to show the trend: thicker sheet needs more current and more time. Real schedules are not linear, and they change with the machine, the electrodes and the coating.
Testing spot welds
Spot welds hide their faults. A weld with a good-looking mark on the outside may have no nugget inside at all, a cold weld or stuck weld. The only way to know is to test. Two shop tests are standard.
- The peel test. Two strips are spot welded together and then peeled apart with pliers or in a vice. A good weld tears a button of metal out of one strip, leaving a hole in the other, and the diameter of the button is measured against the required nugget size. A weld that peels apart at the joint with no button is a failed weld.
- The chisel test. A chisel is driven between the sheets beside a weld on a finished part. Done carefully, it shows whether the weld holds without destroying the part, and is used for checking production parts.
Shops test coupons at the start of each shift, after an electrode change, and whenever the material or thickness changes. Keelson kept a log beside the spot welder: date, material, thickness, settings and the measured button size. Kai's first coupons on the Brine & Ember hood panels peeled with no buttons, because the machine was still set for the galvanized work done the day before. The log caught it before a single hood panel was welded.
Spot weld layout
Spot welds are laid out like rivets, with an edge distance, a pitch along the row and a minimum flange width. Welds too close to an edge squirt metal out of the edge. Welds too close together suffer shunting: some of the current for the new weld flows through the weld next to it instead, so the new weld is smaller. Rules of thumb and standards give minimum spacings that grow with thickness. On hood and casing work, spot weld spacing is usually set by the shop drawing or the product standard.
Stud welding and insulation pins
Stud welding attaches a stud, pin or threaded fastener to a sheet by welding its end in one quick shot. Two processes are used. Drawn arc stud welding lifts the stud slightly to draw an arc, melts the end, then plunges it into the molten pool, and is used for heavier studs. Capacitor discharge stud welding, the process used in sheet metal shops, stores energy in a bank of capacitors and dumps it through the tip of a small stud in a few thousandths of a second. The tip vaporizes, a tiny weld forms and the stud is fixed, with almost no heat reaching the back of the sheet, so coatings on the other side are barely marked.
Duct liner, the acoustic insulation inside duct, is held by adhesive and by mechanical fasteners. The common mechanical fastener is the insulation pin: a thin steel pin with a head, welded to the duct wall through the liner, or a pin welded first with the liner pressed over it and a washer pushed on. The duct standards set the spacing of fasteners from the edges, corners and transverse joints, and along and across the duct, which varies with the duct velocity. Pins must be long enough for the liner thickness and set so the liner is held but not crushed.
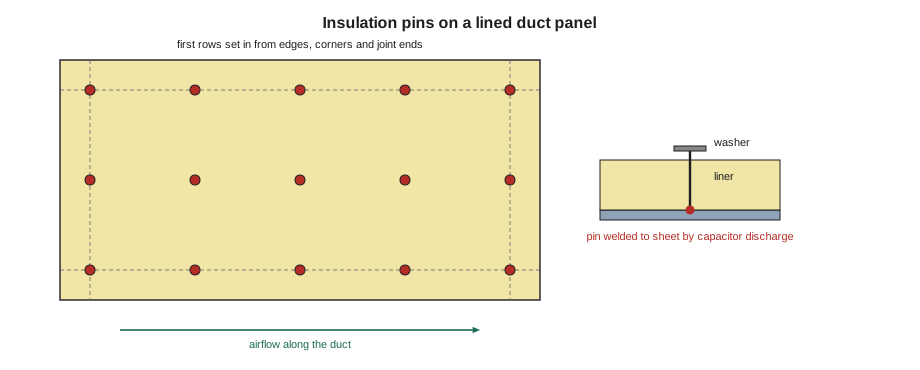
The script lays out a pin grid on a duct panel from the edge distance and spacing. The values are illustrative examples of the kind of spacing the standards set; the actual values depend on the standard's table for the duct velocity and the liner type.
# Insulation pin grid on a lined duct panel (illustrative spacing values)
import math
w, l = 24, 60        # panel width across the duct and length along it, in
edge = 3         # distance of the first row from edges and corners, in
s_across, s_along = 12, 16
n_across = math.ceil((w - 2 * edge) / s_across) + 1
n_along = math.ceil((l - 2 * edge) / s_along) + 1
print(f"{n_across} pins across x {n_along} rows along = {n_across * n_along} pins on the panel")
print(f"actual spacing about {(w - 2 * edge) / (n_across - 1):.1f} x {(l - 2 * edge) / (n_along - 1):.1f} in")3 pins across x 5 rows along = 15 pins on the panel actual spacing about 9.0 x 13.5 in
Stud weld quality is checked by bending a sample pin over with a hammer or a bending tool; a good weld lets the pin bend without breaking off at the base. The gun is held square to the sheet, with the right pin and collet, and the energy setting matched to the pin size and sheet thickness. Like spot welding, stud welding on galvanized needs a slightly higher setting and is checked at the start of each run.
Arc welding and sheet metal
Gas metal arc welding, often called MIG, and gas tungsten arc welding, often called TIG, are used on heavier sheet metal and on stainless and aluminum work: grease duct, hood seams, industrial ducts, tanks and fabrications. Thin gauge is easy to burn through and to distort with arc welding, and welding galvanized steel burns off the coating and gives off zinc fume. These are skills of their own, taught in SMW-230 and the welding program. For this course, it is enough to know when a joint calls for arc welding, as the Brine & Ember grease duct did, and to leave it to a qualified welder until you have that training.
Safety
Spot welders exert large forces between their electrodes, enough to crush a finger; machines have guarding, two-hand controls or foot pedals, and hands are kept clear of the electrodes. Expulsion throws molten metal, so eye and face protection and flame-resistant clothing are worn, and combustibles are kept away from the welder. Welding galvanized steel produces zinc fume and needs local exhaust. Capacitor discharge stud welders store electrical energy in their capacitors; their covers are not opened, and they are maintained only by qualified people. Both machines are electrical equipment subject to the shop's lockout procedure from SMW-110 for maintenance and electrode changes.
Common mistakes
MistakeTrusting the outside mark of a spot weld.
InsteadPeel test coupons to confirm a nugget of the required size.
MistakeRunning the same settings on galvanized as on bare steel.
InsteadRaise current and time for galvanized and dress the electrodes more often.
MistakeLetting electrode faces mushroom over a shift.
InsteadDress the faces regularly and replace worn electrodes.
MistakeCutting squeeze time short to weld faster.
InsteadLet the full force build before the current flows, to avoid expulsion.
MistakeSpacing insulation pins by eye.
InsteadLay out pins from the standard's edge distances and spacings for the duct velocity.
Summary and key terms
- A spot weld fuses overlapped sheets with current, time and electrode force; the nugget forms at the interface between the sheets.
- The weld cycle is squeeze, weld, hold and off; current has the largest effect because heat grows with its square.
- Electrode face size sets weld size; a rule of thumb for steel is about five times the square root of the thickness in millimeters.
- Galvanized steel needs more current and time and wears electrodes faster.
- Spot welds must be checked by peel or chisel tests, logged by shift and setting.
- Capacitor discharge stud welding fixes insulation pins to duct walls at the spacings the standard sets.
- Weld nugget
- The fused lens of metal formed at the interface in a spot weld.
- Expulsion
- Molten metal squirting from a spot weld, a sign of too much current or too little force.
- Shunting
- Current flowing through a nearby weld instead of the new one, making the new weld smaller.
- Peel test
- Peeling apart a spot welded coupon to check the size of the weld button.
- Capacitor discharge stud welding
- Fixing a stud with a short, high-energy discharge from a capacitor bank.
- Insulation pin
- A pin welded to a duct wall to hold acoustic liner.
Practice problems
Work each problem on paper first, then reveal the answer to check.
A peel test leaves no button. What does that mean?
Show answer
The weld had no adequate nugget; the settings or electrodes need correcting before production welding.
Why do welds get weaker over a shift with no change in settings?
Show answer
The electrode faces mushroom, lowering the current density.
Why does capacitor discharge stud welding barely mark the back of the sheet?
Show answer
The energy is released in a few thousandths of a second at the tip, so little heat spreads through.
What does galvanized steel need compared with bare steel in spot welding?
Show answer
More current and time, and more frequent electrode dressing.
Lesson quiz · 5 questions
Score 60% or more to complete this lesson.
Create a free account to save your progress, take quizzes and earn a certificate.