
SMW-120 · Lesson 9 of 12 · 13 min
Tees and intersections
A tee joins a branch duct to a main. Where the two meet, their surfaces cross along a line called the line of intersection, and both patterns depend on it: the branch must be cut to fit the curve of the main, and the main must have a hole cut to match the branch. Finding the line of intersection is the new skill in this lesson. Once it is found, the branch pattern is developed exactly like Lesson 5's cut pipe, and the hole in the main is laid out on the main's own stretchout. The lesson covers the 90-degree tee of equal and unequal sizes, the offset tee and the lateral, a branch joining at an angle, and a round branch on a rectangular main.
Finding the line of intersection
The line of intersection is found by cutting planes. Imagine slicing through both pipes with a plane that contains one element line of the branch. The plane cuts the branch along that element line and cuts the main along a line or curve that is easy to draw. Where the two cut lines cross is a point on the line of intersection. Repeat for each element line of the branch, and the points trace the whole curve.
For round pipes, the cutting planes are usually chosen parallel to both axes, so that each plane cuts the branch along an element line and the main along an element line too. In practice that means the pattern maker draws two views, an elevation and a profile or end view, divides the branch's half plan into equal parts as usual, and carries each division to the view where the main appears as a circle. There, the element line of the branch meets the circle of the main, and that height is projected back to the elevation.
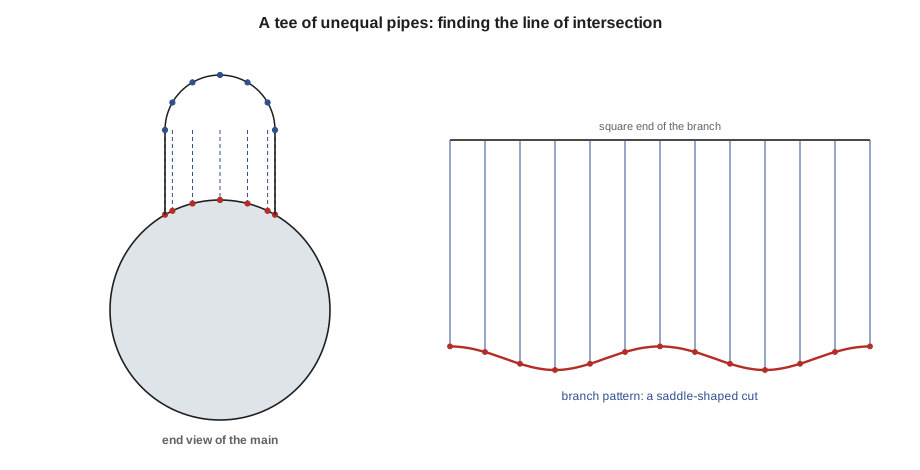
The 90-degree tee of equal diameters
When the branch and the main are the same diameter and their axes cross at right angles, the line of intersection appears in the elevation as two straight lines forming a V, meeting at the center of the main. This is a special case worth remembering, because it makes equal-tee patterns easy: each branch element line meets the V, and the pattern is two Lesson 5 cuts at 45 degrees, back to back. The cut edge of the branch pattern has two humps and two valleys, rising highest where the branch's side elements sit on the main's center line and lowest at the front and back, where they meet the main's top.
Equal-diameter tees are common in exhaust and dust collection, but less so in supply duct, where a branch is usually smaller than its main. Kai developed one first because the V gives a clean check: if the projected points do not fall on two straight lines, something is wrong.
The 90-degree tee of unequal diameters
When the branch is smaller than the main, the line of intersection is a curve, and each point has to be found. In the end view, where the main appears as a circle of radius R, each element line of the branch appears as a vertical line at a distance x from the main's center line. It meets the main's circle at a height y where x² + y² = R². That height, carried back to the elevation and then to the pattern, fixes the length of that element line. For a branch of radius r with its element lines at angles φ around it, x is r times the sine of φ.
So each branch element line is shorter than the longest by R minus y. The branch elements at the front and back of the main, where x is zero, sit on the very top of the main and are the shortest; the elements at the sides, where x equals r, reach down the main's curve and are the longest. For a branch much smaller than its main, the difference is small and the branch cut is almost flat. For a branch nearly as big as its main, the difference approaches the full radius and the cut becomes deeply saddle-shaped.
At Ashgrove, the 10 in branches came off 24 in round mains in the gym, which run overhead. The longest branch element was only about 1 1/16 in longer than the shortest, because 5 in is small compared with 12 in. The saddle cut was shallow but still had to be accurate; a branch cut square would have left a gap of up to about 1 1/16 in at its sides.
Cutting the hole in the main
The hole in the main is the line of intersection laid out on the main's own surface. On the main's stretchout, each point of the intersection has two coordinates: its distance along the main, which can be read straight from the elevation, and its distance around the main's circumference from the top, which is the arc length on the main's circle from its top to the point where the branch element meets it. That arc is R times the angle whose sine is x over R. The hole is not a circle and not an ellipse in general; it is a rounded shape slightly longer around the main than along it.
Shops usually cut the hole in the main after the main is rolled, by tracing around the finished branch held in place, rather than laying it out on the flat. Tracing is quick and automatically matches the branch. But for welded tees, for stainless and for any job where the main is rolled after the hole is cut, the hole has to be laid out flat, and the coordinates give it exactly.
The offset tee
In an offset tee, the branch axis does not pass through the main's axis; the branch is moved sideways so that one side of it is flush with the side of the main. Offset tees are used where a branch must run tight to a wall or to keep a branch's bottom level with the main's bottom. The method is the same; only x changes. If the branch's axis is offset from the main's by a distance e, each element line is at x = e + r sin φ, and the intersection is no longer symmetrical about the branch's center line. The pattern loses its mirror symmetry, so all 12 or 16 heights must be found, not just half of them, and the hole in the main is lopsided.
The lateral
A lateral is a branch that joins its main at an angle other than 90 degrees, usually 45 degrees, pointing in the direction of flow. It is used where a smooth entry matters, as in dust collection and exhaust, because air turning gently into the main loses less pressure than air entering at right angles. Laterals are harder to develop, because the line of intersection is a three-dimensional curve whose shape depends on both diameters and on the angle.
The cutting-plane method still works. Draw the elevation with the branch at its angle β to the main. Draw the end view, looking along the main, where the main is a circle and the branch elements appear at distances x = r sin φ from the center line, just as for the 90-degree tee. Each element meets the main's circle at a height y found from the end view. In the elevation, each branch element line runs at the angle β, so it reaches that height at a distance along the branch that depends on both y and the element's position around the branch. The full formula is in the script; drawn, it is a matter of projecting each height from the end view across to its element line in the elevation and marking where they meet.
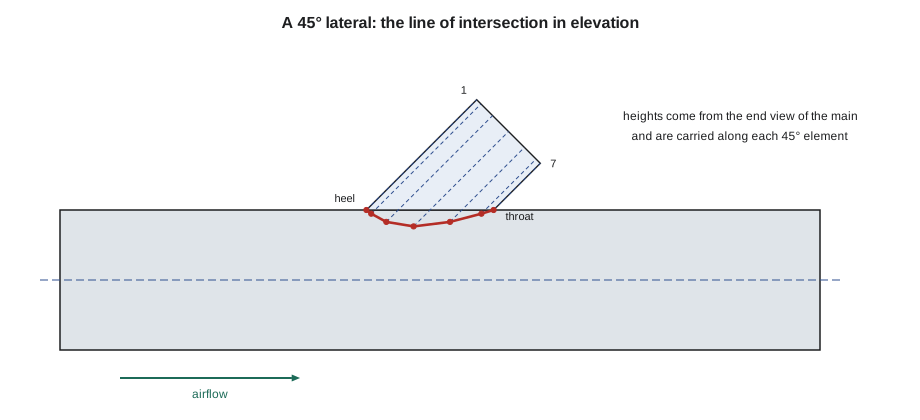
The script finds the length of every branch element line for a tee or lateral of any sizes and angle, measured from a square cut at the branch's far end, and the position of each point of the hole on the main's stretchout.
# Branch element lengths and hole points for a round tee or lateral
import math
D_main, d_branch, t = 24, 10, 0.0276     # in
beta = 45                      # angle between branch and main axes, degrees
L_axis = 28                 # in                     # branch length along its axis from the main's axis to its square end
R = (D_main - t) / 2               # mean radii
r = (d_branch - t) / 2
b = math.radians(beta)
print(f"branch stretchout {2 * math.pi * r:.2f} in")
print(" line   element length   hole: along main, around main from top")
for k in range(0, 7):              # half the branch; the other half mirrors it
    phi = math.pi * k / 6          # line 1 at the heel side of the lateral
    y = r * math.sin(phi)
    z = math.sqrt(R ** 2 - y ** 2)              # height of the contact on the main
    s = (z - r * math.cos(phi) * math.cos(b)) / math.sin(b)
    along = s * math.cos(b) - r * math.cos(phi) * math.sin(b)
    around = R * math.asin(y / R)
print(f"{k + 1:>4} {L_axis - s:>14.2f} in {along:>12.2f} in {around:>10.2f} in")branch stretchout 31.33 in line element length hole: along main, around main from top 1 16.04 in 4.93 in 0.00 in 2 15.74 in 5.62 in 2.51 in 3 14.68 in 7.66 in 4.42 in 4 12.59 in 10.90 in 5.14 in 5 9.69 in 14.71 in 4.42 in 6 7.10 in 17.83 in 2.51 in 7 6.06 in 19.04 in 0.00 in
With β set to 90, the same script gives the plain tee, and the element lengths differ only by R minus y, as above. At 45 degrees the lengths spread out much more, because the heel side of the branch meets the main far from where the throat side does. Line 1 is the heel, the long side; line 7 is the throat, where the branch leans over the main and is shortest.
A round branch on a rectangular main
A round branch on the flat face of a rectangular duct is the easiest intersection of all: the face is flat, so the branch is cut square and the hole is a plain circle, the outside diameter of the branch. The connection is usually made with a manufactured or shop-made spin-in fitting or a flanged collar that is inserted and its tabs bent over inside the duct. A round branch on the side of a rectangular duct near a corner, or a branch whose diameter is close to the duct's depth, has to be checked so that the hole and the collar's flanges clear the corners.
A rectangular branch on a round main, used in some exhaust work, is the reverse: each flat face of the branch meets the main along a curve, found with the same end-view method, and the branch's four faces are developed as in Lesson 4 but with curved bottom edges.
Tees in the field
Many branches are cut into existing mains on site, where the main is already hung and full size layout is not possible. Field fitters use a manufactured saddle tap or a shop-made branch with a flanged base, and cut the hole in the main by tracing around the branch held in place. The pattern maker's work is still needed for the branch itself, because a branch cut square will not seat on a round main, and a branch developed for the wrong main diameter will rock. Sean's crews carried a set of branch patterns for the common main and branch sizes on each job, each marked with both diameters.
Field-cut holes are also where sealing problems start. A hole cut oversize leaves the branch's flange bearing on nothing at one side, and the sealant bridges a gap it was never meant to fill. Sean's rule for his crews was to cut the hole small, trim it to the traced line with snips, and test-fit the branch before any sealant went on.
Common mistakes
MistakeCutting a branch square and hoping the saddle gap seals.
InsteadDevelop the saddle; even a shallow one can leave a large gap at the sides.
MistakeFinding only half the points on an offset tee.
InsteadAn offset branch is not symmetrical; find every point.
MistakeMeasuring the hole's position around the main as a straight distance.
InsteadUse the arc length R × asin(x/R) on the main's stretchout.
MistakePointing a lateral against the direction of flow.
InsteadLaterals enter with the flow; check the drawing's arrows.
MistakeCutting the hole in a flat main and rolling it with the wrong seam position.
InsteadLay out the hole from the main's seam line and keep track of it when rolling.
Summary and key terms
- The line of intersection is found with cutting planes, using the view in which the main is a circle.
- An equal 90-degree tee intersects in a V; unequal tees intersect in a saddle-shaped curve.
- Each branch element meets the main at y = √(R² − x²) with x = r sin φ, or e + r sin φ for an offset tee.
- The hole in the main is laid out on its stretchout from the arc length and the distance along the main.
- Laterals join at an angle and need both the end view and the elevation for each point.
- Round branches on flat faces need only a square cut and a round hole.
- Line of intersection
- The line along which the surfaces of two joined fittings cross.
- Cutting plane
- An imaginary plane used to find points on a line of intersection.
- Tee
- A fitting joining a branch to a main at right angles.
- Offset tee
- A tee whose branch axis is moved sideways from the main axis.
- Lateral
- A branch joining a main at an angle other than 90 degrees.
- Spin-in fitting
- A round collar inserted into a hole in a duct and locked in place.
Lesson quiz · 5 questions
Score 60% or more to complete this lesson.
Create a free account to save your progress, take quizzes and earn a certificate.