
SMW-120 · Lesson 12 of 12 · 13 min
Capstone: a gore elbow and a lateral for Ashgrove
The Ashgrove retrofit had reached the point where the gym's new supply main had to be connected to the branch ducts that drop to the classroom diffusers. Two fittings recurred at every drop: a 45-degree lateral where the branch left the main, and a four-piece 90-degree gore elbow where the branch turned down toward the room. Walt gave Kai the first set to make on his own, start to finish, with Aggie checking only at the points Kai asked her to. This lesson follows that job, from reading the fitting schedule to signing off the finished fittings. Everything in it comes from earlier lessons; the capstone is about putting the steps together without missing one.
The fitting schedule
Lin's fitting schedule for drop B-4 gave the following. Main: 24 in round, 22-gauge galvanized steel. Branch: 10 in round, 24-gauge galvanized steel, 0.0276 in thick, specified to its outside diameter. Lateral: 45 degrees, branch length 28 in along its axis from the main's center line to a crimped end. Elbow: 90 degrees, four pieces, centerline radius 15 in, 2 in collars at each end, standing seams between pieces. Longitudinal seams: grooved seam on the elbow pieces and the lateral branch. All to be sealed with listed duct sealant after assembly.
Before drawing anything, Kai read the schedule twice and wrote down what each line meant for the patterns: which diameter to develop on, how many gores and at what angle, which seams and therefore which allowances, and which edges would need notches. He also checked two things against the specification that Lin's note mentioned: the centerline radius was 1.5 times the diameter, and the lateral pointed with the airflow.
Planning the work
A pattern job goes faster and more accurately when it is planned before the first line is drawn. Kai's plan, written on the back of the schedule, had seven steps. Calculate the elbow's sizes and ordinates and check them against a full-size drawing of one gore. Develop the lateral branch from the cutting-plane method, checking against the script. Add allowances from the shop chart and lay out the notches. Nest the patterns on sheets to minimize waste. Cut, form and assemble. Check each fitting. Record the patterns so the next 41 drops could be made from hard patterns.
The elbow
Using Lesson 7's elbow rule, a four-piece 90-degree elbow has six gores, each with a miter angle of 15 degrees. The ordinates of one gore run from the throat, (R − r) tan 15°, to the heel, (R + r) tan 15°, measured from the gore's center plane. Kai drew one gore full size on layout paper from the elevation and half plan, and then ran the numbers to check. The drawing and the numbers agreed to within half a millimeter on every line. That was the point at which he asked Aggie for her first check, and she signed the layout paper.
He made a hard pattern of the gore from 22-gauge scrap, net, with its center plane marked, the seam lines at both ends and the throat and heel labeled. Then he made a second hard pattern for the end pieces, the gore on top of the collar rectangle. With the two hard patterns, every piece of the elbow could be traced: each middle piece by tracing the gore twice, flipped over the center plane.
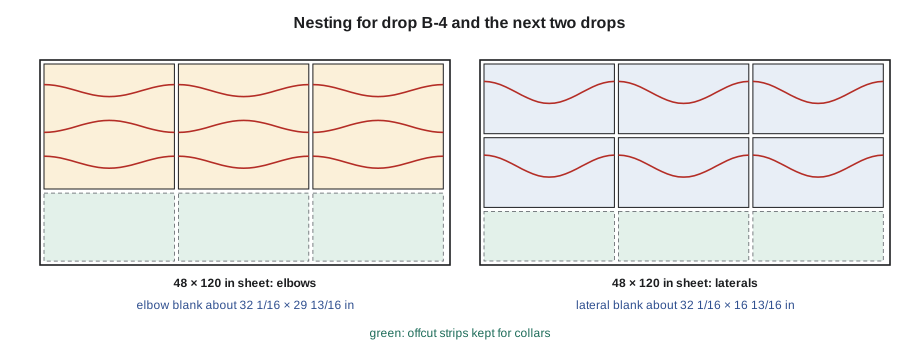
Nesting followed Lesson 7: trace up and down the blank, flipping the gore pattern over each time but never turning it left to right, so that each curved cut is shared and the seams alternate between throat and heel. Because the joints between pieces were standing seams, each shared cut became two cuts, one offset by the small allowance and one by the large, as Lesson 11 showed. The blank grew taller by three joints times the two allowances. On each side of the blank, the grooved seam allowance was added along the full height, and the corners where the seam allowance met each standing-seam allowance were notched square.
The lateral
The lateral branch was the harder pattern. Kai drew the elevation of the main and branch full size, the main as two lines 24 in apart and the branch rising at 45 degrees. He drew the end view of the main as a circle and the half plan of the branch divided into six parts, numbered from the heel side. From the end view, he found the height at which each branch element met the main's circle, using Lesson 9's construction, and carried each height to its element line in the elevation, along the 45-degree branch. Where they met was a point on the line of intersection, and the length of each element from that point to the branch's square end was the ordinate for the pattern.
Then he ran Lesson 9's script with the job's numbers. The drawing and the script agreed on every line except line 3, where the drawing was 5/32 in short. He found the error at once: he had taken the height from the main's outside circle rather than its mean circle. With that corrected, they agreed. Aggie's second check was the lateral layout, and she asked him one question: which way was the air flowing? He pointed the right way.
The lateral branch pattern was laid out on its own stretchout with the grooved seam allowances at each end, the seam at the throat side, and a row of 3/4 in tabs along the saddle-shaped edge, to be turned out and screwed to the main inside a bead of sealant. The hole in the main was not laid out flat. Because the main was already rolled and in the shop, Kai followed the shop practice of tracing around the finished branch held at 45 degrees on the main, then cutting the hole 1/4 in inside the traced line so the tabs had metal to bear on.
The script prints the complete set of ordinates for both patterns, the blank sizes with allowances, and the sheet count for the 42 drops in the job.
# Ashgrove drop B-4: gore elbow and 45-degree lateral, ordinates, blanks and sheet count
import math
D_main, t_main = 24, 0.0336
d, t = 10, 0.0276
R_cl, collar = 15, 2         # in
L_lat = 28
seam = 0.75                   # grooved seam, both edges together
stand = 0.5625                 # standing seam, both edges together
tab = 0.75                     # tabs on the lateral's saddle edge
sheet = (48, 120)
drops = 42
r = (d - t) / 2
Rm = (D_main - t_main) / 2
stretch = 2 * math.pi * r
tan_a = math.tan(math.radians(15))
print("gore ordinates from the center plane, throat (1) to heel (7):")
print("  " + "  ".join(f"{(R_cl - r * math.cos(math.pi * k / 6)) * tan_a:.2f}" for k in range(7)))
b = math.radians(45)
lat = []
for k in range(7):
    phi = math.pi * k / 6
    y = r * math.sin(phi)
    z = math.sqrt(Rm ** 2 - y ** 2)
    s = (z - r * math.cos(phi) * math.cos(b)) / math.sin(b)
    lat.append(L_lat - s)
print("lateral element lengths, heel (1) to throat (7):")
print("  " + "  ".join(f"{v:.2f}" for v in lat))
elbow_blank = (stretch + seam, 6 * R_cl * tan_a + 2 * collar + 3 * stand)
lat_blank = (stretch + seam, max(lat) + tab)
print(f"elbow blank {elbow_blank[0]:.2f} x {elbow_blank[1]:.2f} in, lateral blank {lat_blank[0]:.2f} x {lat_blank[1]:.2f} in")
per_sheet_e = int(sheet[1] // elbow_blank[0]) * int(sheet[0] // elbow_blank[1])
per_sheet_l = int(sheet[1] // lat_blank[0]) * int(sheet[0] // lat_blank[1])
print(f"{per_sheet_e} elbows per sheet, {per_sheet_l} lateral branches per sheet")
print(f"for {drops} drops: {math.ceil(drops / per_sheet_e)} sheets for elbows, {math.ceil(drops / per_sheet_l)} for laterals")gore ordinates from the center plane, throat (1) to heel (7): 2.68 2.86 3.35 4.02 4.69 5.18 5.36 lateral element lengths, heel (1) to throat (7): 16.04 15.74 14.68 12.59 9.70 7.11 6.07 elbow blank 32.08 x 29.80 in, lateral blank 32.08 x 16.79 in 3 elbows per sheet, 6 lateral branches per sheet for 42 drops: 14 sheets for elbows, 7 for laterals
The lateral's element lengths fall steeply from the heel to the throat, as they should for a 45-degree branch: the heel side reaches far along the main before it meets it, and the throat side leans over and meets it close to the branch's own axis.
Cutting, forming and assembling
Kai cut the nested elbow blank on the squaring shear to its overall size, then cut the curves with offset snips, staying on the waste side of each line. He kept each piece in order on the bench, numbered in marker on its inside face, so the nesting sequence was preserved. Each piece was rolled on the slip roll with its edges pre-formed, the grooved seam edges were formed on the brake, and each piece was closed and locked. The standing seams between pieces were formed on the elbow machine, starting at the end piece with the throat seam, and each piece was rotated so its longitudinal seam was opposite its neighbor's before it was locked.
The lateral branch was rolled, its grooved seam closed, its crimped end formed on the crimper, and its tabs turned out along the saddle on a hand seamer. It was offered up to the main, its outline traced, the hole cut, and the branch set in a bead of sealant and screwed through its tabs. After assembly, every seam on both fittings was sealed with listed duct sealant, as the schedule required and SMW-110 described.
Checking and signing off
The finished fittings were checked against the schedule, as Aggie had taught. For the elbow: its two collars square to each other at 90 degrees, checked with a framing square; its centerline radius right, checked by measuring throat and heel arcs; no twist when laid on the bench; ends the right diameter to fit the connecting duct and collar; all seams locked and sealed. For the lateral: the branch at 45 degrees to the main, checked with a protractor head; pointing with the flow; tight to the main all round its saddle, with no gap that sealant was expected to fill; crimped end fitting the next duct.
The elbow passed every check. The lateral had one small gap, about 1/16 in, at its heel side, where a tab had been turned out too far. Kai bent it back, reset the branch and resealed it. Then Aggie signed the job sheet. Walt took the fittings to the truck himself, because he wanted to see the first ones on the hangers.
Recording the patterns
The last step was the one that made the next 41 drops fast. Kai finished the hard patterns properly: the gore and end piece for the elbow, and the lateral branch, each cut from 22-gauge sheet with the net line, the allowance lines and the notches marked, and stamped or written with the job, the fitting, the diameter, the gauge it was developed for, the angle and the date. Lin photographed them and added the photographs and the ordinate tables to the job folder. With the hard patterns, an apprentice could trace and cut a full drop's fittings in under an hour, and the shop could cut the rest on the plasma table from Lin's drawings, checked against Kai's patterns.
Aggie's last comment on the course was the one she gave every apprentice. "You can now make anything that is made of pipes and boxes. Next term, cones."
Time and material on the job sheet
Keelson's job sheets recorded the time and material for every fitting order, and Walt used them to price the next job. Kai's drop B-4 took about six hours for the first set, including the layouts, the hard patterns and the checking, and used about one and a half sheets of branch-gauge material with the offcuts saved. With the hard patterns made, the second set took a little over an hour. Walt wrote both times on the sheet. The first number was what pattern development costs; the second was what it saves.
The material record mattered too. By nesting three elbows to a sheet and saving the strip above them for collars, the job's 42 elbows used 14 sheets; laying each piece out separately, with a strip of waste beside every curve, would have taken about half as many again. On a job with stainless or copper fittings, the same care saves far more.
Kai kept a copy of the job sheet in his own logbook, as SMW-110 had taught, with the hours split between layout, cutting, forming and checking. It was the first record in the logbook of a fitting he had developed himself from a schedule, and the first his instructor at the technical training block asked to see.
Common mistakes
MistakeStarting to draw before reading the schedule twice.
InsteadRead the schedule, list what each line means for the pattern, then plan.
MistakeTaking intersection heights from the main's outside circle.
InsteadUse the mean circle of the main, just as the branch uses its mean diameter.
MistakeLosing track of piece order after cutting a nested blank.
InsteadNumber each piece on its inside face and keep them in sequence.
MistakeExpecting sealant to fill a gap at a saddle.
InsteadReset the branch so it fits tight; sealant seals, it does not fill.
MistakeLeaving hard patterns unlabeled.
InsteadMark each with job, fitting, diameter, gauge, angle and date.
Summary and key terms
- A pattern job starts by reading the schedule and planning the steps.
- Every layout is checked by an independent method: drawing against calculation.
- Gore elbows nest on one blank; standing-seam allowances make the blank taller at each joint.
- Laterals use the cutting-plane method on mean diameters and are fixed by tabs in a sealed hole.
- Finished fittings are checked for angle, radius, twist, fit and sealing before sign-off.
- Labeled hard patterns and recorded ordinates make repeat fittings fast and consistent.
- Fitting schedule
- A list of fittings on a job with their sizes, angles, radii and joints.
- Drop
- The branch duct and fittings that carry air from a main down to an outlet.
- Crimped end
- A pipe end crimped smaller so it slips into the next pipe.
- Sign-off
- A recorded check by a qualified person that work meets the drawing.
- Job folder
- The shop record of drawings, patterns and checks for a job.
Lesson quiz · 5 questions
Score 60% or more to complete this lesson.
Create a free account to save your progress, take quizzes and earn a certificate.