
SMW-120 · Lesson 11 of 12 · 13 min
Allowances for seams, locks and metal thickness
Every pattern in this course so far has been drawn net: the exact outline of the finished surface, with nothing added. A net pattern cut and rolled would make a perfect fitting that falls apart, because it has no metal left to join. Before any pattern is cut, the pattern maker adds allowances: extra metal along the edges that will form the seams, locks and joints. Getting the allowances right is as important as getting the curve right. A fitting with a perfect cut line and the wrong allowance is too tight, too loose, or will not close at all. This lesson covers the allowances used with the patterns in this course: how much to add for the common seams, where to put them, how they interact with metal thickness, and how to notch them so the corners close cleanly. SMW-130 covers how each seam is formed and closed.
Thickness and the mean line
The first allowance is not extra metal at all; it is getting the net size right for the thickness. Lesson 5 explained the mean diameter for rolled pipe. The same reasoning applies to every bend, as SMW-110 showed with bend allowances: the metal that keeps its length is near the middle of the thickness, so patterns for rolled and bent parts are developed on the mean line, halfway through the metal or at the neutral axis for sharper bends. For a pipe specified by its outside diameter, the mean diameter is the outside less one thickness; by its inside diameter, the inside plus one thickness.
For thin duct gauges the correction is small but not zero, and it grows with every layer a seam adds. A grooved seam on round pipe, for example, has four thicknesses of metal at the lock, and the fitting's actual diameter at the seam is slightly larger than elsewhere. Shops allow for this in their machine charts rather than in theory, which is why every machine in Keelson's shop had a laminated card beside it giving the allowances for each gauge it was set up for.
Seam allowances: what they are for
A seam allowance is extra metal added to one or both edges of a pattern so that a seam can be formed. How much depends on the seam, the gauge and the machine. Some seams take the same allowance on both edges, like a grooved seam, where each edge is folded into a hook and the hooks are locked together. Some take different allowances on the two edges, like a Pittsburgh lock, where one edge is formed into a deep pocket and the other into a short flange that slides into it. And some take none at all, like a butt weld, where the edges simply meet.
Allowances are added outside the net pattern, as lines parallel to the net edge. On a straight edge, the allowance line is simply a parallel line. On a curved edge, such as the cut edge of a pipe or a gore, the allowance line is offset from the curve by the same distance everywhere, measured square to the curve. That is not the same as adding the allowance to each ordinate, because on the steep parts of the curve a vertical addition gives a band that is too narrow. Pattern makers draw the offset curve with dividers swung from points along the net curve, or the software does it automatically.
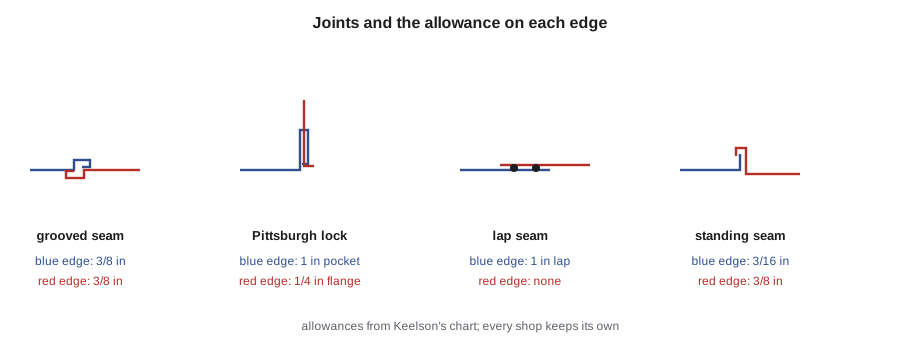
The shop's allowance chart
Allowances are not universal. They depend on the machine that forms the seam, its roll set and the gauge, and every shop keeps its own chart from the machine makers' settings and its own test pieces. Keelson's chart for the gauges used in this course is below. It is typical, not a standard, and an apprentice in another shop should use that shop's chart.
| Joint | Edge A | Edge B | Used for |
|---|---|---|---|
| Grooved seam, 1/4 in wide | 3/8 in | 3/8 in | Longitudinal seam of round pipe and gores |
| Snap lock, round branch duct | 5/8 in (male) | 1/4 in (female) | Longitudinal seam of light round duct |
| Pittsburgh lock | 1 in (pocket) | 1/4 in (flange) | Corner seams of rectangular duct and elbows |
| Standing seam on elbow machine | 3/16 in | 3/8 in | Joints between pieces of gore elbows |
| Lap seam, riveted or soldered | 1 in | none | Architectural laps, copings, flashings |
| Butt weld | none | none | Grease duct, stainless, heavy gauge |
The snap lock line is the one SMW-110 used for the Ashgrove branch duct blank: 5/8 plus 1/4 makes the 7/8 in total seam allowance added to the 31.33 in stretchout.
Where an edge needs no allowance in the chart, the net edge is the cut edge. Where a seam takes different allowances on its two edges, the pattern maker marks on the pattern which edge is which, because two identical-looking halves of a duct with their pocket and flange swapped will not go together.
Where allowances go on the patterns of this course
On a cut pipe or a gore, the longitudinal seam allowance goes on both ends of the stretchout, at the seam line, on the full height of the pattern. The allowance at the curved miter edge depends on how the miter is joined: none for a welded joint, the elbow machine's standing seam allowances for a gore elbow, or a lap for a soldered or riveted downspout. At a square end, the allowance depends on how the pipe connects to the next one: a crimped end needs no extra length, because the crimp is formed into the pipe; a slip joint needs the length of the overlap; a beaded collar needs the bead and its lead.
For gore elbows nested on one blank, as in Lesson 7, the standing seam allowances complicate the nesting. Each miter cut is shared by two pieces, but one piece needs the smaller allowance on that edge and its neighbor the larger. The usual solution is to cut the shared curve along a line offset from the net miter by the smaller allowance on one side, then the larger on the other, which means the blank must be taller by the sum of the two allowances at every miter. For a four-piece elbow, the arithmetic is in the script below.
On a rectangular elbow, the cheeks carry one half of each corner seam and the throat and heel strips the other, as Lesson 8 described, and the allowance on the curved cheek edges is drawn by swinging the arcs at the allowance distance from the net arcs. On tees, the branch's cut edge carries whatever joint fixes it to the main, often a set of tabs or a flange that is turned out and screwed or riveted, and the hole in the main is cut net or slightly undersize so the flange has something to bear on.
The script takes a net pattern size and the joint types and works out the cut blank, including the extra height for nested gore pieces with standing seams.
# From net pattern to cut blank: seam allowances for a pipe piece and a nested gore elbow
import math
d_out, t = 10, 0.0276
seam = (3/8, 3/8)        # in, grooved seam                     # longitudinal seam: (edge A, edge B)
standing = (3/16, 3/8)       # in                # elbow machine standing seam: (small, large)
net_height = 28.11            # in               # nested net height of a four-piece elbow (from Lesson 7)
miters = 3                        # a four-piece elbow has three joints between pieces
stretch = math.pi * (d_out - t)
width = stretch + seam[0] + seam[1]
height = net_height + miters * (standing[0] + standing[1])
print(f"net stretchout {stretch:.3f} in + seam {seam[0] + seam[1]} in = blank width {width:.3f} in")
print(f"net nested height {net_height} in + {miters} x {standing[0] + standing[1]} in = blank height {height:.3f} in")net stretchout 31.329 in + seam 0.75 in = blank width 32.079 in net nested height 28.11 in + 3 x 0.5625 in = blank height 29.797 in
A four-piece elbow has six gores but only three joints between pieces, because the two gores inside a middle piece are one continuous piece of metal. Each of the three joints needs both standing-seam allowances, one on each side of the cut. The two square ends get the collar's connection allowance, which in this example is already included in the collars.
Notching
Where two allowances meet at a corner, the metal piles up. A seam allowance on the end of a stretchout runs into the allowance on the curved miter edge; the pocket of a Pittsburgh lock runs into the flange at the end of a duct section. If nothing is cut away, the corner has too many layers to form and close, and either the lock will not seat or the corner bulges and leaks. So the corners of allowances are notched: small pieces are cut out of the corners of the blank before forming.
The notch shape depends on the seams. For a grooved longitudinal seam meeting a standing-seam edge on a gore, Keelson's practice was a square notch the size of the smaller allowance on each corner of the seam edge. For a Pittsburgh lock on a duct section with a slip-and-drive end, the end of the pocket is notched at 45 degrees so the drive cleat can pass. For copper copings with soldered laps, the lap at each miter is notched so the solder joint is a single overlap, not a triple fold. The shop's notching templates are kept with the allowance chart, and SMW-130 shows each one formed.
Notches are laid out on the pattern, not improvised at the bench, because a notch cut in the wrong place cannot be put back. Kai's first gore elbow with allowances had its seam notches on the wrong end of every piece, because he had flipped the pieces when nesting without flipping the notches. That cost him one blank, and from then on he drew the notches on the hard pattern itself.
Checking allowances before cutting
Three checks catch most allowance errors. First, the net pattern is still visible on the blank, as a separate line inside the allowance lines, so anyone can check that the allowances were added outside it. Second, for every seam the two edges are marked with what they will become, pocket or flange, male or female, so the two halves match. Third, the blank's overall size is checked against the chart before it goes to the shear: net size plus the sum of the allowances. That last check takes ten seconds with a calculator and catches the most expensive mistake of all, a blank cut short.
Allowances for heavier gauges and other metals
Allowances grow with thickness. A grooved seam in 18-gauge steel needs more metal in each hook than one in 26-gauge, partly because the folds have larger radii and partly because each layer adds its thickness to the lock. Machine charts list each gauge separately for that reason, and many machines will not form heavy gauges at all. Stainless steel springs back more than galvanized steel and may need a slightly larger allowance to lock fully. Copper is soft and forms tightly, so its laps for soldering are usually generous, 1 in or more, to give the solder a good surface to flow into, while its locks may need slightly less.
When a fitting is made in a metal the chart does not cover, the shop makes a short test seam in that material and gauge before cutting the real blanks, measures what the seam used, and writes the result on the chart. Aggie's chart had three handwritten lines at the bottom, for zinc, for 16-ounce copper and for a heavy stainless that a previous job had needed.
Allowances and the finished size
Some seams change the finished size of a fitting, and the net pattern must allow for it. A grooved seam on round pipe sits proud of the surface, so a pipe that must slip into another is sometimes made with the seam pressed flat or inside. A Pittsburgh lock on a rectangular duct adds thickness at the corners, which matters only when duct must fit tightly inside a sleeve or a frame. In each case the shop's chart has a note, and the pattern maker reads the notes as well as the numbers.
Common mistakes
MistakeAdding the allowance to each ordinate of a curved edge.
InsteadOffset the curve by the allowance measured square to it.
MistakeGiving both edges of a Pittsburgh lock the same allowance.
InsteadThe pocket and flange edges take different allowances; mark which is which.
MistakeCounting six joints on a four-piece gore elbow.
InsteadOnly the three joints between pieces need standing-seam allowances.
MistakeLeaving allowance corners unnotched.
InsteadNotch where allowances meet so the seam can form and close.
MistakeUsing another shop's allowance chart.
InsteadAllowances depend on the machine and gauge; use the chart for your machines.
Summary and key terms
- Patterns are developed net on the mean line, then allowances are added outside them.
- Each seam takes its own allowance on each edge; some are equal, some are not, some are zero.
- Allowances on curved edges are offset square to the curve.
- Every shop keeps its own allowance chart for its machines and gauges.
- Nested gore elbows need both standing-seam allowances at every joint between pieces.
- Notch where allowances meet, lay notches out on the pattern, and check the blank size before cutting.
- Allowance
- Extra metal added to a net pattern for a seam, lock or joint.
- Grooved seam
- A seam made by hooking two folded edges together and locking them flat.
- Pittsburgh lock
- A corner seam with a pocket on one edge and a flange on the other.
- Snap lock
- A longitudinal seam for light round duct that snaps together without hammering.
- Standing seam
- A raised seam joining the pieces of a round elbow, formed on an elbow machine.
- Notch
- A piece cut from the corner of a blank so seams can form without piling up.
Lesson quiz · 5 questions
Score 60% or more to complete this lesson.
Create a free account to save your progress, take quizzes and earn a certificate.