
SMW-110 · Lesson 9 of 12 · 18 min
Brakes and bending
After cutting, the next thing almost every piece of sheet metal needs is a bend. A flat blank becomes a duct section with four bends, a flashing with three, a pan with eight. Bending looks simple and is not. A bend has a radius, uses up some of the sheet, springs back a little when it is released, and has to be done in the right order or the next bend becomes impossible. Kai's fourth week was spent mostly at the brakes, starting with a set of drip edges for the St. Brendan's Church roof that Aggie wanted made from scrap copper first, so that his mistakes would cost nothing. This lesson covers the machines that bend sheet metal and the arithmetic of bending.
Bending terms
A bend turns one flat section of sheet, a leg or flange, at an angle to another along a bend line. The inside of the bend has a radius, called the inside bend radius, which depends on the tool and the material; it is never truly zero. The metal on the outside of the bend stretches and the metal on the inside compresses. Somewhere in between is a layer that neither stretches nor compresses, called the neutral axis. In sheet metal bending it lies a little inside the middle of the thickness, at a fraction of the thickness from the inside surface called the K-factor, typically about 0.33 to 0.45 for air bending of sheet.
Because the neutral axis keeps its length, the flat length needed to make a bend is the length of the neutral axis through the bend, called the bend allowance. A drawing dimensions the outside of each leg, but the flat blank must be laid out so that the legs plus the bend allowances come out to those dimensions after bending. For thin duct metal bent on a sharp brake, the difference is small, a fraction of a millimeter per bend; for heavier material, larger radii and parts with many bends, it adds up and must be calculated.
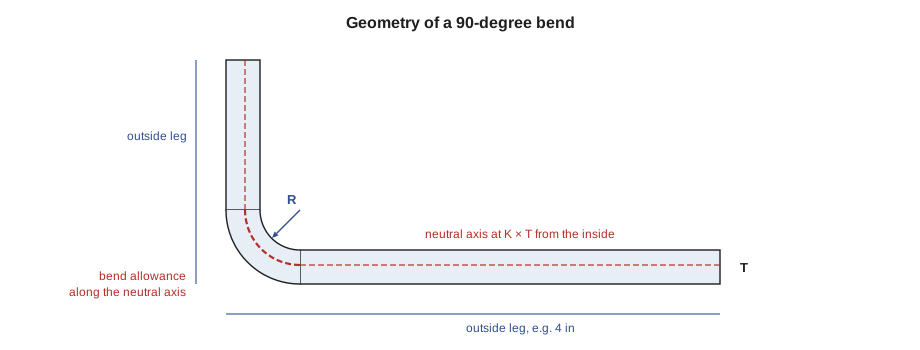
The bend allowance for a bend of angle A in degrees, inside radius R, thickness T and K-factor K is the arc length of the neutral axis.
The outside setback is the distance from the outside corner, where the two outside faces would meet if the bend were sharp, to the point where the bend begins. For a 90-degree bend it is the inside radius plus the thickness. The flat length of a part is the sum of its outside leg dimensions, minus two setbacks for each bend, plus one bend allowance for each bend. The difference between two setbacks and the bend allowance is called the bend deduction, and many shops keep tables of it for their common materials and tools.
Springback
When the bending force is released, the metal springs back slightly toward flat, because the inner part of the bend was only elastically strained. Mild steel springs back a degree or two on a typical sheet metal bend; stainless steel, which is stronger, springs back more; and soft aluminum less. The fix is to overbend: bend a little past the angle wanted, so that the part settles at the right angle. Experienced brake operators know roughly how far to overbend each material, and they check the first piece with a protractor or square before running the rest. Kai's first copper drip edge settled at 87 degrees instead of 90, and Aggie showed him how to push the leaf a fraction further.
Minimum bend radius
Every material has a smallest radius it can be bent to without cracking on the outside of the bend. Mild steel and soft aluminum can be bent nearly flat on themselves, which is how hems are made. Hard tempers of aluminum, some stainless grades and thick material need a larger radius. Pre-painted steel and coated metals have a coating that can crack or craze if the radius is too tight, so the coil maker publishes a minimum bend radius or a T-bend rating for the paint system. The grain of rolled sheet also matters: bends made across the rolling direction crack less than bends along it. On visible architectural work, the tool radius is chosen to suit the material and the look wanted.
The cornice brake and bar folder
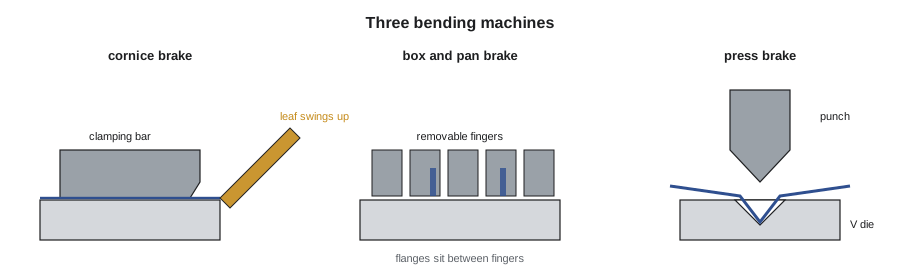
The cornice brake, or leaf brake, is the most common bending machine in a sheet metal shop. The sheet lies on the bed, and a clamping bar, the upper jaw, is brought down onto it along the bend line. The bending leaf, hinged at the front edge of the bed, is then swung up, folding the part of the sheet that sticks out beyond the clamp. Hand brakes are worked by levers and counterweights; power brakes use a motor or hydraulics to swing the leaf. The nose of the clamping bar sets the inside radius, and changing the nose bar changes the radius. The clamping bar is set back from the edge of the leaf by about the thickness of the sheet so the bend forms cleanly.
A bar folder is a smaller machine for folding narrow edges along the length of a sheet, quickly and repeatably: hems, safe edges and the folds for locks and seams. An adjustable depth gauge sets the width of the fold and a wedge adjusts for sharp or rounded folds. Many duct shops use it constantly for the edges of fittings.
The box and pan brake
A box and pan brake, also called a finger brake, works like a cornice brake, but its clamping bar is made of separate fingers of different widths that can be removed and rearranged. That lets an operator make the last bends of a box or pan between flanges that have already been bent up: the fingers are set to just less than the space between the existing flanges, which then sit in the gaps between fingers as the leaf comes up. Box and pan brakes make plenums, access door pans, equipment curbs, drain pans and the many tray-shaped parts of duct work.
Bending order matters on a pan. If the long sides are bent first and their flanges go up, the short sides still have room to bend between them on a finger brake. If the bends are done in the wrong order, a flange can hit the clamping bar or a finished leg can crash into the leaf. Before bending anything with more than two bends, a good operator plans the sequence and checks that every bend has room, sometimes by folding a paper model. Lesson 12's plenum is an exercise in exactly that.
The press brake
A press brake bends sheet by pressing it with a long punch into a die, usually a V-shaped groove. In air bending, the most common method, the punch pushes the sheet into the V without forcing it to the bottom, and the depth of the stroke sets the angle; in bottoming and coining, the sheet is pressed fully into the die to set the angle more precisely, which takes much more force. The width of the V opening is chosen to suit the thickness, often about six to eight times the thickness for mild steel, and the inside radius in air bending is roughly a fraction of the V opening, not the punch nose. Press brakes are rated in tons of force per foot of bend, and modern machines are computer-controlled with back gauges that position each bend automatically.
In a sheet metal shop the press brake makes heavier parts, long straight bends in roofing and cladding panels, and repeat parts where accuracy matters, such as the Brine & Ember hood panels. Its point of operation is the closing gap between punch and die along the whole length of the machine, so it is guarded by light curtains or laser guards that stop the ram if anything breaks the beam, by two-hand controls, or by both. Operators also watch for the sheet whipping up as it bends, which can strike the face or catch a hand between the sheet and the ram.
Calculating a developed length
Aggie's drip edge was simple enough to make by eye, but the St. Brendan's Church job also needed a long run of copper gutter-edge flashing with three bends, and she wanted Kai to calculate the blank before cutting copper that cost more than his week's pay. The script works out the bend allowance for each bend and the developed length of the blank from the outside dimensions on the drawing.
# Developed (flat) length of a bent part from outside dimensions
import math
T = 0.0216        # in (16 oz copper)           # sheet thickness
R = 0.0400        # in           # inside bend radius set by the brake nose
K = 0.44          # K-factor for this material and tooling (shop table)
legs = [2.0, 4.0, 1.0, 0.5]   # in     # outside dimensions of each leg, in order
angles = [90, 90, 135]    # bend angles in degrees between the legs
flat = sum(legs)
for a in angles:
    ba = math.pi / 180 * a * (R + K * T)
    setback = math.tan(math.radians(a) / 2) * (R + T)   # outside setback
    flat += ba - 2 * setback
    print(f"{a} degree bend: allowance {ba:.3f}, outside setback {setback:.3f}, deduction {2 * setback - ba:.3f} in")
print(f"sum of outside legs {sum(legs):.3f} in, developed length {flat:.3f} in")90 degree bend: allowance 0.078, outside setback 0.062, deduction 0.045 in 90 degree bend: allowance 0.078, outside setback 0.062, deduction 0.045 in 135 degree bend: allowance 0.117, outside setback 0.149, deduction 0.181 in sum of outside legs 7.500 in, developed length 7.228 in
Each 90-degree bend took up about 0.045 in less than the sum of its outside legs suggested, and the 135-degree bend for the drip edge took about 0.18 in. The blank came out about 0.27 in shorter than the 7.5 in sum of the outside legs, and Kai laid it out at that length. On 16 oz copper the difference was small; on the 18-gauge stainless hood panels later in the year it would matter a great deal more.
Hems and safe edges
Many sheet metal parts finish with a hem, an edge folded back on itself. A closed hem is folded flat; an open hem leaves a small gap; a teardrop hem leaves a rounded loop. Hems stiffen the edge, remove the sharp cut edge from where people will touch it, and give a clean appearance. A safe edge on a flashing or cover is a hem made for exactly that reason. Hems are made in two steps: bend the edge to an acute angle on the brake or bar folder, then flatten it with the clamping bar, a hemming die or a hand seamer. On pre-painted metal, an open or teardrop hem protects the paint from cracking.
Safe brake operation
Brakes have three main hazards. The first is the pinch point between the clamping bar and the bed, and between the leaf and the clamping bar as the leaf rises, which can crush fingers placed on the sheet near the bend line. The second is the swing of the leaf and its counterweights, which can strike anyone standing in their path. The third, on press brakes, is the closing gap between punch and die. The controls are to keep fingers away from the bend line and the clamp, keep the area around the leaf and counterweights clear, use the guards, light curtains and two-hand controls provided, and lock the clamping bar or ram in position and lock out the machine before changing nose bars, fingers or dies.
Two people often handle long sheets on a brake. One person controls the machine and calls each action out loud: clamp, bend, release. The other supports the sheet and keeps hands at its far edges.
Common mistakes
MistakeLaying out a multi-bend part by adding the outside dimensions.
InsteadSubtract the bend deductions; the flat length is shorter than the sum of the outside legs.
MistakeBending to exactly 90 degrees and expecting the part to stay there.
InsteadOverbend to allow for springback, and check the first piece.
MistakeBending the sides of a pan in an order that leaves no room for the last bend.
InsteadPlan the sequence before bending, and use a finger brake for the last bends.
MistakeBending pre-painted metal to a sharper radius than its rating.
InsteadUse the coil maker's minimum radius or an open hem to avoid cracking the paint.
MistakeHolding the sheet near the bend line while the clamp comes down.
InsteadKeep fingers away from the clamp and bend line; support the sheet at its edges.
Summary and key terms
- Bends have an inside radius and a neutral axis, located by the K-factor, that keeps its length.
- Bend allowance is (π/180) × A × (R + K × T); the developed length is the outside legs minus the bend deductions.
- Materials spring back after bending, stainless most; overbend and check the first piece.
- Each material and coating has a minimum bend radius; bends across the grain crack less.
- Cornice brakes, bar folders, box and pan brakes and press brakes each have their own uses.
- Plan the bending order, and guard against pinch points, the swinging leaf and the press brake's closing gap.
- Bend allowance
- The length of the neutral axis through a bend, used to develop flat patterns.
- K-factor
- The location of the neutral axis as a fraction of thickness from the inside of the bend.
- Springback
- The partial return of a bent part toward flat when the force is released.
- Box and pan brake
- A brake with removable fingers on its clamping bar, used to bend between existing flanges.
- Press brake
- A machine that bends sheet by pressing it with a punch into a die.
- Hem
- An edge folded back on itself to stiffen it and remove the sharp edge.
Practice problems
Work each problem on paper first, then reveal the answer to check.
Find the bend allowance for a 90° bend with R = 0.040 in, T = 0.040 in and K = 0.44.
Show answer
(π/180) × 90 × (0.040 + 0.0176) ≈ 0.090 in.
What is the outside setback of a 90° bend with R = 0.040 in and T = 0.040 in?
Show answer
R + T = 0.080 in.
Why are the last two sides of a pan bent on a box and pan brake?
Show answer
Its fingers can be arranged to fit between flanges already bent.
What V die opening is typical for 1/16 in mild steel?
Show answer
About 6 to 8 times the thickness, roughly 3/8 to 1/2 in.
Lesson quiz · 5 questions
Score 60% or more to complete this lesson.
Create a free account to save your progress, take quizzes and earn a certificate.