
SMW-110 · Lesson 5 of 12 · 20 min
Measuring and layout tools
Every piece of sheet metal starts as marks on a flat sheet. If the marks are wrong, nothing that follows can make the piece right: the shear cuts where it is told, the brake bends where the line is, and the fitting arrives on site the wrong size. Aggie put it plainly on Kai's first layout day. "The machines are accurate. You are the part that isn't, yet." This lesson covers the tools used to measure and mark sheet metal and the basic layout operations that every pattern in the trade depends on. The geometry of patterns themselves begins in SMW-120.
Rules, tapes and units
US shops work almost entirely in feet, inches and fractions of an inch, usually down to sixteenths and for fine work to thirty-seconds. Some equipment, imported material and a few specifications use millimeters, so a sheet metal worker should be able to read a metric rule. Keelson's shop works in inches for duct and architectural work, and Walt keeps a conversion chart above the layout bench for the jobs that arrive in metric.
The steel rule is the basic measuring tool for layout. A good rule has crisp, etched graduations, a square end and no bends or nicks. Rules from 12 in to 36 in long cover most bench work. A tape measure handles longer distances; its hook moves slightly so that it reads correctly whether it is pushed against a surface or hooked over an edge, so a bent or loose hook makes every reading wrong. Folding and extension rules are useful for inside measurements in the field. For long, accurate layout lines on a full sheet, the shop uses a long straightedge and a 10 ft steel tape checked against the rule.
Reading a fractional rule takes practice. An inch is divided into halves, quarters, eighths and sixteenths by graduations of decreasing length, and some rules continue to thirty-seconds on one edge. The common mistakes are counting the wrong number of small graduations and misreading 3/8 as 5/8 by starting from the wrong inch mark. Kai's first error was a 1/2 in one: he started his measurement from the half-inch mark of a damaged rule end and forgot to subtract it.
Two habits prevent most measuring errors. First, measure from a clean reference edge, and mark which edge is the reference so that every later measurement starts from the same place. Second, measure twice, and if the two readings differ, measure a third time before cutting. The old saying is old because it saves material.
Squares, protractors and bevels
A square checks and marks right angles. The combination square has a sliding head on a steel rule and can mark a right angle or a 45-degree angle from an edge, measure depth, and act as a marking gauge for lines parallel to an edge. The steel framing square, with its long body and shorter tongue, lays out large right angles on a full sheet. A try square is a small fixed square for checking bends and edges. A protractor or a sliding T-bevel marks and transfers other angles. All of them are only as good as their own accuracy, so a shop checks its squares by marking a line, flipping the square and marking again: if the two lines do not coincide, the square is out.
Sheared edges of a sheet are usually close to square, but not always, and the sheet may be slightly out from the mill. That is why layout starts by establishing one true straight reference edge and one true line at right angles to it, rather than trusting the corners of the sheet.
Scribers, punches and markers
Lines on sheet metal are drawn with a scriber, a hardened steel point that scratches a thin, precise line. A scribed line is the most accurate mark there is and cannot be wiped off by handling, which is why layout for cutting is scribed. But a scratch through a coating is also damage: on galvanized steel it removes zinc along the line, and on pre-painted, stainless or copper work it leaves a permanent mark on a surface someone will see. So the rule is to scribe only lines that will be cut away or hidden inside a seam, and to mark visible surfaces and bend lines on finished faces with a fine marker or a soft pencil instead. Lead pencils are not used on aluminum or galvanized steel that will be exposed outdoors, because graphite next to those metals can promote corrosion; a fine-point marker is used instead.
A prick punch makes a small, sharp dimple to mark a point precisely, such as the center of a circle or the end of a line. A center punch makes a larger, blunter dimple that guides a drill bit and stops it wandering. Dividers, with two sharp points on hinged legs, step off equal distances and scribe circles and arcs. Trammel points clamp to a bar or rule and scribe arcs too large for dividers, and they are essential for the radial-line patterns of SMW-210. A chalk line snaps long straight lines on large sheets or on site.
Laying out a rectangle that is square
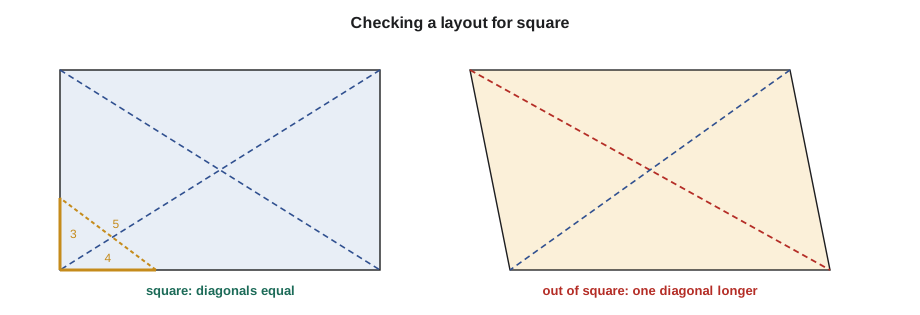
Most of what Kai would lay out in his first year was rectangles: blanks for duct sections, plenum panels, flashings, access doors. A rectangle is square only if its corners are right angles, and the most reliable way to check that on a large piece is to measure its diagonals. In a true rectangle, the two diagonals are equal. If one diagonal is longer than the other, the rectangle is a parallelogram, and the corners at the ends of the longer diagonal are greater than 90 degrees.
For a single right angle, the 3-4-5 rule works at any scale. Mark 3 units along one line and 4 units along the other; if the corner is square, the distance between the marks is exactly 5 units. On a full sheet, Aggie used 3, 4 and 5 ft because the larger the triangle, the more accurately it shows an error.
The script checks a layout by its diagonals and estimates how far one side has to move to square it up. For small errors, the corner angle is off by approximately the difference in the diagonals divided by twice the length of the sides that form it, which Kai would come to judge by eye.
# Check a rectangular layout for square from its two diagonal measurements
import math
width, length = 48, 96                   # in
d1, d2 = 107.47, 107.28                       # measured diagonals
true_d = math.hypot(width, length)
print(f"a true rectangle has diagonals of {true_d:.2f} in")
print(f"measured: {d1} and {d2}; difference {abs(d1 - d2):.2f} in")
# For a small skew, moving one end of the long side sideways by s changes the diagonals by about +/- s*length/true_d
s = abs(d1 - d2) / 2 * true_d / length
print(f"one end of the long side is about {s:.2f} in out of square")
tolerance = 1 / 16    # in, allowed difference on a full sheet
print("within tolerance" if abs(d1 - d2) <= tolerance else "re-mark the corner before cutting")a true rectangle has diagonals of 107.33 in measured: 107.47 and 107.28; difference 0.19 in one end of the long side is about 0.11 in out of square re-mark the corner before cutting
The diagonals of Kai's layout differed by about 3/16 in, which put one end of the long side about 0.1 in out. That was small, but it would have made a duct section that did not close properly, so he re-marked the corner from his reference line and checked again.
Circles and stretchouts
Round duct, collars, end caps and cylinders start from a flat rectangle whose length is the circumference of the finished circle, called the stretchout. The circumference is pi times the diameter. A sheet metal worker adds the allowances for the seam, which SMW-120 and SMW-130 cover in detail, but even at this stage it is worth knowing that a mistake of 1/32 in on the diameter changes the stretchout by more than three times as much.
There is one more subtlety. When a sheet is rolled into a cylinder, the outside surface stretches and the inside surface compresses. The length that stays the same is near the middle of the thickness, so the stretchout for an accurate fit is calculated on the mean diameter, the inside diameter plus one thickness. For thin duct the difference is small, but for heavier material it matters, and the same idea returns in Lesson 9 for bends.
Worked problem
Stretchout for a round collar
Kai needs a collar to fit inside a 10 in round duct, so its outside diameter must be 10 in. It is made from 24-gauge galvanized steel, 0.0276 in thick. What is the stretchout before seam allowances?
Show solution
- \[D_{\text{mean}} = 10 - 0.0276 = 9.972\ \text{in}\]
- \[L = \pi \times 9.972 = 31.33\ \text{in}\]
Answer: About 31 5/16 in, before seam allowances.
Basic geometric constructions with a rule, square, dividers and scriber let a worker lay out a perpendicular from any point on a line, bisect a line or an angle, divide a line into equal parts and find the center of a circle. They are the building blocks of every pattern method, and SMW-120 begins with them.
Caring for layout tools
Layout tools lose accuracy quietly. Rules and squares are kept in a drawer or a rack, not loose in a toolbox where they are bent and nicked. Scriber and divider points are kept sharp and covered when not in use, both to protect them and to protect the person who reaches into the bag. Tapes are kept dry and their hooks checked. Squares are checked against each other every so often by the flip test. Aggie checked her own framing square against the shop's master square on the first day of every month, and wrote the date on a piece of tape on its heel.
Kai's first layout job was the twelve duct blanks for Ashgrove. Aggie checked each one with the diagonal test before it went to the shear. Two needed re-marking. By the end of the week, none did.
Measuring in the field
Field measuring has its own problems. The building is rarely as square, level or plumb as the drawings suggest, and a fitting made to the drawing dimensions may not fit the opening that was actually built. Before Keelson fabricated the transition pieces for the Ashgrove retrofit, Sean sent Kai with a journeyworker to measure every existing opening and every connection to the new rooftop units. They measured each opening in at least two places, because a masonry opening that is 3/8 in narrower at the bottom than the top will not take a fitting built to the top dimension. They recorded which face of each measurement was the reference, sketched every opening with its dimensions, and photographed it with a tape in the picture.
Some field work is easier to measure with a template than with a rule. For an awkward roof penetration at the church, Aggie had Kai cut a template from cardboard on site, trim it until it fitted the real shape, and mark the reference edges on it. Back in the shop, the template was laid on the copper and traced. Templates are slower than numbers, but they capture the shape as built, including the parts nobody would have thought to measure.
A laser distance meter speeds up long measurements in the field and is accurate to a few millimeters over tens of meters, but it measures to whatever surface the dot lands on, so it is checked against a tape on any critical dimension. A laser level projects level and plumb lines across a room for laying out hanger locations, which SMW-310 covers.
Writing it down
Measurements that are not written down clearly get lost or misread. Keelson's rule is that every field measurement sheet shows the job, the location, the date, who measured, the units used and which way is up and which way is north on the sketch. Dimensions are written in one system only on any sheet, never mixed. A measurement that is uncertain is circled and marked for a second check. Kai learned the value of that rule in his second month, when a sheet without units came back from site and nobody could tell whether a 14 was inches or centimeters.
Common mistakes
MistakeTrusting the factory corner of a sheet as square.
InsteadEstablish a straight reference edge and a true perpendicular, then check with diagonals.
MistakeScribing bend lines on pre-painted, stainless or copper surfaces that will be seen.
InsteadScribe only lines that will be cut away or hidden; mark visible faces with a fine marker.
MistakeMeasuring from a damaged rule end without allowing for it.
InsteadMeasure from a clean graduation and subtract it, or replace the rule.
MistakeCalculating a stretchout from the outside diameter of heavy material.
InsteadUse the mean diameter, the inside diameter plus one thickness.
MistakeUsing pencil on aluminum or galvanized steel that will be outdoors.
InsteadUse a fine marker; graphite can promote corrosion.
Summary and key terms
- Layout starts with a straight reference edge and a true perpendicular, not the corners of the sheet.
- Rules, tapes, squares, protractors, scribers, punches, dividers and trammels are the core layout tools.
- Scribe lines that will be cut away or hidden; mark visible surfaces with a marker.
- Equal diagonals show that a rectangle is square; the 3-4-5 triangle checks a single corner.
- Stretchout is pi times the mean diameter, before seam allowances.
- Check and care for layout tools regularly; they lose accuracy without showing it.
- Reference edge
- The edge from which all measurements on a layout are taken.
- Scriber
- A hardened steel point used to scratch precise lines on metal.
- Prick punch
- A sharp punch used to mark a precise point.
- Trammel points
- A pair of points clamped to a bar or rule, used to scribe large arcs.
- Stretchout
- The flat length of a pattern that forms the perimeter of the finished part.
- Mean diameter
- The diameter at the middle of the metal thickness, used for accurate stretchouts.
Practice problems
Work each problem on paper first, then reveal the answer to check.
A 36 by 72 in layout has diagonals of 80.56 and 80.44 in. Is it square?
Show answer
No; a true rectangle has equal diagonals of about 80.50 in. Re-mark before cutting.
What distance between the 3 ft and 4 ft marks shows a square corner?
Show answer
5 ft.
What is the stretchout of a cylinder with a mean diameter of 12 in?
Show answer
π × 12 ≈ 37.70 in, before allowances.
Why is a center punch used before drilling?
Show answer
Its dimple guides the drill bit and stops it wandering.
Lesson quiz · 5 questions
Score 60% or more to complete this lesson.
Create a free account to save your progress, take quizzes and earn a certificate.