
PHOT-202 · Lesson 5 of 12 · 25 min
Detail: lens corrections, sharpening and noise
Detail adjustments determine how crisp, clean and accurate a photograph looks at its final size. They include correcting the optical flaws of the lens, straightening and correcting perspective, sharpening to restore the softness introduced by the sensor and demosaicing, and reducing noise from high ISO or shadow lifting. Done well, these adjustments are invisible: the image simply looks sharp and clean. Done badly, they create halos, artificial textures and plastic-looking surfaces. This lesson covers lens profile corrections, chromatic aberration, perspective and geometry, cropping, the stages of sharpening, sharpening controls and masking, noise reduction including AI denoising, and how to evaluate detail correctly.
Lens profile corrections
Every lens introduces some distortion, vignetting and chromatic aberration (PHOT-201). Raw processors include profiles for thousands of lenses, measured by the software maker or supplied by lens manufacturers, that correct these flaws automatically. Many modern mirrorless lenses are designed to rely on software correction and embed correction data in the raw file, which the raw processor applies automatically and sometimes cannot be turned off. Enabling profile corrections is usually the first step in processing. Amount sliders let you reduce the correction: for example, keeping some vignetting for mood, or reducing distortion correction when it stretches the corners of wide-angle images too much. Lenses without profiles, such as vintage or adapted lenses, can be corrected manually with distortion and vignetting sliders.
Chromatic aberration and fringing
Lateral chromatic aberration produces red-cyan or blue-yellow fringes along high-contrast edges toward the corners of the frame. It is usually corrected well by a single checkbox that realigns the color channels. Longitudinal chromatic aberration, common in fast lenses used wide open, produces purple or magenta fringes in front of the focus plane and green fringes behind it, and is often visible around backlit edges, such as branches against a bright sky or highlights on metal and jewelry. Defringe tools target purple and green hues near edges, with adjustable hue ranges and amounts. Use them carefully: aggressive defringing can remove color from genuinely purple or green objects, such as flowers or clothing. Local defringe brushes or masks limit the correction to affected areas.
Perspective and geometry
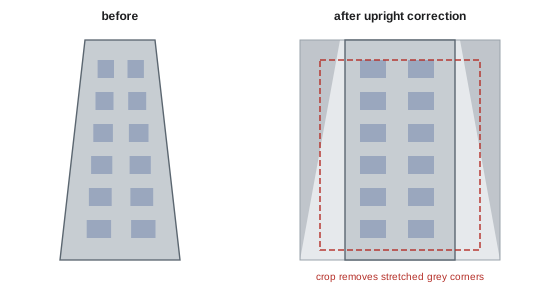
When a camera is tilted up to photograph a building, vertical lines converge, making the building appear to lean backward (keystone distortion). Raw processors offer geometry tools to correct this: automatic upright modes that detect lines and straighten them; guided modes in which you draw lines along verticals and horizontals that should be straight; and manual sliders for vertical, horizontal and rotation correction, aspect ratio and scale. Full correction of strong convergence can make buildings look top-heavy or stretched, because we expect some convergence when looking up; many architectural photographers correct most but not all of it, or adjust the aspect slider to restore proportions. Correction crops the image and stretches parts of it, reducing resolution in the corners, so shooting with a tilt-shift lens or leaving extra space around the subject helps (PHOT-311).
Cropping and straightening
Cropping removes distractions, strengthens composition and sets the aspect ratio for the output. Crop tools offer overlays such as the rule of thirds, the golden ratio and diagonal guides, and preset aspect ratios such as 2:3, 4:5, 1:1 and 16:9. Straighten horizons using the angle tool or by drawing along a line that should be level; tilted horizons are one of the most noticeable flaws in landscapes and seascapes. Remember that cropping reduces the pixels available for printing: a 24-megapixel image cropped to half its width and height retains only 6 megapixels, enough for a sharp print of about 20 × 13 cm at 300 pixels per inch, but not for a large print. Think about the final output before cropping heavily.
Three stages of sharpening
Digital images benefit from sharpening at three stages, each with a different purpose:
- Capture sharpening restores the softness introduced by the sensor, the optical low-pass filter, demosaicing and lens. It is applied globally in the raw processor, usually with modest settings, and aims for an image that looks naturally crisp at 100 % view.
- Creative or local sharpening emphasizes specific areas, such as eyes in a portrait or texture in a product, applied with brushes and masks or in Photoshop.
- Output sharpening compensates for the softening that occurs when images are resized for screens or printed on paper, where ink spreads. It depends on the output size, medium and viewing distance, and is applied at export (Lesson 11).
Separating these stages prevents oversharpening: capture sharpening should be gentle, because output sharpening will add more for the specific output.
Sharpening controls
Most raw processors use unsharp-mask-style sharpening with four main controls:
- Amount: the strength of the sharpening, how much edge contrast is increased.
- Radius: the width of the edge halo created; small radii (around 0.5 to 1 pixel) suit fine detail such as landscapes and products; larger radii (around 1 to 2 pixels) suit images with broader detail.
- Detail: how much sharpening is applied to fine textures versus edges; high values sharpen fine texture but also noise; low values limit sharpening to larger edges and reduce halos.
- Masking: restricts sharpening to edges, protecting smooth areas such as skin and sky; holding a modifier key while dragging shows the mask in black and white.
Portraits usually call for moderate amounts with high masking, to keep skin smooth while sharpening eyes, lashes and hair. Landscapes and architecture often suit small radii with higher detail. Oversharpening shows as bright halos along edges, crunchy textures and amplified noise. Some newer raw processors and plug-ins also offer deconvolution or AI-based sharpening that reverses specific blur more precisely than unsharp masking, with less haloing.
| Subject | Amount | Radius | Detail | Masking |
|---|---|---|---|---|
| Portrait | Moderate | About 1.0 | Low to moderate | High (protect skin) |
| Landscape | Moderate | About 0.7–1.0 | Moderate to high | Low to moderate |
| Architecture | Moderate to high | About 0.7 | High | Moderate |
| High-ISO image | Low | About 1.0 | Low | High (avoid sharpening noise) |
Noise and noise reduction
Noise appears as random variations in brightness (luminance noise) and color (color or chroma noise), most visible in shadows, smooth areas and high-ISO images. Raw processors offer two traditional controls: luminance noise reduction, which smooths brightness variations at the risk of losing fine detail and creating a plastic look; and color noise reduction, which removes colored speckles with little visible loss and is applied by default at a low level. Detail and contrast sliders control how much fine detail is preserved. As with sharpening, the right amount depends on the output: a high-ISO image viewed small on a phone needs much less noise reduction than one printed large.
AI-based noise reduction has transformed high-ISO processing. Tools such as Adobe Denoise, DxO DeepPRIME and others use neural networks trained on pairs of noisy and clean images to separate noise from detail during demosaicing, producing results that can look as clean as images shot two or three stops lower in ISO. They typically create a new DNG file with the denoising applied, and take longer to process. They work best on raw files and can occasionally invent texture or smooth fine detail such as hair and fabric, so results should be checked at 100 %. For wildlife, sports, events and astrophotography, AI denoising allows higher ISO settings and faster shutter speeds than were practical before.
Worked problem
Processing a high-ISO event photo
A wedding photographer shot reception images at ISO 12,800 on a full-frame camera. The faces show visible luminance and color noise in the shadows. What processing sequence would give the cleanest result?
Show solution
- Apply AI denoise to the raw file first, at a moderate strength, creating a new DNG.
- Check faces, hair and fabrics at 100 % for artifacts, and reduce strength if textures look artificial.
- Process tone and color on the denoised file, avoiding extreme shadow lifting.
- Apply modest capture sharpening with high masking, so that smooth skin and backgrounds are not sharpened.
- Add output sharpening at export for the album or web size.
Answer: AI denoise first on the raw file, check details, process tone and color, sharpen gently with masking, and add output sharpening at export.
Evaluating detail correctly
Judge sharpening and noise reduction at 100 % magnification, where one image pixel equals one screen pixel, because lower magnifications hide or exaggerate effects depending on the software's preview scaling. Also look at the image at its intended output size: a print viewed from a meter away or an image on a phone. Some photographers check at 50 % on high-resolution screens, which approximates how detail will appear in print. Compare before and after views frequently. Remember that slightly soft images often look more natural than oversharpened ones, and that some grain or noise can add texture and a film-like character; noise reduction to perfect smoothness is not always desirable.
Adding grain
Film grain effects add a fine, random texture. Grain can make digital images feel more organic, hide banding in smooth gradients, unify composites with different noise characteristics, and give black-and-white images a classic look. Grain controls typically include amount, size and roughness. Add grain after noise reduction and at a level that suits the output size, since grain that looks fine on screen may be invisible or excessive in print.
Removing dust spots
Dust on the sensor appears as dark, soft spots in the same position in every image, most visible in skies and plain backgrounds at small apertures. Raw processors offer spot removal tools with a visualize spots view, which displays the image as a high-contrast black-and-white map that makes dust spots obvious. Remove spots on one image, then sync the spot removal to other images from the same session, checking each, because the spot positions are the same but the backgrounds differ. Cleaning the sensor regularly (PHOT-201) reduces the work. Dust spots removed in the raw processor are stored as instructions and can be revised later.
Moiré and its removal
Moiré, colored or patterned interference that appears when fine repetitive patterns such as fabrics, screens or architectural details exceed the sensor's resolving power, is most common in cameras without optical low-pass filters. Raw processors include moiré reduction brushes that remove the false color, and Photoshop techniques such as blurring a color-only layer can reduce it further. Luminance moiré, patterns in brightness rather than color, is much harder to remove. Prevention, by changing distance, angle, aperture or focus slightly when shooting fabrics, is easier than cure.
Detail and resolution enhancement
Some raw processors offer detail enhancement features that re-demosaic raw files using machine learning, producing slightly finer detail and fewer artifacts, particularly in fine textures and with Fujifilm X-Trans files. Super resolution features double the linear resolution of images, creating files with four times as many pixels, useful for large prints or heavy crops. Both create new DNG files and should be used selectively on images that need them, since they increase file sizes considerably and processing takes time.
Detail for different outputs
The amount of detail processing an image needs depends on its destination. An image for a 1080-pixel social media post will be heavily downsized, hiding noise and softness, so heavy noise reduction and sharpening are unnecessary and may even look worse. An image for a large fine art print needs careful, measured sharpening, noise reduction and possibly upscaling, judged with test prints. Many photographers keep capture processing moderate and apply output-specific sharpening and noise reduction at export, using export presets for each common output, which keeps the master flexible for any future use.
Common mistakes
MistakeSkipping lens profile corrections.
InsteadEnable them early in processing.
MistakeFully correcting every converging vertical.
InsteadCorrect most convergence and check proportions.
MistakeHeavy capture sharpening.
InsteadSharpen gently and add output sharpening at export.
MistakeSharpening skin and noise.
InsteadUse masking to protect smooth areas.
MistakeJudging detail at fit-to-screen view.
InsteadEvaluate at 100 % and at output size.
Summary and key terms
- Lens profiles correct distortion, vignetting and chromatic aberration.
- Defringe tools target purple and green fringes from fast lenses.
- Geometry tools correct perspective but crop and stretch the image.
- Cropping reduces the pixels available for printing.
- Sharpen in three stages: capture, creative and output.
- Amount, radius, detail and masking control sharpening.
- AI denoising cleans high-ISO raw files dramatically; check results at 100 %.
- Lens profile
- Data used to correct a lens's optical flaws.
- Lateral chromatic aberration
- Color fringes toward the frame edges.
- Longitudinal chromatic aberration
- Purple and green fringes in front of and behind focus.
- Keystone distortion
- Converging lines from tilting the camera.
- Upright
- Automatic perspective correction.
- Capture sharpening
- Sharpening to restore capture softness.
- Output sharpening
- Sharpening for a specific output size and medium.
- Radius
- Width of the sharpening effect.
- Masking
- Limiting sharpening to edges.
- AI denoise
- Neural network noise reduction.
Practice problems
Work each problem on paper first, then reveal the answer to check.
What do lens profiles correct?
Show answer
Distortion, vignetting and chromatic aberration.
What colors does longitudinal CA produce?
Show answer
Purple in front of focus, green behind.
Why not fully correct every converging vertical?
Show answer
It can look top-heavy and stretched.
Pixels left after cropping a 24 MP image to half width and height?
Show answer
6 MP.
Name the three stages of sharpening.
Show answer
Capture, creative, output.
What does the masking slider do?
Show answer
Restricts sharpening to edges.
Typical radius for fine landscape detail?
Show answer
About 0.7–1.0 pixel.
What are the two kinds of noise?
Show answer
Luminance and color noise.
What does AI denoise usually create?
Show answer
A new DNG file.
At what magnification should sharpening be judged?
Show answer
100 %, plus output size.
Lesson quiz · 5 questions
Score 60% or more to complete this lesson.
Create a free account to save your progress, take quizzes and earn a certificate.