
PHOT-102 · Lesson 5 of 12 · 25 min
Reflectors, diffusers and flags
Natural and available light rarely falls exactly as a photograph needs. Shadows may be too deep, the light too hard, a background too bright, or an unwanted reflection may spoil a glossy surface. Before reaching for flash, photographers modify the existing light with three simple families of tools: reflectors, which add light by bouncing it into shadows; diffusers and scrims, which soften or reduce light passing through them; and flags, which block light from where it is not wanted. Film crews call this equipment grip, and the principles apply equally to flash and continuous lights later in the course. This lesson covers the materials and their effects, how to position reflectors and diffusers, subtractive lighting with flags and negative fill, the stands and clamps that hold everything, and how to work safely and efficiently on location.
Reflectors
A reflector is any surface used to redirect light onto the subject, most often to fill shadows created by the main light. Reflectors range from purpose-made collapsible discs to sheets of foam board, a white wall, a newspaper, or a car's sunshade. The most common professional tool is the five-in-one collapsible reflector: a translucent disc with a zippered cover that is white on one side and silver or gold on the other, and black and another surface on the reversed cover. Each surface behaves differently:
- White: reflects light diffusely, giving soft, natural fill with modest intensity. The safest choice for portraits.
- Silver: reflects light more directly and efficiently, giving brighter, crisper fill with a cooler tone and a more specular quality. Silver can be harsh when close and is often used further away or for backlit subjects needing strong fill.
- Gold: reflects warm light, adding a sunny glow to skin in cool light; it can easily look unnatural, so softer mixes such as gold and silver weave (often called sunfire or zebra) are popular.
- Black: reflects almost nothing, used as negative fill or a flag (see below).
- Translucent: the bare disc, used as a diffuser between the light and the subject.
The amount of fill a reflector gives depends on its surface, its size, its distance from the subject, and the angle at which light strikes it. A reflector catches light most efficiently when it faces the source squarely; a reflector turned edge-on to the sun catches almost nothing. To aim a reflector, hold it so that it faces halfway between the source and the subject, watch the patch of reflected light on the subject or the ground, and move it until the patch falls where it is needed. Like any light, a reflector's fill follows the inverse square law approximately: bringing it from 2 m to 1 m from the subject roughly doubles to quadruples the fill, and also makes it softer.
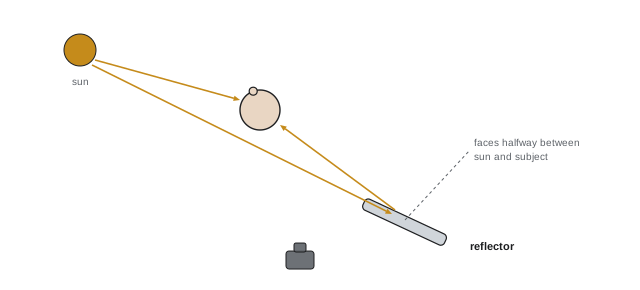
Positioning reflectors for portraits
Common reflector placements include:
- Opposite the key light, on the shadow side of the face, to reduce contrast. This is the most common use, with sunlight, window light or a studio key light.
- Below the face, angled up, in a clamshell arrangement: a soft key light above and in front, and a reflector below the chin bounces light into the eye sockets and under the chin, giving even, glamorous beauty lighting with two catchlights.
- In front of a backlit subject: with the sun behind the subject as a rim light, a reflector in front provides the main light on the face. Silver or sunfire is often needed here, because the reflector must provide most of the light on the face.
- As a hair or accent light: a small reflector, or a mirror, can redirect sunlight onto hair or a background.
Watch the eyes: a reflector held too low creates uplighting that looks unnatural; one held too close may make the subject squint. The reflector also creates its own catchlights, which should look natural, typically lower and weaker than the key light's.
Bounce surfaces indoors
Indoors, the walls, ceiling and floor are reflectors whether you want them or not. White and light-colored surfaces fill shadows and lower contrast, colored surfaces add their color, and dark surfaces absorb light. Large sheets of white foam board (often called bounce boards) or V-flats, two tall boards hinged to stand on their own, act as portable white walls; turned around, black V-flats serve as large flags. A ceiling or wall can be used deliberately as a giant reflector for a light or flash aimed at it, a technique called bounce lighting, explored with flash in Lesson 7.
Diffusers and scrims
A diffuser placed between a light source and the subject scatters the light, making the diffuser itself the new source. Its effects depend on size and material:
- It enlarges the apparent source to the size of the diffuser, softening shadows, as long as the diffuser is larger than the original source and close to the subject (Lesson 2).
- It reduces the quantity of light, typically by half a stop to two stops depending on density.
- It may change the color slightly; professional diffusion materials are designed to be neutral.
Outdoors, a large diffusion panel (scrim) held over or beside a subject in direct sun creates an island of soft light, transforming harsh midday sun into flattering portrait light over a small area. Because the diffuser reduces the light on the subject but not on the background, the background becomes relatively brighter by the same amount; with a one-stop diffuser, exposing for the subject brightens a sunlit background by a stop, sometimes causing it to clip. Choose a darker or shaded background, or accept a bright, airy look. Film and advertising shoots use large frames called butterflies or overheads, from 1.8 m (6 ft) to 6 m (20 ft) square or more, stretched with diffusion, nets (which reduce light without diffusing it) or solid black fabric.
Worked problem
Diffusing midday sun for a portrait
At midday, a portrait subject in direct sun meters f/16 at 1/125 s at ISO 100, and the sunlit grass background also meters f/16. The photographer places a one-stop diffusion panel close above and in front of the subject. What happens to the exposure and the background, and how can the result be balanced?
Show solution
- The diffuser reduces the light on the subject by one stop: the subject now meters f/11 at 1/125 s.
- Exposing for the subject at f/11 makes the background, still in full sun, one stop brighter than the subject.
- Options: accept a bright background; reposition so the background is in shade or darker; or add a reflector in front of the subject to raise the subject by half to one stop.
Answer: The subject receives soft, flattering light one stop dimmer than the sun; exposing for the face makes the sunlit background one stop brighter, which can look fresh and airy but may clip bright areas. Choosing a darker background or adding fill keeps the balance.
Flags and subtractive lighting
Sometimes the best way to improve light is to take some away. Flags are opaque panels, usually black fabric on a wire frame, used to block light from reaching part of the scene or the lens. They are used to:
- Shape the main light by cutting it off from a background, a wall or the edges of a set.
- Prevent lens flare by blocking light from shining directly into the lens.
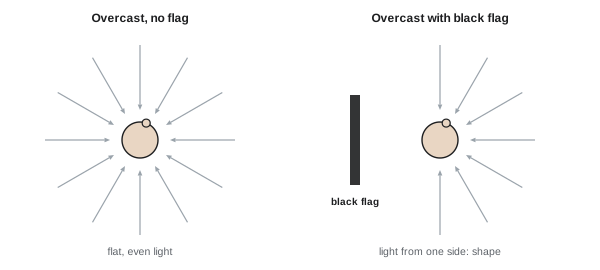
- Act as negative fill: a black surface on the shadow side absorbs ambient light that would otherwise fill the shadows, increasing contrast and modeling. Outdoors under an overcast sky, a black flag on one side of a face turns flat, shadowless light into directional light with shape, a technique called subtractive lighting.
- Block top light: a flag or black fabric overhead under an overcast sky reduces light from above, so that the remaining light comes from the side, filling the eye sockets and adding catchlights.
Related tools include cutters (long, narrow flags), gobos (any object that blocks light, sometimes with shaped cut-outs to project patterns), cookies (panels with random holes that cast dappled patterns), nets and scrims (mesh that reduces light by half or one stop without diffusing it), and snoots and barn doors on lights (Lesson 8).
Holding everything: stands, clamps and weights
Reflectors and diffusers need to be held, and an assistant is the most flexible stand: they can adjust angles instantly as the subject moves. Without one, photographers use light stands with reflector holders, C-stands (century stands) with grip arms and heads, which can hold flags and panels at any angle, and clamps of many kinds (spring clamps, super clamps, A-clamps) to attach equipment to stands, furniture and railings. Every stand carrying anything that can catch the wind needs weight on its base: sandbags or water bags placed on the leg, with the heaviest leg pointing toward the load. Large reflectors and diffusers act as sails; outdoors, even a light wind can topple a stand and throw a panel into a person or a lens. Overhead frames on location need a crew, guy lines and enough weight to hold them in gusts.
Working on location
A small location lighting kit for natural-light portraits might contain a 1 m five-in-one reflector, a 1.2 m by 1.8 m scrim or diffusion panel, a black flag or fabric, a light stand with a reflector holder, two sandbags, a few clamps, and a white balance target. With this kit and an understanding of the sun's position, one photographer and one assistant can produce consistent, controlled light almost anywhere. Habits that make location work efficient include:
- Survey the light first: find the direction and quality of the existing light and decide what to add or remove before unpacking.
- Start with the least intervention: often moving the subject a few meters solves more than any modifier.
- Add one thing at a time, checking each change in the viewfinder or on screen.
- Watch the edges of the frame: reflectors, flags and stands creep into the picture.
- Respect the wind, the public and the location: secure everything and keep walkways clear (Lesson 12).
Reflectors in the studio and for products
In the studio and on the tabletop, reflectors and flags shape light from flash and continuous sources as they shape daylight. White cards placed close to a product fill shadows and add soft highlights; small mirrors redirect light into dark corners or create bright accents; black cards define edges on glassware and deepen shadows; and diffusion panels between a light and a glossy product create smooth gradients in its reflections (Lesson 11). Many still-life photographers use a single light and a collection of cards and mirrors, rather than several lights, because reflectors fill without creating additional shadows or catchlights.
Common mistakes
MistakeHolding a reflector edge-on to the light.
InsteadFace it halfway between the source and the subject and watch the reflected patch.
MistakeUsing silver or gold close to a face in bright sun.
InsteadUse white close up, or move silver further away.
MistakeDiffusing the subject without considering the background.
InsteadExpect the background to brighten relative to the subject and compose accordingly.
MistakeAdding light when the problem is too much fill.
InsteadUse flags and negative fill to remove light.
MistakeLeaving stands and panels unweighted outdoors.
InsteadSandbag every stand and secure panels against wind.
Summary and key terms
- Reflectors add light by bouncing it; white, silver, gold and mixed surfaces differ in intensity, quality and color.
- Aim reflectors halfway between source and subject; fill increases and softens as the reflector moves closer.
- Common placements are opposite the key, below the face (clamshell), and in front of backlit subjects.
- Diffusers enlarge the source and reduce its intensity, brightening the background relatively.
- Flags block light; negative fill and subtractive lighting add shape to flat light.
- Stands, clamps and sandbags hold modifiers safely.
- On location, survey the light, intervene minimally and add one change at a time.
- Reflector
- A surface used to bounce light onto the subject.
- Five-in-one reflector
- A collapsible reflector with interchangeable surfaces.
- Clamshell lighting
- A key light above and a reflector or fill below the face.
- Diffuser (scrim)
- Translucent material that scatters light passing through it.
- Butterfly (overhead)
- A large frame holding diffusion, nets or solid fabric.
- Flag
- An opaque panel used to block light.
- Subtractive lighting
- Shaping light by removing it with flags.
- Net
- A mesh that reduces light without diffusing it.
- C-stand
- A versatile stand with an arm for holding flags and panels.
- V-flat
- Two hinged boards used as a large reflector or flag.
Practice problems
Work each problem on paper first, then reveal the answer to check.
Which reflector surface gives the softest, most natural fill?
Show answer
White.
How should a reflector be aimed?
Show answer
Facing halfway between the light source and the subject.
What happens to fill when a reflector moves from 2 m to 1 m?
Show answer
It increases roughly two to four times and becomes softer.
Describe clamshell lighting.
Show answer
Key light above and in front, reflector below the face angled up.
Why is silver often needed for backlit subjects?
Show answer
The reflector must supply most of the light on the face.
A one-stop diffuser is placed over a subject in sun. How does the background change relative to the subject?
Show answer
It becomes one stop brighter.
What is negative fill?
Show answer
A black surface that absorbs light to deepen shadows.
How does subtractive lighting improve overcast portraits?
Show answer
Blocking light on one side makes the light directional and adds modeling.
What is the difference between a net and a diffuser?
Show answer
A net reduces light without softening; a diffuser softens and reduces it.
Where should the sandbag go on a stand?
Show answer
On the leg pointing toward the load.
Lesson quiz · 5 questions
Score 60% or more to complete this lesson.
Create a free account to save your progress, take quizzes and earn a certificate.