
LVT-220 · Lesson 7 of 12 · 22 min
Installing and powering wireless access points
Fourteen wireless access points will cover the Brightwater floor. Each one is a small radio base station, a computer and a switch in a white plastic case, and each one depends on everything in the course so far: a certified cable, a switch port at the right speed, enough PoE power, the right VLANs and a working DHCP and DNS so it can find its controller. Choosing where they go, how many there are and which channels they use is wireless design, which LVT-320 covers. This lesson covers the installer's part: what an access point is, how the design reaches the ceiling, how to mount, connect and power access points, and how to confirm each one is working before the ladder moves on.
What an access point does
An access point connects wireless devices to the wired network. It has radios in two or three bands, at 2.4 GHz, 5 GHz and, on newer models, 6 GHz, and each radio talks to the phones, laptops and tablets near it on a chosen channel. On the wired side, it has one or two Ethernet ports. It takes the wireless users' traffic and sends it to the switch, usually tagged with the VLAN of the wireless network each user joined, so that a staff laptop lands on the staff wireless VLAN and a visitor's phone on the guest VLAN, all through the same cable.
Access points are managed centrally. A controller, either an appliance in the building, a function of the switches, or a cloud service, holds the configuration: network names, security settings, channels and power levels. When an access point boots, it finds its controller, downloads its configuration and starts serving users. An access point that cannot reach its controller sits with its radios off or in a default state and shows a status light pattern the manufacturer's guide explains. For the installer, the controller's dashboard is the proof: an access point that shows as online, with the right name and location, is connected correctly.
Wi-Fi generations, briefly
Wireless networking follows the IEEE 802.11 standards, and the Wi-Fi Alliance certifies products and gives the generations simple names. Wi-Fi 5 is 802.11ac, in the 5 GHz band. Wi-Fi 6 is 802.11ax, in 2.4 and 5 GHz, and Wi-Fi 6E is the same technology extended into the 6 GHz band. Wi-Fi 7 is 802.11be: the Wi-Fi Alliance began certifying Wi-Fi 7 products in January 2024, and the IEEE published the final standard in 2025. Its headline features are wider channels in the 6 GHz band, up to 320 MHz, and multi-link operation, which lets a device use more than one band at the same time.
Regulators opened the 6 GHz band for license-exempt Wi-Fi in both countries in recent years. In the United States, the FCC's 2020 rules allowed low-power indoor access points across the band without coordination, and standard-power operation, including outdoors, under an automated frequency coordination system that began operating in 2024. In Canada, ISED's 2021 decision opened the band for low-power indoor use, with standard power under automated coordination following under its later rules. For the installer, the practical point is that most 6 GHz access points installed today are low-power indoor devices: they are designed and certified for indoor mounting only, and must not be mounted outdoors or in a weatherproof enclosure on an outside wall unless the model is certified for that use.
| Name | Standard | Bands | Note for installers |
|---|---|---|---|
| Wi-Fi 5 | 802.11ac | 5 GHz | Usually 1 Gb/s port; Class 3 or 4 PoE |
| Wi-Fi 6 | 802.11ax | 2.4 and 5 GHz | Often 2.5 Gb/s port; Class 4 |
| Wi-Fi 6E | 802.11ax | 2.4, 5 and 6 GHz | Indoor-only models common; Class 4 to 6 |
| Wi-Fi 7 | 802.11be | 2.4, 5 and 6 GHz | 2.5, 5 or 10 Gb/s port; Class 5 or 6; second port on some models |
Speed and power on the wired side
A modern access point can carry more than a gigabit of traffic, which is why Wi-Fi 6 and 7 models have 2.5 Gb/s or faster Ethernet ports, as lesson 2 explained. Brightwater's access points have one 2.5 Gb/s port and one 1 Gb/s port; the design runs two cables to each so the second port can provide redundancy or a second uplink later. Their data sheet says they need Class 6 power for full operation and run with reduced features on Class 4: with less power, they turn off one radio or reduce the number of antenna chains. An access point on a port that supplies less than it asks for may work, but not at full capacity, and its status page or the controller will usually show a power warning in lower-case text that is easy to miss.
The uplink from the access switch to the core must carry the traffic of all the access points on the switch. Omar's design allows for the wireless traffic to be bursty: not every access point is busy at once. A simple estimate compares the total that the access points could send with the uplink capacity. The ratio between the two is called oversubscription, and lesson 8 uses it for cameras too.
# Access point uplink check: switch ports, power and uplink capacity
aps = 14
port_gbps = 2.5
busy_fraction = 0.35          # share of peak capacity in use at a busy hour
class_w, draw_w = 60.0, 24.0  # Class 6 requested; typical measured draw
uplink_gbps = 2 * 10           # two 10 Gb/s fiber uplinks per switch
peak = aps * port_gbps
busy = peak * busy_fraction
print(f"access points: {aps}, wired peak {peak:.1f} Gb/s, busy-hour estimate {busy:.1f} Gb/s")
print(f"oversubscription at peak: {peak / uplink_gbps:.2f} : 1")
print(f"power reserved by class: {aps * class_w:.0f} W, typical draw {aps * draw_w:.0f} W")access points: 14, wired peak 35.0 Gb/s, busy-hour estimate 12.2 Gb/s oversubscription at peak: 1.75 : 1 power reserved by class: 840 W, typical draw 336 W
From design to ceiling
The wireless design arrives as a floor plan with each access point marked and named, a mounting detail and a list of models. Sanjay placed the outlets for the Brightwater access points from an early version of that plan, so each access point location already has two certified links ending in a ceiling outlet or a surface-mount box above the ceiling. The installer's job is to mount each access point at its marked location, within the tolerance the design allows, usually 3 ft, and to report any location where an obstruction prevents it. A location moved further than that, or moved behind a metal duct, can leave a gap in coverage that only shows up when users complain.
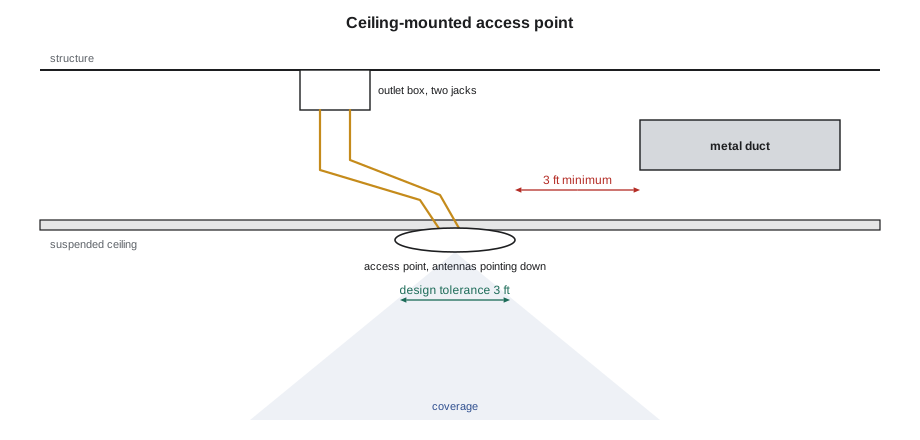
Obstructions matter because metal blocks and reflects radio waves. A large duct, a cable tray, a structural beam or a light fixture right beside an access point can shadow part of its coverage. Most indoor access points are designed to hang below the ceiling with their antennas pointing down and out; mounting one on a wall, upside down or above the ceiling tiles changes its pattern and weakens its signal. Where the design calls for an above-ceiling mount, as some hospitals require for infection control or appearance, the access point model and the design will account for it. Otherwise, the access point goes on the ceiling, in the open.
Maya's mounting checklist for each access point covers the bracket, the cords and the record. The bracket is fixed to the ceiling grid or a tile with the backing plate the manufacturer supplies, so the access point does not pull the tile down; a heavy access point on a lay-in tile needs a support wire to the structure, according to the ceiling's own rules. The patch cords from the outlet to the access point are the design's Category 6A cords, as short as practical, with a service loop, and they leave enough room for the access point to be removed without unplugging. The cord from the 2.5 Gb/s outlet goes to the access point's 2.5 Gb/s port, which is usually labeled on the case. A security cable or locking bracket is used where the design calls for one. Finally, she photographs the installed access point, the MAC label and the cords, and records the location, at least 3 ft from the nearest large metal object.
Powering up and checking
The order of checks on each access point follows the layers. At the switch, the PoE light should come on within a second or two, and the PoE page should show the expected class. The link light follows when the access point's Ethernet port starts, and its color or the port status should show 2.5 Gb/s. On the access point, the status light goes through a boot sequence, usually a minute or two, and settles into the pattern for connected to its controller. On the controller dashboard, the access point should appear as online, with its serial number and MAC address matching the label, and be given its name and location from the plan.
Where the controller is in the cloud, Omar pre-loads the serial numbers into the dashboard from the list Maya sends from the shop, with the planned name for each. Each access point then picks up its name and settings as soon as it connects. This only works if the serial numbers on the list match the access points actually mounted at each location, which is why the crew labels each access point with its planned name before it leaves the shop, and why Maya photographs the label at each location.
# Matching mounted access points to the plan and the controller
plan = {"AP-6-01": "Q2NL-7K3D-01", "AP-6-02": "Q2NL-7K3D-02", "AP-6-03": "Q2NL-7K3D-03", "AP-6-04": "Q2NL-7K3D-04"}
mounted = {"AP-6-01": "Q2NL-7K3D-01", "AP-6-02": "Q2NL-7K3D-03", "AP-6-03": "Q2NL-7K3D-02", "AP-6-04": "Q2NL-7K3D-04"}
online = {"Q2NL-7K3D-01": ("2.5G", 60), "Q2NL-7K3D-02": ("2.5G", 60), "Q2NL-7K3D-03": ("1G", 60), "Q2NL-7K3D-04": ("2.5G", 30)}
for name, serial in mounted.items():
    notes = []
    if plan[name] != serial:
        notes.append(f"serial {serial} belongs at {[k for k, v in plan.items() if v == serial][0]}")
    speed, watts = online.get(serial, ("down", 0))
    if speed != "2.5G":
        notes.append(f"link at {speed}")
    if watts < 60:
        notes.append(f"port gives {watts} W, needs 60 W")
print(f"{name}: " + ("ok" if not notes else "; ".join(notes)))AP-6-01: ok AP-6-02: serial Q2NL-7K3D-03 belongs at AP-6-03; link at 1G AP-6-03: serial Q2NL-7K3D-02 belongs at AP-6-02 AP-6-04: port gives 30 W, needs 60 W
The check shows the kinds of mistakes that happen on a floor of identical white boxes: two access points swapped between locations, one linked at 1 Gb/s because its cord went into the second port, and one on a port limited to Class 4. Each is easy to fix while the ladder is still there and hard to find from the dashboard a week later.
Access points in other settings
The Hartwell warehouse is a different problem. The access points hang from the roof structure, 40 ft above the floor, over racks of metal shelving that block and reflect the signal, and the design uses directional antennas aimed down the aisles. Each access point is installed from a lift, under the warehouse's lift permit for that zone, and the antennas must be aimed as the design shows, with the angle checked on a level. Re-aiming an antenna later means another lift permit and a closed aisle, so the crew checks the aim before the lift comes down.
At St. Brendan's, the access points serve clinical devices: wireless phones, infusion pumps and patient monitors that must never lose their connection. The hospital's design uses more access points, closer together, with careful attention to roaming between them, and some patient rooms have access points mounted in the room for coverage through heavy walls. Infection control rules decide how the ceiling is opened, as LVT-110 described, and every access point is cleaned with the hospital's approved wipes before it is mounted in a clinical area.
At Riverside, each classroom has an access point, 120 in all, on the school board's standard bracket, with two cables. The school board's network team installs nothing on site; it ships access points pre-configured in labeled boxes, and the crew's job is to mount the right box in the right room and check that each one comes online. With 120 identical devices, the labeled box and the photograph at each room are what keep the record straight.
Outdoor and special locations
An access point outside, on a parking lot pole or the side of a building, must be a model rated for outdoor use, with a suitable enclosure rating and temperature range, and in the 6 GHz band it must also be permitted for outdoor operation, which most low-power indoor models are not. Its cable needs surge protection where it enters the building, and the code course covers the bonding rules. Outdoor installations also face wind, sun and ice, and a mounting that is fine indoors may not hold. The crew follows the manufacturer's outdoor mounting instructions exactly and uses the design's specified bracket and sealing.
Worked problem
An access point with a power warning
AP-6-10 in the large boardroom shows as online in the controller, but with a note that it is running in a reduced power mode with one radio disabled. Its switch port shows Class 6 detected and 30 W allocated. The other access points on the same switch show 60 W allocated. What should Maya report?
Show solution
- The access point asked for Class 6 and was given 30 W, so the port is limited to Class 4.
- The other ports give 60 W, so the switch can supply it; the limit is a setting on this port, or the switch was short of budget when this port came up.
- She checks the switch's PoE budget page: plenty of power remains, so the budget is not the cause.
- She reports port, class detected, power allocated and the access point's warning to Omar.
Answer: Omar finds the port in a template meant for phones, with a 30 W limit. He moves it to the access point template, and AP-6-10 restarts with all radios on.
Common mistakes
MistakeMounting an access point above the ceiling or on a wall when the design shows a ceiling mount.
InsteadMount it as the design shows, in the open, antennas pointing down.
MistakeMoving an access point well away from its marked location to avoid an obstruction without telling anyone.
InsteadReport locations that cannot be met so the designer can decide.
MistakePlugging the faster outlet into the access point's slower port.
InsteadCheck the port labels and confirm the link speed at the switch.
MistakeMounting a low-power indoor 6 GHz access point outdoors.
InsteadUse only models certified for the location and band.
MistakeLeaving the access point's serial number unrecorded at each location.
InsteadPhotograph the label and match it to the plan before moving on.
Summary and key terms
- An access point bridges wireless users to the wired network and usually carries several VLANs on its port.
- Access points get their configuration from a controller, on site or in the cloud; online in the dashboard is the proof of a good install.
- Wi-Fi 6, 6E and 7 access points often need 2.5 Gb/s ports and Class 5 or 6 PoE; less power can disable radios.
- Most 6 GHz access points today are low-power indoor devices and must not be used outdoors.
- Mount at the marked location, clear of metal, with short Category 6A cords and the right port.
- Check PoE, link speed, boot status and the controller for every access point, and match serial numbers to the plan.
- Access point
- A device that connects wireless clients to the wired network.
- Controller
- The system that holds and pushes access point configuration.
- Wi-Fi 7
- The Wi-Fi generation based on IEEE 802.11be.
- Low-power indoor
- A 6 GHz device class permitted indoors without frequency coordination.
- Automated frequency coordination
- A system that tells standard-power 6 GHz devices which channels and power they may use.
- Oversubscription
- The ratio of the traffic that could be offered to the capacity of the link that carries it.
Practice problems
Work each problem on paper first, then reveal the answer to check.
An access point asks for Class 6 but the port supplies Class 4. What might happen?
Show answer
It may run with reduced features, such as a radio turned off.
Why are access points usually mounted below the ceiling?
Show answer
Their antennas are designed to point down and out; above-ceiling or wall mounts change the pattern.
How does the crew prove an access point is connected correctly?
Show answer
It shows online on the controller with the right name, serial number, link speed and power.
Can a low-power indoor 6 GHz access point be mounted on an outside wall?
Show answer
No, unless the model is certified for that use.
Lesson quiz · 5 questions
Score 60% or more to complete this lesson.
Create a free account to save your progress, take quizzes and earn a certificate.