
ELEC-230 · Lesson 4 of 12 · 26 min
Offsets, kicks and saddles
Buildings are full of obstacles: beams, pipes, ducts, ledges, and boxes set slightly out from the wall. A conduit run that follows the building lines must step around them without changing its overall direction. The bends that do this, offsets, kicks and saddles, make up most of the bending an electrician does after the basic 90°. Each is built from two or more smaller bends, and each can be calculated with a little trigonometry that is condensed into easy multipliers. This lesson explains the geometry, the standard multiplier and shrink tables, and the step-by-step methods for offsets, rolling offsets, kicks and three- and four-point saddles.
The offset
An offset is two equal bends in opposite directions that move the conduit sideways by a set distance (the offset depth) while keeping it parallel to its original line. It is used where a conduit leaves a box set out from the wall, steps over a ledge, or moves into a different plane to clear an obstruction. The two bends are made at the same angle, commonly 10°, 22½°, 30°, 45° or 60°, and the distance between them determines the depth.
The geometry is a right triangle. The depth is the side opposite the bend angle θ, and the slanted section of conduit between the bends is the hypotenuse. The distance between the bend marks is therefore:
The factor 1/sin θ (the cosecant) is the offset multiplier, printed on most benders and memorized by most electricians:
| Angle | Multiplier | Shrink per inch of depth |
|---|---|---|
| 10° | 5.76 | 1/16 in |
| 22½° | 2.61 | 3/16 in |
| 30° | 2.00 | 1/4 in |
| 45° | 1.41 | 3/8 in |
| 60° | 1.15 | 1/2 in |
Shallow angles give long, gentle offsets that are easy to pull through; steep angles give short offsets that fit tight spaces but add more resistance. The 30° offset is popular because its multiplier is exactly 2 and its shrink is a simple ¼ inch per inch of depth.
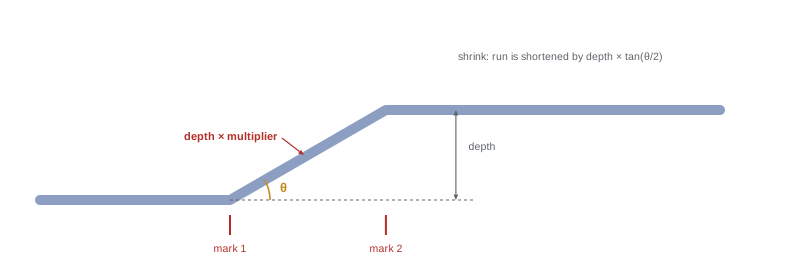
Shrink
Because the slanted section is longer than its horizontal projection, an offset shortens the overall length of the run. This shortening is called shrink. It does not matter when the offset is made near a free end, but it matters when the offset must land at a precise point, such as stepping over an obstruction at a known distance. Shrink per inch of depth equals tan(θ/2), which gives the values in the table. For a 30° offset 4 inches deep, the shrink is 4 × ¼ = 1 inch.
When you bend an offset toward an obstruction (measuring from the end of the conduit you are working at), add the shrink to the measurement to the obstruction to find the first mark, so that after bending the offset lands where it should. When the offset is bent away from the obstruction, from the far end of the run, shrink can usually be ignored.
Worked problem
An offset over a ledge
A ½-inch EMT conduit running along a wall must rise 3 inches over a concrete ledge whose near face is 40 inches from the end of the conduit. Use 30° bends. Where are the marks?
Show solution
- Distance between marks: 3 × 2 = 6 inches.
- Shrink: 3 × ¼ = ¾ inch.
- The offset must be complete before the ledge: place the second (farther) mark at 40 + ¾ = 40¾ inches, and the first mark 6 inches back at 34¾ inches.
- Bend 30° at the first mark (using the arrow), rotate the conduit 180° about its axis, and bend 30° at the second mark in the opposite direction.
Answer: Marks at 34¾ and 40¾ inches. After bending, the conduit should rise 3 inches with the offset finished just at the face of the ledge. Rotating exactly 180° between the bends keeps the offset in one plane; a sighting line along the conduit helps.
Rolling offsets
Sometimes the conduit must move both sideways and up (or down) at once, for example to step diagonally around a corner of a beam. Rather than making two separate offsets, a single rolling offset moves it in both directions. The true offset depth is the diagonal of the rise and the spread:
The offset is then calculated and bent with the true depth, and the conduit is rolled so that the offset points along the diagonal. For a rise of 6 inches and a spread of 8 inches, the true offset is √(36 + 64) = 10 inches; with 30° bends the marks are 20 inches apart. A simple field method is to measure the diagonal directly with a tape between the two lines the conduit must follow.
Kicks
A kick is a single bend of less than 90° that moves a conduit away from a surface or changes its direction slightly, for example to bring a conduit running along a wall out to a box mounted in front of the wall, or to turn a conduit a few degrees to follow a non-square wall. A kick and a 90° are often combined: a conduit coming up from a floor box with a 90° stub may need a small kick so the stub runs tight to a wall. Kicks count toward the 360° limit between pull points, and like offsets they are bent with the angle read from the degree marks on the bender or checked with an angle finder.
The three-point saddle
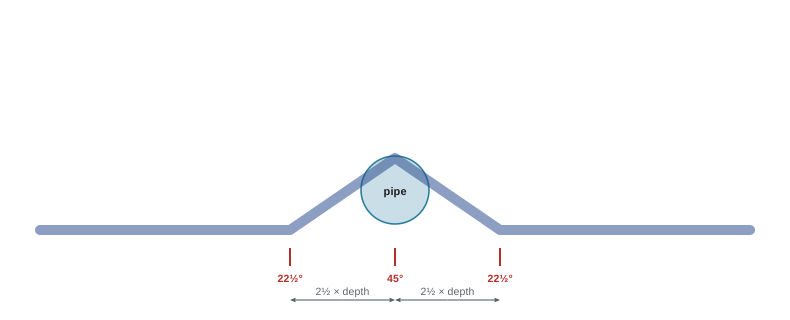
A three-point saddle carries a conduit over a round obstruction, such as a pipe crossing its path, and returns it to the original line. It has a center bend (usually 45°) and two outer bends (usually 22½° each) in the opposite direction, so the total of the outer bends equals the center bend and the conduit ends parallel to where it started.
The standard method for a 45° center and 22½° outer bends:
- Measure the height of the obstruction (the saddle depth).
- Mark the center: the distance to the center of the obstruction, plus the shrink of 3/16 inch per inch of depth, so the saddle lands centered over the obstruction.
- Mark the two outer bends at 2½ inches per inch of depth on each side of the center mark.
- Bend the center mark to 45° using the rim notch or center mark of the bender, then bend each outer mark to 22½° in the opposite direction, rotating the conduit 180° between the center and outer bends.
Worked problem
Saddling over a pipe
A ¾-inch EMT run must cross a 2-inch-high water pipe whose center is 30 inches from the end of the conduit. Lay out a three-point saddle.
Show solution
- Depth: 2 inches. Shrink: 2 × 3/16 = ⅜ inch.
- Center mark: 30 + ⅜ = 30⅜ inches from the end.
- Outer marks: 2 × 2½ = 5 inches each side, at 25⅜ and 35⅜ inches.
- Bend 45° at the center mark and 22½° at each outer mark in the opposite direction.
Answer: Marks at 25⅜, 30⅜ and 35⅜ inches. The saddle rises 2 inches centered on the pipe and the conduit returns to its original line. If clearance over the pipe is needed, add it to the depth.
The four-point saddle
A wide obstruction, such as a rectangular duct or a beam, needs a four-point saddle: two offsets back to back, one rising over the near edge and one returning down after the far edge. Each offset is calculated as above. The key measurements are the depth of the obstruction, its width, and where it starts. A common layout is:
- First offset: second mark (the end of the rise) at the near edge of the obstruction plus the shrink; first mark one multiplier distance before it.
- Second offset: first mark (the start of the descent) at the far edge of the obstruction, that is, the second mark of the first offset plus the obstruction width; second mark one multiplier distance after it.
Because the bends alternate direction, the conduit must be rotated 180° between the second and third bends. Four-point saddles add more degrees of bend than three-point saddles (with 30° bends, four bends total 120°), so they consume more of the 360° allowance.
Working accurately
Offsets and saddles demand precision in three things: the marks, the angles and the plane. Mark all bends before starting and label them, use a consistent bender mark (normally the arrow, measuring each bend from the same direction), read angles carefully from the bender's degree marks or an angle finder, and keep every bend in the same plane by sighting along the conduit or using a level on a reference line drawn along its length. When many conduits run in parallel, offsets must also be adjusted so they stay evenly spaced through the bends; that technique, concentric and parallel bending, is covered in Lesson 5.
Box offsets
One of the most frequent offsets is the box offset: a small offset, about the depth of a box's raised knockout or the thickness of a strap, that lets a conduit running tight to a wall enter a surface-mounted box or fitting squarely. Many electricians make it quickly by eye with a few short bends near the end of the conduit, while some benders have a dedicated box offset mark. Because the depth is small, the bends are made at shallow angles (often around 10°), and the result should let the conduit lie flat against the wall right up to the box connector. A poorly made box offset forces the connector at an angle, strains the fitting and looks unprofessional.
Planning bends in sequence
Real runs combine many bends: a stub-up from a floor box, an offset over a ledge, a kick to follow a wall, a saddle over a pipe and a 90° into a panel. Plan the order so that each bend is made from a known reference, usually working from one end, and so that already-bent sections do not prevent the conduit from sitting in the bender for later bends. Some combinations are easier with the conduit turned end for end. Record the plan on a sketch with each mark and angle, mark all bends before starting, and check each bend against the sketch as you go. When a run is too complex for one length, split it at a coupling or a conduit body, which also provides a pull point.
Experienced electricians also learn to estimate offsets by eye for small adjustments, but for anything that must land precisely, measuring and calculating is faster than trial and error, because every failed attempt costs a length of conduit and the time to bend it again.
Common mistakes
MistakeIgnoring shrink when bending toward an obstruction.
InsteadAdd shrink to the measurement so the offset lands at the right point.
MistakeNot rotating exactly 180° between offset bends.
InsteadRotate precisely and sight along the conduit to stay in one plane.
MistakeUsing unequal angles in an offset.
InsteadBend both to the same angle so the conduit ends parallel.
MistakeMaking two separate offsets for a diagonal move.
InsteadUse a rolling offset with the true depth.
MistakeForgetting that saddles use up the bend allowance.
InsteadCount every bend toward 360° between pull points.
Summary and key terms
- An offset is two equal opposite bends; distance between marks = depth × multiplier (1/sin θ).
- Multipliers: 10° 5.76, 22½° 2.61, 30° 2, 45° 1.41, 60° 1.15.
- Shrink per inch of depth = tan(θ/2): 1/16, 3/16, 1/4, 3/8 and 1/2 inch.
- Rolling offsets use the true depth √(rise² + spread²).
- A kick is a single bend under 90°.
- Three-point saddles: 45° center, 22½° outer bends at 2½ × depth, shrink 3/16 per inch.
- Four-point saddles are two offsets around a wide obstruction.
- Offset
- Two equal opposite bends that move conduit sideways while keeping it parallel.
- Offset depth
- The sideways distance an offset moves the conduit.
- Multiplier
- The factor that converts depth to distance between offset marks.
- Shrink
- The shortening of a run caused by an offset or saddle.
- Rolling offset
- An offset in two directions at once.
- True offset
- The diagonal depth of a rolling offset.
- Kick
- A single bend of less than 90°.
- Three-point saddle
- A center bend and two outer bends crossing a round obstruction.
- Four-point saddle
- Two offsets crossing a wide obstruction.
- Angle finder
- A tool for measuring bend angles.
Practice problems
Work each problem on paper first, then reveal the answer to check.
What is the distance between marks for a 5-inch offset with 30° bends?
Show answer
10 inches.
What is the distance between marks for a 4-inch offset with 45° bends?
Show answer
4 × 1.41 ≈ 5.66 inches (about 5⅝).
What is the shrink of a 6-inch, 30° offset?
Show answer
1½ inches.
Why do shallow offset angles help pulling?
Show answer
They add less resistance than sharp bends.
What is the true offset for a rise of 9 inches and a spread of 12 inches?
Show answer
15 inches.
With 22½° bends, how far apart are the marks for that 15-inch rolling offset?
Show answer
15 × 2.61 ≈ 39 inches.
For a 3-inch three-point saddle, how far are the outer marks from the center?
Show answer
7½ inches each side.
What is the shrink of a 3-inch three-point saddle?
Show answer
3 × 3/16 = 9/16 inch.
How many degrees of bend does a four-point saddle with 30° bends add?
Show answer
120°.
Why must the conduit be rotated 180° between offset bends?
Show answer
So the second bend is opposite the first and the conduit ends parallel in the same plane.
Lesson quiz · 5 questions
Score 60% or more to complete this lesson.
Create a free account to save your progress, take quizzes and earn a certificate.