
CINE-320 · Lesson 8 of 12 · 24 min
Sound for documentary
Audiences forgive imperfect images in documentary far more readily than imperfect sound. A shaky shot of a crucial moment is acceptable; a crucial line of dialogue that cannot be understood is lost, and with it the meaning of the scene. Sound in documentary is also uniquely difficult: subjects move unpredictably, locations are noisy, and there is rarely a second take. Many documentary camera operators also record sound, either as self-shooters or as the backup to a sound recordist. This lesson covers microphone types and placement, the physics of distance and level, gain staging and levels, wireless systems, timecode and synchronization, room tone and ambience, and delivery loudness. It aims to give cinematographers enough knowledge to record clean dialogue and work well with sound professionals.
Why documentary sound is hard
Drama sound recordists can rehearse, ask for quiet on set, place microphones precisely and request another take. Documentary recordists face traffic, crowds, machinery, wind, air conditioning and echoing rooms, and subjects who move between rooms, turn away and talk over each other. The goal is intelligible dialogue with a consistent sound quality, plus enough ambience and effects to build a soundtrack in post-production. Achieving it requires the right microphones, careful placement and constant monitoring through good headphones.
Microphone types
- Shotgun microphones: highly directional microphones mounted on a boom pole or on the camera, rejecting sound from the sides and rear. On a boom held just out of frame, a shotgun captures natural, full dialogue; mounted on the camera, it is often too far from the subject and best used for ambience and backup.
- Hypercardioid and cardioid microphones: less directional than shotguns, they sound more natural indoors, where reflections from walls confuse long shotguns.
- Lavalier microphones: tiny microphones clipped to or hidden in clothing, usually connected to wireless transmitters. They stay a constant distance from the speaker's mouth and are the most reliable way to capture dialogue from moving subjects.
- Stereo and ambisonic microphones: used to record ambience and atmospheres that give a soundtrack a sense of space.
- Recorders: dedicated multitrack field recorders with high-quality preamplifiers, timecode and safety tracks, or the camera's own audio inputs for simpler setups.
Distance and the inverse-square law
The level of direct sound from a source falls with distance. Under free-field conditions, sound intensity follows the inverse-square law, so the sound pressure level changes by:
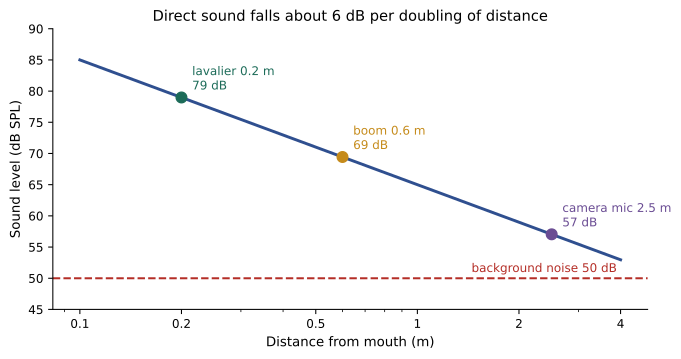
Halving the distance raises the direct sound by about 6 dB; doubling it lowers the direct sound by about 6 dB. Background noise and room reflections do not change much as the microphone moves, so moving closer to the speaker improves the ratio of voice to noise. This is the single most important principle in documentary sound: get the microphone close.
Worked problem
Comparing microphone positions
A subject speaks at a level that gives 65 dB SPL at 1 m in a room with 50 dB SPL of background noise. Compare the voice-to-noise ratio for a camera-mounted shotgun at 2.5 m, a boom at 0.6 m and a lavalier at about 0.2 m from the mouth, ignoring microphone directivity.
Show solution
- At 2.5 m: \( 65 + 20 \log_{10}(1 \div 2.5) = 65 - 8.0 = 57 \) dB, so voice exceeds noise by about 7 dB.
- At 0.6 m: \( 65 + 20 \log_{10}(1 \div 0.6) = 65 + 4.4 \approx 69 \) dB, about 19 dB above the noise.
- At 0.2 m: \( 65 + 20 \log_{10}(1 \div 0.2) = 65 + 14 = 79 \) dB, about 29 dB above the noise.
- Directional microphones add some extra rejection of off-axis noise, but distance dominates.
Answer: About 7 dB, 19 dB and 29 dB respectively; the closer microphones are far cleaner.
Placing lavaliers and booms
Lavalier placement is a craft. The classic position is on the sternum, about 15 to 20 cm below the chin, centered so that turning the head does not change level dramatically. Hidden lavaliers are placed under clothing with tape and mounts that prevent rustling, which is the most common problem; natural fabrics such as cotton are quieter than synthetics. Avoid placing lavaliers where jewelry, scarves or seatbelts rub. Ask permission before placing a microphone on someone's body, explain what you are doing, and let the subject place it themselves if they prefer, with guidance. Always offer this choice, and take particular care with children and in culturally sensitive settings.
Booms provide the most natural sound, capturing the voice with some of the room's acoustic character. The microphone is aimed at the speaker's mouth from above or below, as close as the frame allows. Booming from above suits most situations; from below may be necessary in low ceilings but picks up more chest resonance and is more likely to enter wide shots. The boom operator follows the conversation, swinging between speakers, and must coordinate with the camera operator on framing.
Recording both a lavalier and a boom on separate tracks gives the editor a choice and protects against rustle, wind or interference on one of them. Many documentary productions routinely record every subject on a lavalier and boom simultaneously.
Gain staging and levels
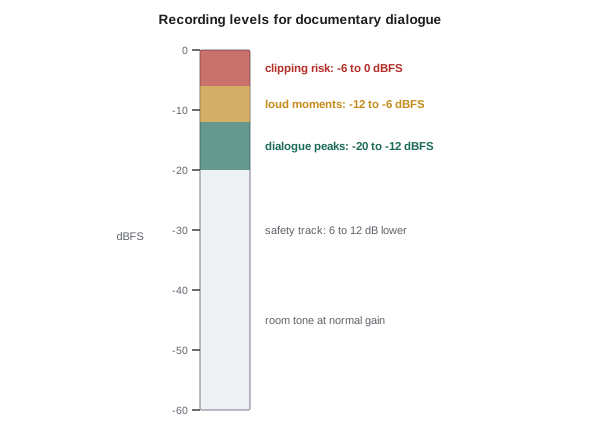
Digital recordings clip harshly when the signal exceeds 0 dBFS (decibels relative to full scale), and the clipped audio cannot be repaired. Good practice is to set the preamplifier gain so that normal dialogue peaks around -20 to -12 dBFS, leaving headroom for shouts and laughter, while keeping the noise floor low. Many field recorders offer 32-bit float recording, which captures an enormous dynamic range and makes clipping in the recorder almost impossible, although microphones and preamplifiers can still overload. Safety tracks recorded 6 to 12 dB lower than the main track, and limiters set to catch only peaks, provide extra protection when 32-bit float is not available.
| Signal | Target level | Notes |
|---|---|---|
| Normal dialogue | Peaks about -20 to -12 dBFS | Leave room for loud moments |
| Loud speech, laughter | Below -6 dBFS | Use a limiter or safety track |
| Clipping point | 0 dBFS | Unrecoverable in fixed-point formats |
| Safety track | 6 to 12 dB below main | Backup for unexpected peaks |
| Room tone | Recorded at normal gain | 30 to 60 seconds |
| Delivery loudness | About -24 LKFS integrated for broadcast | Platform specifications vary |
Wind, handling noise and locations
Wind is the enemy of outdoor recording. Foam windscreens are adequate indoors only; outdoors, use basket-style windshields with furry covers, and fur covers for lavaliers. Handling noise from boom poles and camera-mounted microphones is reduced with shock mounts and careful technique. In locations, identify noise sources early: ask permission to turn off refrigerators, air conditioning, fans and music during interviews, and always switch them back on, perhaps leaving your car keys in the refrigerator as a reminder, as many recordists do. Choose interview rooms with soft furnishings, which reduce echo; hang blankets if necessary.
Wireless, timecode and synchronization
Wireless systems transmit lavalier and boom signals to the recorder or camera. Digital wireless systems are common, but radio frequencies are regulated and congested: use systems approved for your country, scan for clear frequencies and carry spare batteries. Regulators in both Canada and the United States have reassigned parts of the UHF spectrum formerly used by wireless microphones, so older systems may now operate in prohibited bands; check current rules from Innovation, Science and Economic Development Canada or the Federal Communications Commission before using older gear.
When sound is recorded separately from the camera, synchronization is essential. Timecode generators jammed to the same time on cameras and recorders allow automatic alignment in editing. Without timecode, editors synchronize using the camera's guide track and waveform matching, or a clap or slate at the start of each take. Always send a feed from the recorder to the camera when possible, so the camera files contain usable audio even if separate files are lost.
Ambience, room tone and wild sound
A documentary soundtrack needs more than dialogue. Record room tone, 30 to 60 seconds of a location's ambient sound with everyone silent, at the end of each scene or interview, so editors can fill gaps and smooth edits. Record ambiences, such as traffic, birdsong, a busy market or machinery, and wild sound effects, such as doors, footsteps and specific actions, to build the soundtrack and cover silent footage such as slow motion.
Delivery loudness and accessibility
Broadcasters and streamers specify loudness for final mixes. In Canada and the United States, broadcast television targets an integrated loudness of about -24 LKFS following the ATSC A/85 recommended practice, which the CRTC requires Canadian broadcasters to follow and which underpins the US CALM Act. Streaming services set their own targets, commonly around -24 to -27 LKFS measured on dialogue or the full mix; always check the current delivery specification. Clean, intelligible dialogue also helps closed captioning and accessibility, which are discussed with delivery in Lesson 12.
Monitoring and headphones
Good headphones are the documentary sound recordist's most important tool, and every camera operator who records sound should wear them too. Closed-back headphones that isolate outside noise let you hear what the microphone hears, including rustle, wind, hum, distortion and distant traffic that the ear would otherwise filter out. Listen continuously, not only at the start of a scene: a lavalier can slip under a collar, a wireless signal can drop out or a refrigerator can switch on halfway through an interview. When monitoring through the camera, check that the headphone output reflects the recorded signal rather than a pre-amplified feed. If you cannot monitor constantly as a self-shooter, check the audio meters frequently and listen back to short sections during breaks.
Multiple speakers
Scenes with several people talking, such as family dinners, meetings or group activities, are among the hardest to record. Put lavaliers on the main participants and record each on a separate track, use a boom to capture the overall conversation and anyone without a lavalier, and record a wide stereo ambience for the room. Multitrack recorders with automatic mixing help manage levels, but keep isolated tracks so the mixer can rebalance them in post-production. Note who is wearing which microphone, because the editor will need to know.
Sound and the camera operator
Even when a professional sound recordist is present, the camera operator influences sound quality. Choosing positions that allow the boom to get close, avoiding wide shots during key dialogue when the boom would have to retreat, and warning the recordist about framing changes all help. Camera noise matters too: fans, lens motors and clicking buttons can be heard on a quiet set, so operators learn which settings and accessories are silent. When the recordist asks for a moment to fix a microphone or wait for a plane to pass, the operator should support the request whenever the action allows, because the edit cannot replace a ruined line of dialogue.
Recording a few seconds of each microphone with the subject saying their name and spelling it, at the start of an interview, also gives editors and caption writers a useful reference.
Common mistakes
MistakeRelying on the camera-mounted microphone for dialogue.
InsteadUse lavaliers and booms close to the speaker.
MistakeRecording dialogue peaks near 0 dBFS.
InsteadAim for peaks around -20 to -12 dBFS with safety tracks or 32-bit float.
MistakeRecording outdoors with foam windscreens.
InsteadUse furry windshields and lavalier covers.
MistakePlacing lavaliers without permission or explanation.
InsteadAsk, explain and offer subjects the choice to place it themselves.
MistakeForgetting room tone.
InsteadRecord 30 to 60 seconds at each location.
Summary and key terms
- Intelligible dialogue is the priority in documentary sound.
- Lavaliers stay close to moving speakers; booms give natural sound; recording both adds safety.
- Direct sound changes by 20 log of the distance ratio, about 6 dB per halving or doubling.
- Dialogue peaks around -20 to -12 dBFS leave headroom; 32-bit float and safety tracks prevent clipping.
- Wind protection, quiet rooms and managing noise sources are essential.
- Timecode and guide tracks keep separate recordings in sync.
- Room tone, ambience and wild sound complete the soundtrack; broadcast targets about -24 LKFS.
- Shotgun microphone
- A highly directional microphone used on booms or cameras.
- Lavalier
- A small clip-on microphone, usually wireless.
- Boom
- A pole that holds a microphone close to the speaker out of frame.
- dBFS
- Decibels relative to digital full scale, where 0 is clipping.
- 32-bit float
- A recording format with very large dynamic range.
- Safety track
- A duplicate track recorded at lower gain.
- Room tone
- The ambient sound of a location without speech.
- Wild sound
- Sound effects recorded separately from picture.
- Timecode
- A time reference used to synchronize recordings.
- LKFS
- Loudness units relative to full scale, used for delivery loudness.
Practice problems
Work each problem on paper first, then reveal the answer to check.
Level change moving a mic from 2 m to 0.5 m?
Show answer
About +12 dB.
Level change moving from 0.3 m to 1.2 m?
Show answer
About -12 dB.
Typical lavalier position?
Show answer
On the sternum about 15 to 20 cm below the chin.
Target peaks for dialogue?
Show answer
About -20 to -12 dBFS.
Why record lav and boom on separate tracks?
Show answer
For choice and protection against problems on one track.
How long should room tone be?
Show answer
About 30 to 60 seconds.
Why use furry windshields?
Show answer
Foam is inadequate outdoors in wind.
What is a safety track?
Show answer
A duplicate recorded 6 to 12 dB lower.
What should you check before using old wireless gear?
Show answer
Whether its frequencies are still permitted.
Typical broadcast loudness target?
Show answer
About -24 LKFS integrated.
Lesson quiz · 5 questions
Score 60% or more to complete this lesson.
Create a free account to save your progress, take quizzes and earn a certificate.